Samsung SF-565PR Win 2000/xp/2003/vista/2008/win 7(32,64bit) ( 20.6 - Page 21
Features of the Scan Manager Window, If you define, the scan size too, small, multi- - manual
 |
UPC - 635753610277
View all Samsung SF-565PR manuals
Add to My Manuals
Save this manual to your list of manuals |
Page 21 highlights
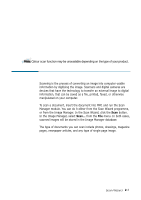
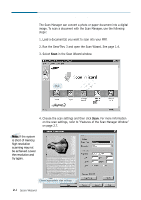
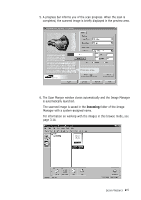
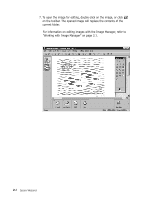
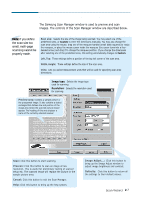
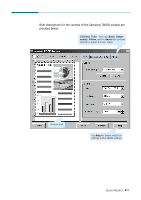
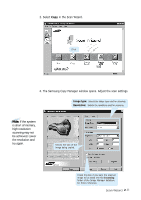
Features of the Scan Manager Window The Samsung Scan Manager window is used to preview and scan images. The controls of the Scan Manager window are described below. Note: If you define the scan size too small, multi-page scanning cannot be properly made. Scan size: Selects the size of the image being scanned. You may select one of the predefined sizes, or Custom to enter the dimensions manually. You may also change the scan area using the mouse: drag one of the marquee handles (small black squares) to resize the marquee, or place the mouse cursor inside the marquee (the cursor turns into a fourheaded arrow) and drag it to change the marquee position. If you change the dimensions after selecting one of the predefined sizes, this setting automatically changes to Custom. Left, Top: These settings define a position of the top left corner of the scan area. Width, Height: These settings define the size of the scan area. Units: Lets you select measurement units that will be used for specifying scan area dimensions. Image type: Selects the image type used for scanning. Resolution: Selects the resolution used for scanning. Preview area: Contains a sample picture or the prescanned image. It also contains a dotted rectangle that defines size and position of the image area where the scanned picture should appear. The heading of this area displays a name of the currently selected scanner. Scan: Click this button to start scanning. Prescan: Click this button to scan an image at low resolution. This is useful for preliminary testing of scanner setup etc. The scanned image will replace the picture in the sample picture area. Cancel: Click this button to exit the Scan Manager. Help: Click this button to bring up the help system. Image Adjust...: Click this button to bring up the Image Adjust window to adjust image brightness and contrast. Defaults: Click this button to return all the settings to their default values. Scan Wizard 2.7
-
 1
1 -
2
-
3
-
4
-
5
-
6
-
7
-
8
-
9
-
10
-
11
-
12
-
13
-
14
-
15
-
 16
16 -
 17
17 -
 18
18 -
 19
19 -
 20
20 -
 21
21 -
 22
22 -
 23
23 -
 24
24 -
 25
25 -
 26
26 -
27
-
28
-
29
-
30
-
31
-
32
-
33
-
34
-
35
-
36
-
37
-
38
-
39
-
40
-
41
-
42
-
43
-
44
-
45
-
46
-
47
-
48
-
49
-
50
-
51
-
52
-
53
-
54
-
55
-
56
-
57
-
58
-
59
-
60
-
61
-
62
-
63
-
64
-
65
-
66
-
67
-
68
-
69
-
70
-
71
-
72
-
73
-
74
-
75
-
76
-
77
-
78
-
79
-
80
-
81
-
82
-
83
-
84
-
85
-
86
-
87
-
88
-
89
-
90
-
91
-
92
-
93
-
94
-
95
-
96
-
97
-
98
-
99
-
100
-
101
-
102
-
103
-
104
-
105
-
106
-
107
-
108
-
109
-
110
-
111
-
112
-
113
-
114
-
115
-
116
-
117
-
118
-
119
-
120
-
121
-
122
-
123
-
124
-
125
-
126
-
127
-
128
-
129
-
130
-
131
-
132
-
133
-
134
-
135
-
136
-
137
-
138
-
139
-
140
-
141
-
142
-
143
-
144
-
145
-
146
-
147
-
148
-
149
-
150
-
151
-
152
-
153
-
154
-
155
-
156
-
157
-
158
-
159
-
160
-
161
-
162
-
163
-
164
-
165
 |
 |
