Yamaha DM2000 Owner's Manual - Page 126
Insert On/off, Comp On/off
 |
View all Yamaha DM2000 manuals
Add to My Manuals
Save this manual to your list of manuals |
Page 126 highlights
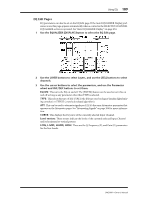
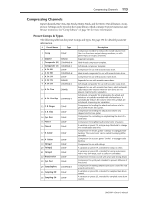
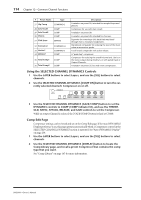
112 Chapter 12-Common Channel Functions 2 Use the LAYER buttons to select Layers, and use the [SEL] buttons to select channels. 3 Use the cursor buttons to select the parameters, and use the Parameter wheel, INC/DEC buttons, and [ENTER] button to set them. INSERT ON/OFF: This turns the currently selected channel's Insert on and off. It works in unison with the SELECTED CHANNEL PHASE/INSERT [INSERT ON] button. INSERT POSITION: This determines the position of the Insert within the channel, and can be set to pre-EQ, pre-fader, or post-fader. INSERT OUT: This selects the destination for the Insert Out, which can be a Slot Output, Omni Out, 2TR Digital Output, or the input to an internal effects processor. See page 242 and page 247 for Input and Output patch parameter lists. The Port ID of the currently selected destination is displayed below the currently selected channel's Long name in the upper-right corner of the page. The destination port can also be selected by using the Patch Select window (see page 67), which is accessed by pressing [ENTER] while this parameter is selected. Insert Outs can also be patched on the Output Patch pages. See "Output Patching" on page 63 for more information. INSERT IN: This selects the source for the Insert In, which can be an AD Input, Slot Input, 2TR Digital or Analog Input, or the output of an internal effects processor. See page 242 for a list of Input Channel Insert In sources; page 247 for a list of Output Channel Insert In sources. The Port ID of the currently selected source is displayed below the currently selected channel's Long name in the upper-right corner of the page. The source port can also be selected by using the Patch Select window (see page 67), which is accessed by pressing [ENTER] while this parameter is selected. Insert Ins can also be patched on the Input Channel Insert In Patch pages. See "Patching Input Channel Insert Ins" on page 62 for more information. COMP ON/OFF: This turns the currently selected channel's Compressor on and off. It works in unison with the SELECTED CHANNEL DYNAMICS [COMP ON] button, and the ON/OFF button on the Comp Edit page. See "Compressing Channels" on page 113 for more information. COMP POSITION: This determines the position of the Compressor within the channel, and can be set to pre-EQ, pre-fader, or post-fader. It works in unison with the POSITION parameter on the Comp Edit page. See "Compressing Channels" on page 113 for more information. COMP ORDER: If the Insert and Compressor are set to the same position in the channel (i.e., INSERT POSITION and COMP POSITION are the same), you can use this parameter to set the order of the Insert and Compressor to either Comp->Ins or Ins->Comp. GEQ: This parameter allows you to insert a GEQ into the output of the currently selected Output Channel. This parameter can also be set on the Graphic Equalizer Edit page (see page 155) and the Graphic Equalizer Insert page (see page 66). When a Y56K card effect, or an internal effects processor is inserted in the currently selected channel, when the EFFECTS/PLUG-INS [CHANNEL INSERTS] button is pressed, the corresponding EFFECTS/PLUG-INS [1-8] button indicator flashes, and the corresponding Effects, or Plug-In edit page appears. If it's a Y56K card that's inserted, the [PLUG-INS] button indicator also flashes. If it's an internal effects processor, the [INTERNAL EFFECTS] button indicator also flashes. This applies only to effects that are inserted into channels. If there's nothing inserted in the currently selected channel, a message appears. DM2000-Owner's Manual
-
 1
1 -
2
-
3
-
4
-
5
-
6
-
7
-
8
-
9
-
10
-
11
-
12
-
13
-
14
-
15
-
16
-
17
-
18
-
19
-
20
-
21
-
22
-
23
-
24
-
25
-
26
-
27
-
28
-
29
-
30
-
31
-
32
-
33
-
34
-
35
-
36
-
37
-
38
-
39
-
40
-
41
-
42
-
43
-
44
-
45
-
46
-
47
-
48
-
49
-
50
-
51
-
52
-
53
-
54
-
55
-
56
-
57
-
58
-
59
-
60
-
61
-
62
-
63
-
64
-
65
-
66
-
67
-
68
-
69
-
70
-
71
-
72
-
73
-
74
-
75
-
76
-
77
-
78
-
79
-
80
-
81
-
82
-
83
-
84
-
85
-
86
-
87
-
88
-
89
-
90
-
91
-
92
-
93
-
94
-
95
-
96
-
97
-
98
-
99
-
100
-
101
-
102
-
103
-
104
-
105
-
106
-
107
-
108
-
109
-
110
-
111
-
112
-
113
-
114
-
115
-
116
-
117
-
118
-
119
-
120
-
 121
121 -
 122
122 -
 123
123 -
 124
124 -
 125
125 -
 126
126 -
 127
127 -
 128
128 -
 129
129 -
 130
130 -
 131
131 -
132
-
133
-
134
-
135
-
136
-
137
-
138
-
139
-
140
-
141
-
142
-
143
-
144
-
145
-
146
-
147
-
148
-
149
-
150
-
151
-
152
-
153
-
154
-
155
-
156
-
157
-
158
-
159
-
160
-
161
-
162
-
163
-
164
-
165
-
166
-
167
-
168
-
169
-
170
-
171
-
172
-
173
-
174
-
175
-
176
-
177
-
178
-
179
-
180
-
181
-
182
-
183
-
184
-
185
-
186
-
187
-
188
-
189
-
190
-
191
-
192
-
193
-
194
-
195
-
196
-
197
-
198
-
199
-
200
-
201
-
202
-
203
-
204
-
205
-
206
-
207
-
208
-
209
-
210
-
211
-
212
-
213
-
214
-
215
-
216
-
217
-
218
-
219
-
220
-
221
-
222
-
223
-
224
-
225
-
226
-
227
-
228
-
229
-
230
-
231
-
232
-
233
-
234
-
235
-
236
-
237
-
238
-
239
-
240
-
241
-
242
-
243
-
244
-
245
-
246
-
247
-
248
-
249
-
250
-
251
-
252
-
253
-
254
-
255
-
256
-
257
-
258
-
259
-
260
-
261
-
262
-
263
-
264
-
265
-
266
-
267
-
268
-
269
-
270
-
271
-
272
-
273
-
274
-
275
-
276
-
277
-
278
-
279
-
280
-
281
-
282
-
283
-
284
-
285
-
286
-
287
-
288
-
289
-
290
-
291
-
292
-
293
-
294
-
295
-
296
-
297
-
298
-
299
-
300
-
301
-
302
-
303
-
304
-
305
-
306
-
307
-
308
-
309
-
310
-
311
-
312
-
313
-
314
-
315
-
316
-
317
-
318
-
319
-
320
-
321
-
322
-
323
-
324
-
325
-
326
-
327
-
328
-
329
-
330
-
331
-
332
-
333
-
334
-
335
-
336
-
337
-
338
-
339
-
340
-
341
-
342
-
343
-
344
-
345
-
346
-
347
-
348
-
349
-
350
-
351
-
352
-
353
-
354
-
355
-
356
-
357
-
358
-
359
-
360
-
361
-
362
 |
 |