Yamaha DM2000 Owner's Manual - Page 213
LOCATOR CTRL/CLUTCH & [13] Command-ALT/FINE buttons
 |
View all Yamaha DM2000 manuals
Add to My Manuals
Save this manual to your list of manuals |
Page 213 highlights
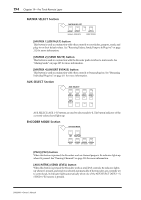
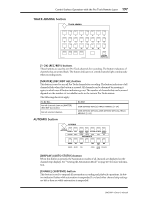
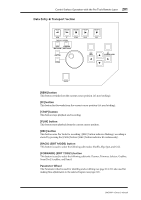
Control Surface Operation with the Pro Tools Remote Layer 199 [12] (CTRL/CLUTCH) & [13] (Command-ALT/FINE) buttons These buttons are used in conjunction with other buttons to modify function operation. They correspond to the Control and Command modifier keys found on Macintosh keyboards. [14] (MONITOR) button This button is used to display the monitor mode currently selected in the Pro Tools Operations menu. When the monitor mode is set to "Auto Input Monitor," "Auto" is displayed. When it's set to "Input Only Monitor," "Inpt" is displayed. Aux Input channels always display "AUX." Master fader channels always display "Mstr." And MIDI Tracks always display "MIDI." [15] (UNDO) button This button is used to undo and redo the last operation. Its indicator lights up when the last operation can be undone, and it flashes when the last operation can be redone. [16] (SAVE) This button is used to save the current session (same as Save Session command in the File menu). Its indicator lights up when there are unsaved changes, and goes out when there are no unsaved changes. When pressed, the indicator flashes and you can press it again to go ahead and save the current session, or press [ESC] to cancel. LOCATOR Section LOCATOR DISPLAY (MEM-LOC) LOCATE MEMORY 1 2 3 4 5 6 7 8 AUDITION PRE IN OUT POST RETURN END ONLINE LOOP QUICK TO ZERO PUNCH [DISPLAY] (MEM-LOC) button This button is used to open and close the Memory Locations window. LOCATE MEMORY [1-8] buttons These buttons perform the same transport-related functions as the 1-8 number keys on a Macintosh keyboard. If you set the Numeric keypad Mode in Pro Tools to "Classic" (Setups menu, Preferences), these buttons can be used to directly locate markers 1-8. [AUDITION] button This button is used in conjunction with the [PRE], [IN], [OUT], and [POST] buttons for auditioning. Its indicator lights up while auditioning is on and operation is as follows: • Press the [PRE] button to audition the section between the pre-roll point and the in point of the selected region. • Press the [IN] button to audition from the in point of the selected region, continuing for the specified pre-roll time. • Press the [OUT] button to audition the section before the out point of the selected region. The length of the section is determined by the post-roll time. DM2000-Owner's Manual
-
 1
1 -
2
-
3
-
4
-
5
-
6
-
7
-
8
-
9
-
10
-
11
-
12
-
13
-
14
-
15
-
16
-
17
-
18
-
19
-
20
-
21
-
22
-
23
-
24
-
25
-
26
-
27
-
28
-
29
-
30
-
31
-
32
-
33
-
34
-
35
-
36
-
37
-
38
-
39
-
40
-
41
-
42
-
43
-
44
-
45
-
46
-
47
-
48
-
49
-
50
-
51
-
52
-
53
-
54
-
55
-
56
-
57
-
58
-
59
-
60
-
61
-
62
-
63
-
64
-
65
-
66
-
67
-
68
-
69
-
70
-
71
-
72
-
73
-
74
-
75
-
76
-
77
-
78
-
79
-
80
-
81
-
82
-
83
-
84
-
85
-
86
-
87
-
88
-
89
-
90
-
91
-
92
-
93
-
94
-
95
-
96
-
97
-
98
-
99
-
100
-
101
-
102
-
103
-
104
-
105
-
106
-
107
-
108
-
109
-
110
-
111
-
112
-
113
-
114
-
115
-
116
-
117
-
118
-
119
-
120
-
121
-
122
-
123
-
124
-
125
-
126
-
127
-
128
-
129
-
130
-
131
-
132
-
133
-
134
-
135
-
136
-
137
-
138
-
139
-
140
-
141
-
142
-
143
-
144
-
145
-
146
-
147
-
148
-
149
-
150
-
151
-
152
-
153
-
154
-
155
-
156
-
157
-
158
-
159
-
160
-
161
-
162
-
163
-
164
-
165
-
166
-
167
-
168
-
169
-
170
-
171
-
172
-
173
-
174
-
175
-
176
-
177
-
178
-
179
-
180
-
181
-
182
-
183
-
184
-
185
-
186
-
187
-
188
-
189
-
190
-
191
-
192
-
193
-
194
-
195
-
196
-
197
-
198
-
199
-
200
-
201
-
202
-
203
-
204
-
205
-
206
-
207
-
 208
208 -
 209
209 -
 210
210 -
 211
211 -
 212
212 -
 213
213 -
 214
214 -
 215
215 -
 216
216 -
 217
217 -
 218
218 -
219
-
220
-
221
-
222
-
223
-
224
-
225
-
226
-
227
-
228
-
229
-
230
-
231
-
232
-
233
-
234
-
235
-
236
-
237
-
238
-
239
-
240
-
241
-
242
-
243
-
244
-
245
-
246
-
247
-
248
-
249
-
250
-
251
-
252
-
253
-
254
-
255
-
256
-
257
-
258
-
259
-
260
-
261
-
262
-
263
-
264
-
265
-
266
-
267
-
268
-
269
-
270
-
271
-
272
-
273
-
274
-
275
-
276
-
277
-
278
-
279
-
280
-
281
-
282
-
283
-
284
-
285
-
286
-
287
-
288
-
289
-
290
-
291
-
292
-
293
-
294
-
295
-
296
-
297
-
298
-
299
-
300
-
301
-
302
-
303
-
304
-
305
-
306
-
307
-
308
-
309
-
310
-
311
-
312
-
313
-
314
-
315
-
316
-
317
-
318
-
319
-
320
-
321
-
322
-
323
-
324
-
325
-
326
-
327
-
328
-
329
-
330
-
331
-
332
-
333
-
334
-
335
-
336
-
337
-
338
-
339
-
340
-
341
-
342
-
343
-
344
-
345
-
346
-
347
-
348
-
349
-
350
-
351
-
352
-
353
-
354
-
355
-
356
-
357
-
358
-
359
-
360
-
361
-
362
 |
 |