Yamaha DM2000 Owner's Manual - Page 186
Creating a Time Signature Map, Recording an Automix, Press the AUTOMIX [REC] button.
 |
View all Yamaha DM2000 manuals
Add to My Manuals
Save this manual to your list of manuals |
Page 186 highlights
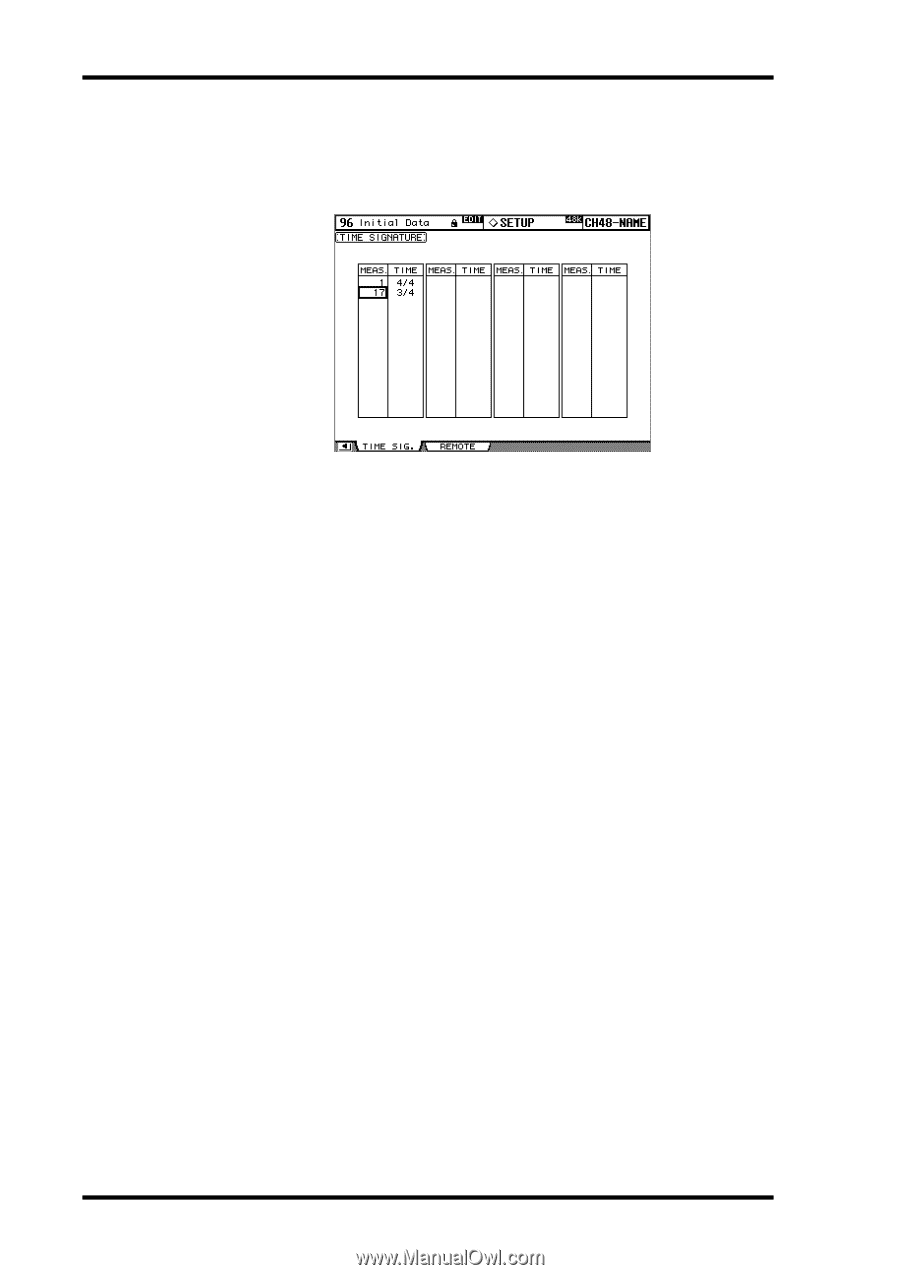
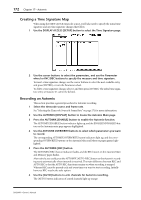
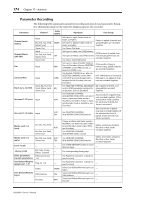
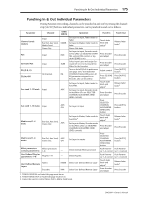
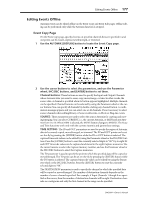
172 Chapter 17-Automix Creating a Time Signature Map When using the MIDI CLOCK timecode source, you'll also need to specify the initial time signature and any time signature changes that follow. 1 Use the DISPLAY ACCESS [SETUP] button to select the Time Signature page. 2 Use the cursor buttons to select the parameters, and use the Parameter wheel or INC/DEC buttons to specify the measure and time signature. To insert a time signature change, use the cursor buttons to select the next available entry, and press [ENTER], or turn the Parameter wheel. To delete a time signature change, select it, and then press [ENTER]. The initial time signature entry at measure #1 cannot be deleted. Recording an Automix This section provides a general procedure for Automix recording. 1 Select the timecode source and frame rate. See "Selecting the Timecode Source & Frame Rate" on page 171 for more information. 2 Use the AUTOMIX [DISPLAY] button to locate the Automix Main page. 3 Press the AUTOMIX [ENABLE] button to enable the Automix function. The AUTOMIX [ENABLE] button indicator lights up, and the ENABLED/DISABLED button on the Automix main page appears highlighted. 4 Use the AUTOMIX OVERWRITE buttons to select which parameters you want to record. The corresponding AUTOMIX OVERWRITE button indicators light up, and the corresponding OVERWRITE buttons on the Automix Main and Memory pages appear highlighted. 5 Press the AUTOMIX [REC] button. The AUTOMIX [REC] button indicator flashes, and the REC button on the Automix Main and Memory pages flashes. Alternatively, you could press the AUTOMIX [AUTO-REC] button so that Automix recording starts automatically when timecode is received. The main difference between REC and AUTO REC is that the AUTO REC functions remains on when recording is stopped. Whereas REC must be pressed each and every time you want to start recording. Initially however, REC may be the safer option. 6 Use the [AUTO] buttons to arm channels for Automix recording. The [AUTO] button indicators of armed channels light up orange. DM2000-Owner's Manual
-
 1
1 -
2
-
3
-
4
-
5
-
6
-
7
-
8
-
9
-
10
-
11
-
12
-
13
-
14
-
15
-
16
-
17
-
18
-
19
-
20
-
21
-
22
-
23
-
24
-
25
-
26
-
27
-
28
-
29
-
30
-
31
-
32
-
33
-
34
-
35
-
36
-
37
-
38
-
39
-
40
-
41
-
42
-
43
-
44
-
45
-
46
-
47
-
48
-
49
-
50
-
51
-
52
-
53
-
54
-
55
-
56
-
57
-
58
-
59
-
60
-
61
-
62
-
63
-
64
-
65
-
66
-
67
-
68
-
69
-
70
-
71
-
72
-
73
-
74
-
75
-
76
-
77
-
78
-
79
-
80
-
81
-
82
-
83
-
84
-
85
-
86
-
87
-
88
-
89
-
90
-
91
-
92
-
93
-
94
-
95
-
96
-
97
-
98
-
99
-
100
-
101
-
102
-
103
-
104
-
105
-
106
-
107
-
108
-
109
-
110
-
111
-
112
-
113
-
114
-
115
-
116
-
117
-
118
-
119
-
120
-
121
-
122
-
123
-
124
-
125
-
126
-
127
-
128
-
129
-
130
-
131
-
132
-
133
-
134
-
135
-
136
-
137
-
138
-
139
-
140
-
141
-
142
-
143
-
144
-
145
-
146
-
147
-
148
-
149
-
150
-
151
-
152
-
153
-
154
-
155
-
156
-
157
-
158
-
159
-
160
-
161
-
162
-
163
-
164
-
165
-
166
-
167
-
168
-
169
-
170
-
171
-
172
-
173
-
174
-
175
-
176
-
177
-
178
-
179
-
180
-
 181
181 -
 182
182 -
 183
183 -
 184
184 -
 185
185 -
 186
186 -
 187
187 -
 188
188 -
 189
189 -
 190
190 -
 191
191 -
192
-
193
-
194
-
195
-
196
-
197
-
198
-
199
-
200
-
201
-
202
-
203
-
204
-
205
-
206
-
207
-
208
-
209
-
210
-
211
-
212
-
213
-
214
-
215
-
216
-
217
-
218
-
219
-
220
-
221
-
222
-
223
-
224
-
225
-
226
-
227
-
228
-
229
-
230
-
231
-
232
-
233
-
234
-
235
-
236
-
237
-
238
-
239
-
240
-
241
-
242
-
243
-
244
-
245
-
246
-
247
-
248
-
249
-
250
-
251
-
252
-
253
-
254
-
255
-
256
-
257
-
258
-
259
-
260
-
261
-
262
-
263
-
264
-
265
-
266
-
267
-
268
-
269
-
270
-
271
-
272
-
273
-
274
-
275
-
276
-
277
-
278
-
279
-
280
-
281
-
282
-
283
-
284
-
285
-
286
-
287
-
288
-
289
-
290
-
291
-
292
-
293
-
294
-
295
-
296
-
297
-
298
-
299
-
300
-
301
-
302
-
303
-
304
-
305
-
306
-
307
-
308
-
309
-
310
-
311
-
312
-
313
-
314
-
315
-
316
-
317
-
318
-
319
-
320
-
321
-
322
-
323
-
324
-
325
-
326
-
327
-
328
-
329
-
330
-
331
-
332
-
333
-
334
-
335
-
336
-
337
-
338
-
339
-
340
-
341
-
342
-
343
-
344
-
345
-
346
-
347
-
348
-
349
-
350
-
351
-
352
-
353
-
354
-
355
-
356
-
357
-
358
-
359
-
360
-
361
-
362
 |
 |