Yamaha DM2000 Owner's Manual - Page 88
Setting Input Channel Levels, Grouping Input Channel Faders
 |
View all Yamaha DM2000 manuals
Add to My Manuals
Save this manual to your list of manuals |
Page 88 highlights
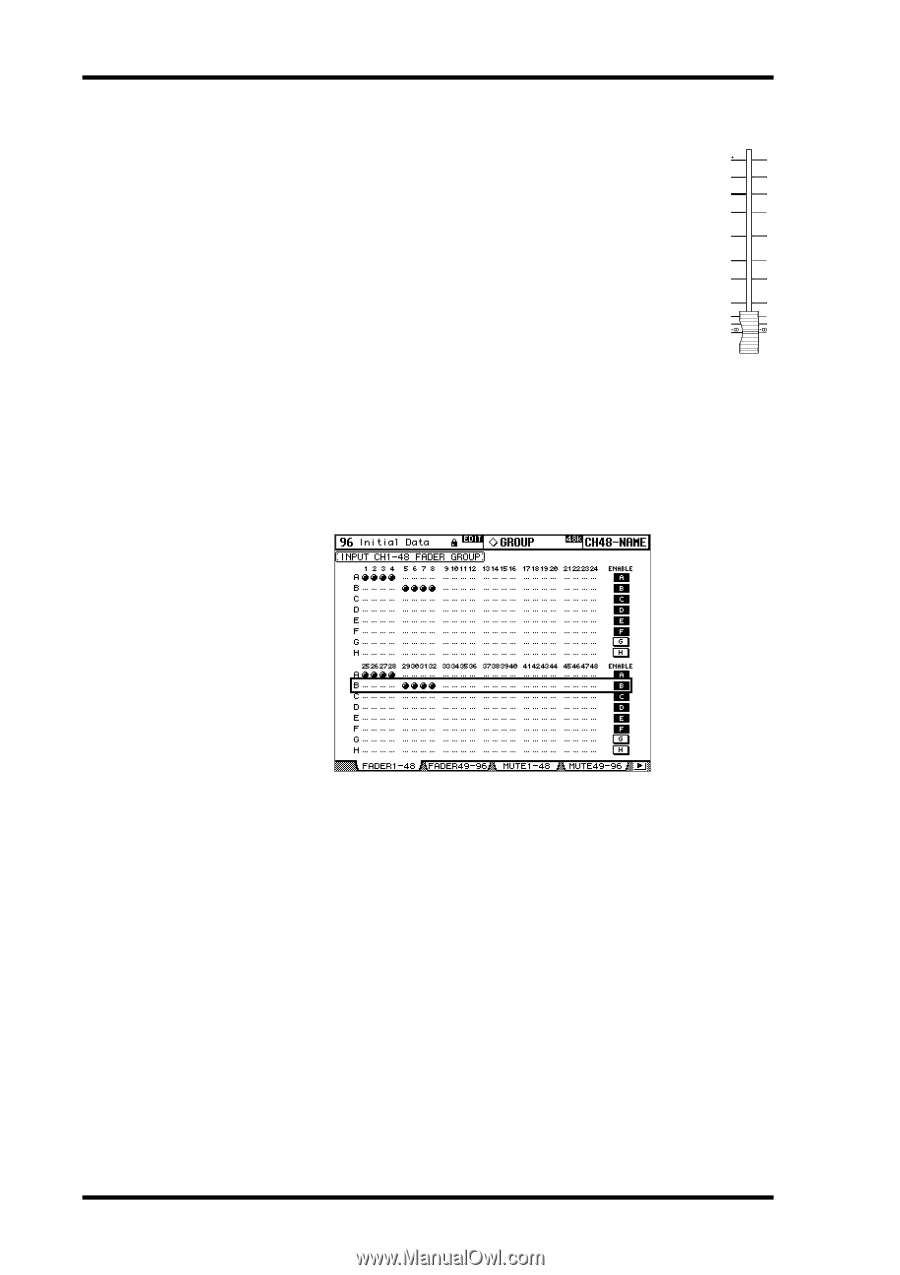
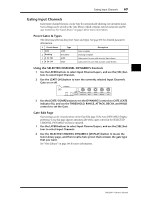
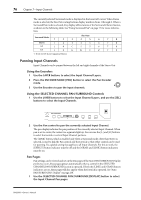
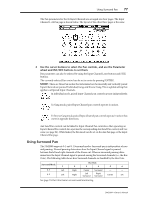
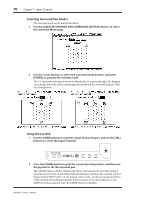
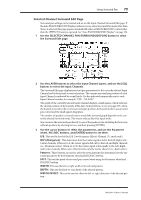
74 Chapter 7-Input Channels Setting Input Channel Levels Input Channel levels can be set as follows. 1 Use the LAYER buttons to select the Input Channel Layers. 2 Press the FADER MODE [FADER] button to select Fader mode. 10 0 5 5 0 10 5 15 3 Use the faders to set the Input Channel levels. 10 20 Refer to the legend on the left side of the faders when setting Input Channel levels. 15 30 Fader positions can be viewed on the Fader View pages. See "Viewing Channel Fader Settings" on page 125 for more information. 20 40 30 50 40 60 50 70 Grouping Input Channel Faders Input Channel faders can be grouped, allowing you to control the level of several Input Channels simultaneously. There are eight Input Channel Fader groups: A, B, C, D, E, F, G, and H. 1 Use the DISPLAY ACCESS [GROUP] button to locate the Input Channel Fader Group pages. The Fader Group parameters for the 96 Input Channels are divided between two pages. The Input Channel 1-48 Fader Group page is shown below. The layout of the other page is the same. 2 Use the LAYER buttons to select the Input Channel Layers. The corresponding Fader Group page and group row is selected as each Input Channel Layer is selected. 3 Use the Up/Down cursor buttons to select Fader groups A-H. The selected group is highlighted by a flashing cursor box. 4 Use the [SEL] buttons to add and remove faders to and from the selected group. When an Input Channel is added to a group, its [SEL] button indicator lights up. ENABLE: These buttons are used to enable and disable the groups. You can temporarily disable a Fader group in order to make adjustments to individual faders by operating the desired channel fader while holding down its [SEL] button. Fader groups are active only in Fader mode (i.e., when the FADER MODE [FADER] button indicator is on). See "Selecting Fader Modes" on page 44 for more information. DM2000-Owner's Manual
-
 1
1 -
2
-
3
-
4
-
5
-
6
-
7
-
8
-
9
-
10
-
11
-
12
-
13
-
14
-
15
-
16
-
17
-
18
-
19
-
20
-
21
-
22
-
23
-
24
-
25
-
26
-
27
-
28
-
29
-
30
-
31
-
32
-
33
-
34
-
35
-
36
-
37
-
38
-
39
-
40
-
41
-
42
-
43
-
44
-
45
-
46
-
47
-
48
-
49
-
50
-
51
-
52
-
53
-
54
-
55
-
56
-
57
-
58
-
59
-
60
-
61
-
62
-
63
-
64
-
65
-
66
-
67
-
68
-
69
-
70
-
71
-
72
-
73
-
74
-
75
-
76
-
77
-
78
-
79
-
80
-
81
-
82
-
 83
83 -
 84
84 -
 85
85 -
 86
86 -
 87
87 -
 88
88 -
 89
89 -
 90
90 -
 91
91 -
 92
92 -
 93
93 -
94
-
95
-
96
-
97
-
98
-
99
-
100
-
101
-
102
-
103
-
104
-
105
-
106
-
107
-
108
-
109
-
110
-
111
-
112
-
113
-
114
-
115
-
116
-
117
-
118
-
119
-
120
-
121
-
122
-
123
-
124
-
125
-
126
-
127
-
128
-
129
-
130
-
131
-
132
-
133
-
134
-
135
-
136
-
137
-
138
-
139
-
140
-
141
-
142
-
143
-
144
-
145
-
146
-
147
-
148
-
149
-
150
-
151
-
152
-
153
-
154
-
155
-
156
-
157
-
158
-
159
-
160
-
161
-
162
-
163
-
164
-
165
-
166
-
167
-
168
-
169
-
170
-
171
-
172
-
173
-
174
-
175
-
176
-
177
-
178
-
179
-
180
-
181
-
182
-
183
-
184
-
185
-
186
-
187
-
188
-
189
-
190
-
191
-
192
-
193
-
194
-
195
-
196
-
197
-
198
-
199
-
200
-
201
-
202
-
203
-
204
-
205
-
206
-
207
-
208
-
209
-
210
-
211
-
212
-
213
-
214
-
215
-
216
-
217
-
218
-
219
-
220
-
221
-
222
-
223
-
224
-
225
-
226
-
227
-
228
-
229
-
230
-
231
-
232
-
233
-
234
-
235
-
236
-
237
-
238
-
239
-
240
-
241
-
242
-
243
-
244
-
245
-
246
-
247
-
248
-
249
-
250
-
251
-
252
-
253
-
254
-
255
-
256
-
257
-
258
-
259
-
260
-
261
-
262
-
263
-
264
-
265
-
266
-
267
-
268
-
269
-
270
-
271
-
272
-
273
-
274
-
275
-
276
-
277
-
278
-
279
-
280
-
281
-
282
-
283
-
284
-
285
-
286
-
287
-
288
-
289
-
290
-
291
-
292
-
293
-
294
-
295
-
296
-
297
-
298
-
299
-
300
-
301
-
302
-
303
-
304
-
305
-
306
-
307
-
308
-
309
-
310
-
311
-
312
-
313
-
314
-
315
-
316
-
317
-
318
-
319
-
320
-
321
-
322
-
323
-
324
-
325
-
326
-
327
-
328
-
329
-
330
-
331
-
332
-
333
-
334
-
335
-
336
-
337
-
338
-
339
-
340
-
341
-
342
-
343
-
344
-
345
-
346
-
347
-
348
-
349
-
350
-
351
-
352
-
353
-
354
-
355
-
356
-
357
-
358
-
359
-
360
-
361
-
362
 |
 |