Yamaha DM2000 Owner's Manual - Page 239
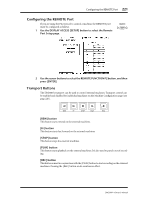
Arming Machine Tracks, 1-24] buttons, TRACK ARMING GROUP [A-D] buttons, ALL CLEAR] button
 |
View all Yamaha DM2000 manuals
Add to My Manuals
Save this manual to your list of manuals |
Page 239 highlights
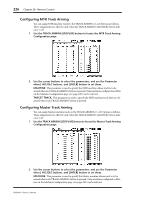
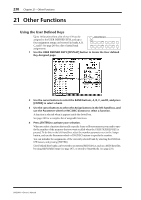
Arming Machine Tracks 225 These points can also be set on-the-fly, so long as the DM2000 is receiving timecode. To do this, while holding down the LOCATOR [SET] button, press the [1-8], [IN], [OUT], or [RTZ] button. PREROLL TIME: In conjunction with the in point, this determines the position that will be located when the LOCATOR [PRE] button is pressed. For example, if the in point is 00:01:00.00 and the pre-roll time is 5 seconds, 00:00:55.00 will be located. POSTROLL TIME: In conjunction with the out point, this determines the position that will be located when the LOCATOR [POST] button is pressed. For example, if the out point is 00:01:00.00 and the post-roll time is 5 seconds, 00:01:05.00 will be located. ROLLBACK TIME: This determines how many seconds the machines roll back from the current position when the LOCATOR [ROLL BACK] button is pressed. Arming Machine Tracks The TRACK ARMING section can be used to arm tracks on external machines. TRACK ARMING DISPLAY 1 2 3 4 5 6 7 8 9 10 11 12 13 14 15 16 17 18 19 20 21 22 23 24 A B C D TRACK ARMING GROUP ALL CLEAR MASTER [1-24] buttons These buttons are used to arm tracks on the external MTR and Master machines. Their indicators light up when tracks are armed. These buttons can be configured to arm any track of any machine. See "Configuring MTR Track Arming" on page 226 and "Configuring Master Track Arming" on page 226 for more information. TRACK ARMING GROUP [A-D] buttons These buttons are used to select track arming groups A, B, C, and D. The indicator of the currently selected group lights up. Track arming groups can be used only with P2 machines. See "Configuring Track Arming Groups" on page 227 for more information. [ALL CLEAR] button This button is used to clear all track arming on the external machines. [MASTER] button This button is used to select the MTR or Master machines for track arming. When its button indicator is off, the TRACK ARMING section controls machines set to MTR. When the button indicator is lit, the TRACK ARMING section controls machines set to MASTER. See "Configuring Machines" on page 220. DM2000-Owner's Manual
-
 1
1 -
2
-
3
-
4
-
5
-
6
-
7
-
8
-
9
-
10
-
11
-
12
-
13
-
14
-
15
-
16
-
17
-
18
-
19
-
20
-
21
-
22
-
23
-
24
-
25
-
26
-
27
-
28
-
29
-
30
-
31
-
32
-
33
-
34
-
35
-
36
-
37
-
38
-
39
-
40
-
41
-
42
-
43
-
44
-
45
-
46
-
47
-
48
-
49
-
50
-
51
-
52
-
53
-
54
-
55
-
56
-
57
-
58
-
59
-
60
-
61
-
62
-
63
-
64
-
65
-
66
-
67
-
68
-
69
-
70
-
71
-
72
-
73
-
74
-
75
-
76
-
77
-
78
-
79
-
80
-
81
-
82
-
83
-
84
-
85
-
86
-
87
-
88
-
89
-
90
-
91
-
92
-
93
-
94
-
95
-
96
-
97
-
98
-
99
-
100
-
101
-
102
-
103
-
104
-
105
-
106
-
107
-
108
-
109
-
110
-
111
-
112
-
113
-
114
-
115
-
116
-
117
-
118
-
119
-
120
-
121
-
122
-
123
-
124
-
125
-
126
-
127
-
128
-
129
-
130
-
131
-
132
-
133
-
134
-
135
-
136
-
137
-
138
-
139
-
140
-
141
-
142
-
143
-
144
-
145
-
146
-
147
-
148
-
149
-
150
-
151
-
152
-
153
-
154
-
155
-
156
-
157
-
158
-
159
-
160
-
161
-
162
-
163
-
164
-
165
-
166
-
167
-
168
-
169
-
170
-
171
-
172
-
173
-
174
-
175
-
176
-
177
-
178
-
179
-
180
-
181
-
182
-
183
-
184
-
185
-
186
-
187
-
188
-
189
-
190
-
191
-
192
-
193
-
194
-
195
-
196
-
197
-
198
-
199
-
200
-
201
-
202
-
203
-
204
-
205
-
206
-
207
-
208
-
209
-
210
-
211
-
212
-
213
-
214
-
215
-
216
-
217
-
218
-
219
-
220
-
221
-
222
-
223
-
224
-
225
-
226
-
227
-
228
-
229
-
230
-
231
-
232
-
233
-
 234
234 -
 235
235 -
 236
236 -
 237
237 -
 238
238 -
 239
239 -
 240
240 -
 241
241 -
 242
242 -
 243
243 -
 244
244 -
245
-
246
-
247
-
248
-
249
-
250
-
251
-
252
-
253
-
254
-
255
-
256
-
257
-
258
-
259
-
260
-
261
-
262
-
263
-
264
-
265
-
266
-
267
-
268
-
269
-
270
-
271
-
272
-
273
-
274
-
275
-
276
-
277
-
278
-
279
-
280
-
281
-
282
-
283
-
284
-
285
-
286
-
287
-
288
-
289
-
290
-
291
-
292
-
293
-
294
-
295
-
296
-
297
-
298
-
299
-
300
-
301
-
302
-
303
-
304
-
305
-
306
-
307
-
308
-
309
-
310
-
311
-
312
-
313
-
314
-
315
-
316
-
317
-
318
-
319
-
320
-
321
-
322
-
323
-
324
-
325
-
326
-
327
-
328
-
329
-
330
-
331
-
332
-
333
-
334
-
335
-
336
-
337
-
338
-
339
-
340
-
341
-
342
-
343
-
344
-
345
-
346
-
347
-
348
-
349
-
350
-
351
-
352
-
353
-
354
-
355
-
356
-
357
-
358
-
359
-
360
-
361
-
362
 |
 |