Yamaha DM2000 Owner's Manual - Page 193
ERASE button, COPY button, MOVE/MERGE button, TRIM button, UNDO button, FADER i.e., Inputs Channels
 |
View all Yamaha DM2000 manuals
Add to My Manuals
Save this manual to your list of manuals |
Page 193 highlights
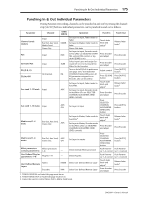
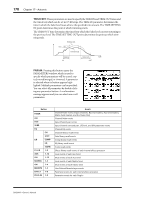
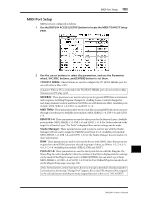
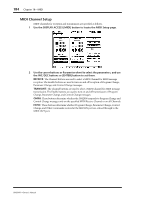
Editing Events Offline 179 ERASE button: This button is used to erase the specified Automix data. Use the channel buttons to select the source channels. Use the IN and OUT parameters to specify the region to be erased. Use the PARAMETERS window to specify which Automix events are to be erased. Then select the ERASE button and press [ENTER]. COPY button: This button is used to copy the specified Automix data. Use the channel buttons to select the source channels. Use the IN and OUT parameters to specify the region to be copied. Use the TO parameter to specify the point to which the specified data is to be copied. Use the DESTINATION parameter to specify the channels to which the specified data is to be copied. Use the PARAMETERS window to specify which Automix events are to be copied. Then select the COPY button and press [ENTER]. Duplicate events at the specified destination will be erased. MOVE/MERGE button: This button is used to move/merge the specified Automix data. To move events, set the SOURCE to CURRENT. Use the channel buttons to select the source channels. Use the IN and OUT parameters to specify the region to be moved. Use the TO parameter to specify the point to which the specified data it to be moved. Use the DESTINATION parameter to specify the channels to which the specified data is to be moved. Use the PARAMETERS window to specify which Automix events are to be moved. Then select the MOVE button and press [ENTER]. To merge events from another Automix, select the SOURCE MEM option and specify the source Automix. Use the channel buttons to select the source channels. Use the IN and OUT parameters to specify the region to be merged. Use the TO parameter to specify the point to which the specified data it to be merged. Use the DESTINATION parameter to specify the channels to which the specified data is to be merged. Use the PARAMETERS window to specify which Automix events are to be merged. Then select the MERGE button and press [ENTER]. TRIM button: This button is used to trim the specified Automix data. Use the channel buttons to select the source channels. Use the IN and OUT parameters to specify the region to be trimmed. Use the TRIM EDIT IN and OUT parameters to specify the TRIM IN and OUT times, and set the trim amount. Use the PARAMETERS window to specify which Automix events are to be trimmed (see below). Then select the TRIM button and press [ENTER]. For trimming, you can select the following Fader events on the PARAMETERS window: FADER (i.e., Inputs Channels, Bus Out masters, Aux Send masters, Matrix Send masters, and the Stereo Out), AUX 1-12 (i.e., Aux Send levels 1-12), and MATRIX 1-4 (i.e., Matrix Send levels 1-4). UNDO button: This button works the same as the UNDO button on the Automix Main page. See "UNDO" on page 167 for more information. DM2000-Owner's Manual
-
 1
1 -
2
-
3
-
4
-
5
-
6
-
7
-
8
-
9
-
10
-
11
-
12
-
13
-
14
-
15
-
16
-
17
-
18
-
19
-
20
-
21
-
22
-
23
-
24
-
25
-
26
-
27
-
28
-
29
-
30
-
31
-
32
-
33
-
34
-
35
-
36
-
37
-
38
-
39
-
40
-
41
-
42
-
43
-
44
-
45
-
46
-
47
-
48
-
49
-
50
-
51
-
52
-
53
-
54
-
55
-
56
-
57
-
58
-
59
-
60
-
61
-
62
-
63
-
64
-
65
-
66
-
67
-
68
-
69
-
70
-
71
-
72
-
73
-
74
-
75
-
76
-
77
-
78
-
79
-
80
-
81
-
82
-
83
-
84
-
85
-
86
-
87
-
88
-
89
-
90
-
91
-
92
-
93
-
94
-
95
-
96
-
97
-
98
-
99
-
100
-
101
-
102
-
103
-
104
-
105
-
106
-
107
-
108
-
109
-
110
-
111
-
112
-
113
-
114
-
115
-
116
-
117
-
118
-
119
-
120
-
121
-
122
-
123
-
124
-
125
-
126
-
127
-
128
-
129
-
130
-
131
-
132
-
133
-
134
-
135
-
136
-
137
-
138
-
139
-
140
-
141
-
142
-
143
-
144
-
145
-
146
-
147
-
148
-
149
-
150
-
151
-
152
-
153
-
154
-
155
-
156
-
157
-
158
-
159
-
160
-
161
-
162
-
163
-
164
-
165
-
166
-
167
-
168
-
169
-
170
-
171
-
172
-
173
-
174
-
175
-
176
-
177
-
178
-
179
-
180
-
181
-
182
-
183
-
184
-
185
-
186
-
187
-
 188
188 -
 189
189 -
 190
190 -
 191
191 -
 192
192 -
 193
193 -
 194
194 -
 195
195 -
 196
196 -
 197
197 -
 198
198 -
199
-
200
-
201
-
202
-
203
-
204
-
205
-
206
-
207
-
208
-
209
-
210
-
211
-
212
-
213
-
214
-
215
-
216
-
217
-
218
-
219
-
220
-
221
-
222
-
223
-
224
-
225
-
226
-
227
-
228
-
229
-
230
-
231
-
232
-
233
-
234
-
235
-
236
-
237
-
238
-
239
-
240
-
241
-
242
-
243
-
244
-
245
-
246
-
247
-
248
-
249
-
250
-
251
-
252
-
253
-
254
-
255
-
256
-
257
-
258
-
259
-
260
-
261
-
262
-
263
-
264
-
265
-
266
-
267
-
268
-
269
-
270
-
271
-
272
-
273
-
274
-
275
-
276
-
277
-
278
-
279
-
280
-
281
-
282
-
283
-
284
-
285
-
286
-
287
-
288
-
289
-
290
-
291
-
292
-
293
-
294
-
295
-
296
-
297
-
298
-
299
-
300
-
301
-
302
-
303
-
304
-
305
-
306
-
307
-
308
-
309
-
310
-
311
-
312
-
313
-
314
-
315
-
316
-
317
-
318
-
319
-
320
-
321
-
322
-
323
-
324
-
325
-
326
-
327
-
328
-
329
-
330
-
331
-
332
-
333
-
334
-
335
-
336
-
337
-
338
-
339
-
340
-
341
-
342
-
343
-
344
-
345
-
346
-
347
-
348
-
349
-
350
-
351
-
352
-
353
-
354
-
355
-
356
-
357
-
358
-
359
-
360
-
361
-
362
 |
 |