Yamaha DM2000 Owner's Manual - Page 202
Pro Tools Remote Layer, Configuring Windows Computers, Configuring Macintosh Computers, - drivers
 |
View all Yamaha DM2000 manuals
Add to My Manuals
Save this manual to your list of manuals |
Page 202 highlights
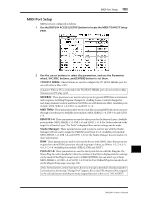
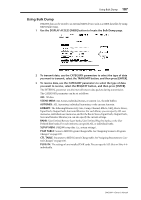
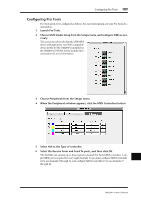
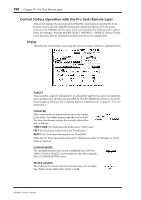
188 Chapter 19-Pro Tools Remote Layer 19 Pro Tools Remote Layer The DM2000 features a Remote Layer target especially designed for controlling Pro Tools. If an optional MB2000 Peak Meter Bridge is installed, Pro Tools channel levels are displayed by the meters, and timecode is displayed on the TIME CODE counter. Configuring Windows Computers 1 Connect your PC. The DM2000 can be connected to your Windows PC by connecting the TO HOST SERIAL port to a suitable RS232 serial port on your PC, or by connecting the TO HOST USB port to a USB port on your PC. If you use the TO HOST SERIAL port, make sure that the TO HOST SERIAL parameter on the MIDI/TO HOST Setup page is set to PC-2 (see page 183). 2 Install the necessary drivers. Once your PC is connected, you'll need to install the TO HOST SERIAL or TO HOST USB drivers included on the DM2000 CD-ROM. Configuring Macintosh Computers 1 Connect your Mac. The DM2000 can be connected to your Mac by connecting the TO HOST SERIAL port to either the Printer or Modem port on your Mac, or by connecting the TO HOST USB port to a USB port on your Mac. If you use the TO HOST SERIAL port, make sure that the TO HOST SERIAL parameter on the MIDI/TO HOST Setup page is set to Mac (see page 183). 2 Install OMS. The DM2000 communicates with Pro Tools via OMS (Open Music System) software. If you already have OMS installed on your Mac, there's no need to install it again and you can move on to the next section. If you don't already have OMS installed, it's included on the DM2000 CD-ROM. Refer to the OMS documentation included on the DM2000 CD-ROM for more information on installing. 3 Install Yamaha USB MIDI driver 1.04 or later. If you are using the TO HOST USB port, you must also install the Yamaha USB MIDI driver included on the DM2000 CD-ROM. See the included documentation for more information. Configuring the DM2000 1 Use the DISPLAY ACCESS [SETUP] button to locate the MIDI/TO HOST Setup page, and use the DAW parameter to specify the port to which Pro Tools is connected. See "MIDI Port Setup" on page 183 for more information. 2 Use the DISPLAY ACCESS [REMOTE] button to locate the Remote pages, and assign Pro Tools to a Remote Layer. See "Assigning Targets to Remote Layers" on page 217 for more information. 3 Use the LAYER [REMOTE] buttons to select the Pro Tools Remote Layer. When the Pro Tools Remote Layer is selected, the DM2000's control surface controls Pro Tools, not the DM2000. In order to control the DM2000, you need to select an Input Channel Layer or the Master Layer. Audio mixing on the Input and Master Layers, and Automix continues while the Pro Tools Layer is selected. DM2000-Owner's Manual
-
 1
1 -
2
-
3
-
4
-
5
-
6
-
7
-
8
-
9
-
10
-
11
-
12
-
13
-
14
-
15
-
16
-
17
-
18
-
19
-
20
-
21
-
22
-
23
-
24
-
25
-
26
-
27
-
28
-
29
-
30
-
31
-
32
-
33
-
34
-
35
-
36
-
37
-
38
-
39
-
40
-
41
-
42
-
43
-
44
-
45
-
46
-
47
-
48
-
49
-
50
-
51
-
52
-
53
-
54
-
55
-
56
-
57
-
58
-
59
-
60
-
61
-
62
-
63
-
64
-
65
-
66
-
67
-
68
-
69
-
70
-
71
-
72
-
73
-
74
-
75
-
76
-
77
-
78
-
79
-
80
-
81
-
82
-
83
-
84
-
85
-
86
-
87
-
88
-
89
-
90
-
91
-
92
-
93
-
94
-
95
-
96
-
97
-
98
-
99
-
100
-
101
-
102
-
103
-
104
-
105
-
106
-
107
-
108
-
109
-
110
-
111
-
112
-
113
-
114
-
115
-
116
-
117
-
118
-
119
-
120
-
121
-
122
-
123
-
124
-
125
-
126
-
127
-
128
-
129
-
130
-
131
-
132
-
133
-
134
-
135
-
136
-
137
-
138
-
139
-
140
-
141
-
142
-
143
-
144
-
145
-
146
-
147
-
148
-
149
-
150
-
151
-
152
-
153
-
154
-
155
-
156
-
157
-
158
-
159
-
160
-
161
-
162
-
163
-
164
-
165
-
166
-
167
-
168
-
169
-
170
-
171
-
172
-
173
-
174
-
175
-
176
-
177
-
178
-
179
-
180
-
181
-
182
-
183
-
184
-
185
-
186
-
187
-
188
-
189
-
190
-
191
-
192
-
193
-
194
-
195
-
196
-
 197
197 -
 198
198 -
 199
199 -
 200
200 -
 201
201 -
 202
202 -
 203
203 -
 204
204 -
 205
205 -
 206
206 -
 207
207 -
208
-
209
-
210
-
211
-
212
-
213
-
214
-
215
-
216
-
217
-
218
-
219
-
220
-
221
-
222
-
223
-
224
-
225
-
226
-
227
-
228
-
229
-
230
-
231
-
232
-
233
-
234
-
235
-
236
-
237
-
238
-
239
-
240
-
241
-
242
-
243
-
244
-
245
-
246
-
247
-
248
-
249
-
250
-
251
-
252
-
253
-
254
-
255
-
256
-
257
-
258
-
259
-
260
-
261
-
262
-
263
-
264
-
265
-
266
-
267
-
268
-
269
-
270
-
271
-
272
-
273
-
274
-
275
-
276
-
277
-
278
-
279
-
280
-
281
-
282
-
283
-
284
-
285
-
286
-
287
-
288
-
289
-
290
-
291
-
292
-
293
-
294
-
295
-
296
-
297
-
298
-
299
-
300
-
301
-
302
-
303
-
304
-
305
-
306
-
307
-
308
-
309
-
310
-
311
-
312
-
313
-
314
-
315
-
316
-
317
-
318
-
319
-
320
-
321
-
322
-
323
-
324
-
325
-
326
-
327
-
328
-
329
-
330
-
331
-
332
-
333
-
334
-
335
-
336
-
337
-
338
-
339
-
340
-
341
-
342
-
343
-
344
-
345
-
346
-
347
-
348
-
349
-
350
-
351
-
352
-
353
-
354
-
355
-
356
-
357
-
358
-
359
-
360
-
361
-
362
 |
 |