Yamaha DM2000 Owner's Manual - Page 31
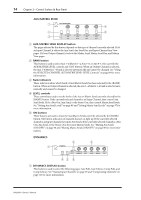
BEQ ON button CATT control DFREQUENCY/Q indicators EFREQUENCY/Q controls FEQ GAIN controls GEQ displays ACOPY button BPASTE button
 |
View all Yamaha DM2000 manuals
Add to My Manuals
Save this manual to your list of manuals |
Page 31 highlights
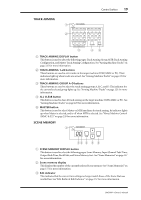
Control Surface 17 B EQ ON button This button is used to turn the EQ of the currently selected channel on and off. Its indicator lights up when the EQ is on. See "Using EQ" on page 107 for more information. C ATT control This control is used to attenuate the pre-EQ signal of the currently selected channel. See "Attenuating Signals" on page 106 for more information. D FREQUENCY/Q indicators These indicators show whether each FREQUENCY/Q control is set to control frequency or Q. The FREQUENCY indicator lights up when it's set to control frequency; the Q indicator, when it's set to control Q. See "Using EQ" on page 107 for more information. E FREQUENCY/Q controls These are rotary controls and push switches. The push switches are used to select either frequency or Q. The current setting is shown by the FREQUENCY/Q indicators. The rotary controls are used to set the frequency or Q, as selected by the push switches. See "Using EQ" on page 107 for more information. F EQ GAIN controls These controls are used to set the gain of each EQ band. See "Using EQ" on page 107 for more information. G EQ displays Normally these displays show the frequency of each band. When the GAIN is adjusted, the gain value is displayed. When the Q is adjusted, the Q value is displayed. If the gain or Q is not adjusted for two seconds, the frequency value reappears. See "Using EQ" on page 107 for more information. CHANNEL COPY 1 2 CHANNEL COPY PASTE A COPY button This button is used to copy channel settings to the Copy buffer. See "Copying Channel Settings" on page 129 for more information. B PASTE button This button is used to paste the settings in the Copy buffer to the specified channel. See "Copying Channel Settings" on page 129 for more information. DM2000-Owner's Manual
-
 1
1 -
2
-
3
-
4
-
5
-
6
-
7
-
8
-
9
-
10
-
11
-
12
-
13
-
14
-
15
-
16
-
17
-
18
-
19
-
20
-
21
-
22
-
23
-
24
-
25
-
 26
26 -
 27
27 -
 28
28 -
 29
29 -
 30
30 -
 31
31 -
 32
32 -
 33
33 -
 34
34 -
 35
35 -
 36
36 -
37
-
38
-
39
-
40
-
41
-
42
-
43
-
44
-
45
-
46
-
47
-
48
-
49
-
50
-
51
-
52
-
53
-
54
-
55
-
56
-
57
-
58
-
59
-
60
-
61
-
62
-
63
-
64
-
65
-
66
-
67
-
68
-
69
-
70
-
71
-
72
-
73
-
74
-
75
-
76
-
77
-
78
-
79
-
80
-
81
-
82
-
83
-
84
-
85
-
86
-
87
-
88
-
89
-
90
-
91
-
92
-
93
-
94
-
95
-
96
-
97
-
98
-
99
-
100
-
101
-
102
-
103
-
104
-
105
-
106
-
107
-
108
-
109
-
110
-
111
-
112
-
113
-
114
-
115
-
116
-
117
-
118
-
119
-
120
-
121
-
122
-
123
-
124
-
125
-
126
-
127
-
128
-
129
-
130
-
131
-
132
-
133
-
134
-
135
-
136
-
137
-
138
-
139
-
140
-
141
-
142
-
143
-
144
-
145
-
146
-
147
-
148
-
149
-
150
-
151
-
152
-
153
-
154
-
155
-
156
-
157
-
158
-
159
-
160
-
161
-
162
-
163
-
164
-
165
-
166
-
167
-
168
-
169
-
170
-
171
-
172
-
173
-
174
-
175
-
176
-
177
-
178
-
179
-
180
-
181
-
182
-
183
-
184
-
185
-
186
-
187
-
188
-
189
-
190
-
191
-
192
-
193
-
194
-
195
-
196
-
197
-
198
-
199
-
200
-
201
-
202
-
203
-
204
-
205
-
206
-
207
-
208
-
209
-
210
-
211
-
212
-
213
-
214
-
215
-
216
-
217
-
218
-
219
-
220
-
221
-
222
-
223
-
224
-
225
-
226
-
227
-
228
-
229
-
230
-
231
-
232
-
233
-
234
-
235
-
236
-
237
-
238
-
239
-
240
-
241
-
242
-
243
-
244
-
245
-
246
-
247
-
248
-
249
-
250
-
251
-
252
-
253
-
254
-
255
-
256
-
257
-
258
-
259
-
260
-
261
-
262
-
263
-
264
-
265
-
266
-
267
-
268
-
269
-
270
-
271
-
272
-
273
-
274
-
275
-
276
-
277
-
278
-
279
-
280
-
281
-
282
-
283
-
284
-
285
-
286
-
287
-
288
-
289
-
290
-
291
-
292
-
293
-
294
-
295
-
296
-
297
-
298
-
299
-
300
-
301
-
302
-
303
-
304
-
305
-
306
-
307
-
308
-
309
-
310
-
311
-
312
-
313
-
314
-
315
-
316
-
317
-
318
-
319
-
320
-
321
-
322
-
323
-
324
-
325
-
326
-
327
-
328
-
329
-
330
-
331
-
332
-
333
-
334
-
335
-
336
-
337
-
338
-
339
-
340
-
341
-
342
-
343
-
344
-
345
-
346
-
347
-
348
-
349
-
350
-
351
-
352
-
353
-
354
-
355
-
356
-
357
-
358
-
359
-
360
-
361
-
362
 |
 |