HP 8550dn HP Color LaserJet 8550, 8550N, 8550DN, 8550GN, 8550MFP Printer - Use - Page 198
Cleaning the Density Sensor, To clean the density sensor and, erase lamp
 |
UPC - 088698946428
View all HP 8550dn manuals
Add to My Manuals
Save this manual to your list of manuals |
Page 198 highlights
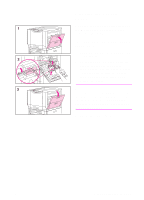
Cleaning the Density Sensor Clean the density sensor after replacing the imaging drum and when printed colors are inaccurate. To clean the density sensor and erase lamp 1 Open the upper door on the right side of the printer. 2 On the inside of the door, locate the density sensor and the density sensor brush. Use the brush to brush off toner particles from the density sensor and the erase lamp. Then replace the brush. Note You can also use a hand wipe to clean the density sensor. To prevent scratches on the sensor, do not use any paper products, such as tissue or paper towels, to clean the sensor. 3 Close the upper right door. EN Print Quality Problems 197
-
 1
1 -
2
-
3
-
4
-
5
-
6
-
7
-
8
-
9
-
10
-
11
-
12
-
13
-
14
-
15
-
16
-
17
-
18
-
19
-
20
-
21
-
22
-
23
-
24
-
25
-
26
-
27
-
28
-
29
-
30
-
31
-
32
-
33
-
34
-
35
-
36
-
37
-
38
-
39
-
40
-
41
-
42
-
43
-
44
-
45
-
46
-
47
-
48
-
49
-
50
-
51
-
52
-
53
-
54
-
55
-
56
-
57
-
58
-
59
-
60
-
61
-
62
-
63
-
64
-
65
-
66
-
67
-
68
-
69
-
70
-
71
-
72
-
73
-
74
-
75
-
76
-
77
-
78
-
79
-
80
-
81
-
82
-
83
-
84
-
85
-
86
-
87
-
88
-
89
-
90
-
91
-
92
-
93
-
94
-
95
-
96
-
97
-
98
-
99
-
100
-
101
-
102
-
103
-
104
-
105
-
106
-
107
-
108
-
109
-
110
-
111
-
112
-
113
-
114
-
115
-
116
-
117
-
118
-
119
-
120
-
121
-
122
-
123
-
124
-
125
-
126
-
127
-
128
-
129
-
130
-
131
-
132
-
133
-
134
-
135
-
136
-
137
-
138
-
139
-
140
-
141
-
142
-
143
-
144
-
145
-
146
-
147
-
148
-
149
-
150
-
151
-
152
-
153
-
154
-
155
-
156
-
157
-
158
-
159
-
160
-
161
-
162
-
163
-
164
-
165
-
166
-
167
-
168
-
169
-
170
-
171
-
172
-
173
-
174
-
175
-
176
-
177
-
178
-
179
-
180
-
181
-
182
-
183
-
184
-
185
-
186
-
187
-
188
-
189
-
190
-
191
-
192
-
 193
193 -
 194
194 -
 195
195 -
 196
196 -
 197
197 -
 198
198 -
 199
199 -
 200
200 -
 201
201 -
 202
202 -
 203
203 -
204
-
205
-
206
-
207
-
208
-
209
-
210
-
211
-
212
-
213
-
214
-
215
-
216
-
217
-
218
-
219
-
220
-
221
-
222
-
223
-
224
-
225
-
226
-
227
-
228
-
229
-
230
-
231
-
232
-
233
-
234
-
235
-
236
-
237
-
238
-
239
-
240
-
241
-
242
 |
 |

EN
Print Quality Problems
197
Cleaning the Density
Sensor
Clean the density sensor after replacing
the imaging drum and when printed
colors are inaccurate.
To clean the density sensor and
erase lamp
1
Open the upper door on the right side
of the printer.
2
On the inside of the door, locate the
density sensor and the density
sensor brush. Use the brush to brush
off toner particles from the density
sensor and the erase lamp. Then
replace the brush.
Note
You can also use a hand wipe to clean
the density sensor. To prevent scratches
on the sensor, do not use any paper
products, such as tissue or paper towels,
to clean the sensor.
3
Close the upper right door.