Canon imagePROGRAF W8400 W8400 User's Guide - Page 336

Setting NetWare Protocol, Configuring the Protocol Using a Web Browser (Remote UI)

Page 336 highlights

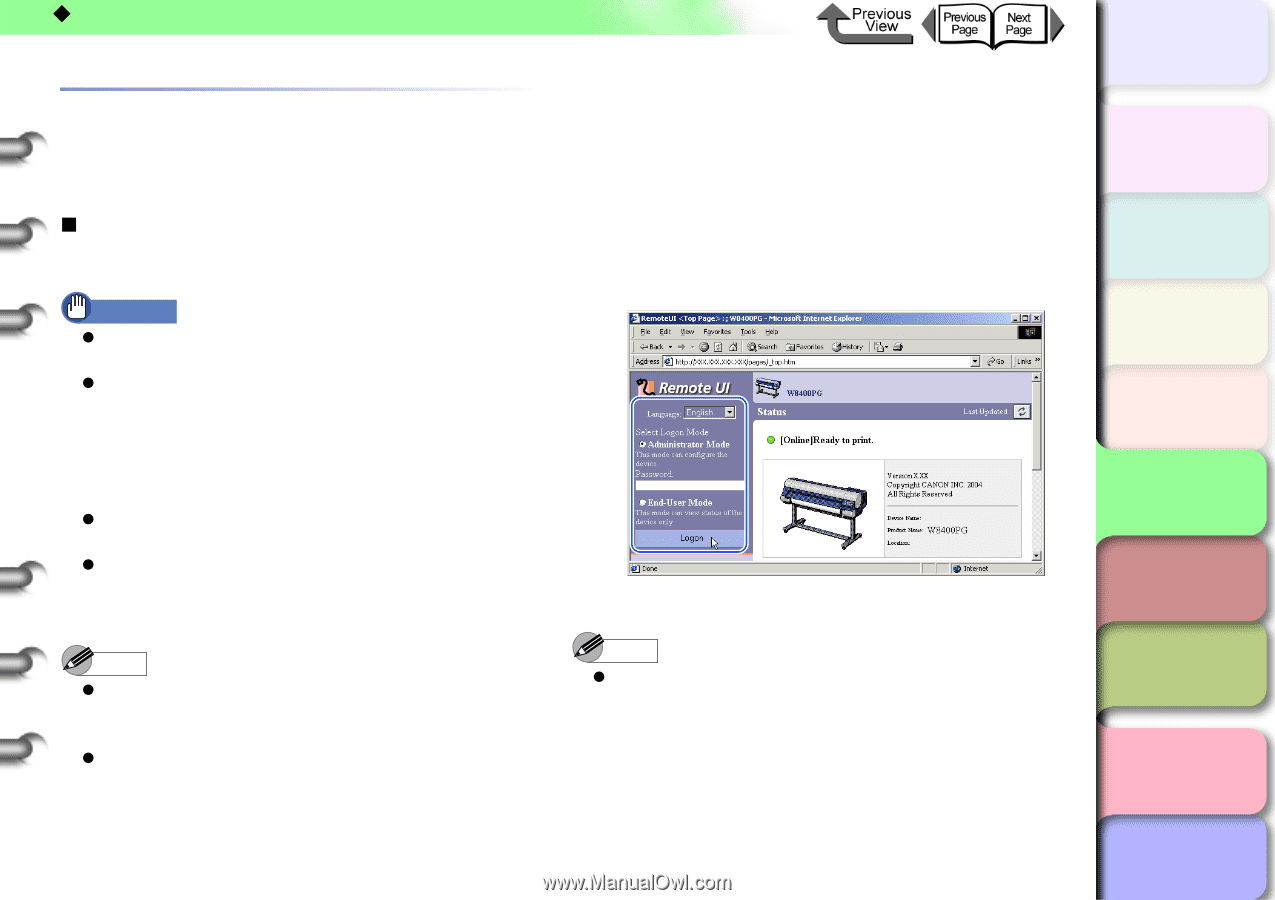
‹ NetWare Settings (Windows) Setting NetWare Protocol The printer protocol settings can be configured from a computer using a web browser (Remote UI). First set the printer IP address. (→ P.5-7) „ Configuring the Protocol Using a Web Browser (Remote UI) Important z You can use Netscape Navigator/Communicator 6.0 or later, or Internet Explorer 5.01 or later for the web browser. z You cannot connect to the printer via a proxy server. In an environment that uses a proxy server, add the printer IP address to Exceptions (addresses that do not use a proxy) in the web browser proxy server settings. (These settings vary depending on the network environment.) z Enable the JavaScript and Cookies settings in the web browser. z If multiple remote UIs are run at the same time, the last setting to be made will be used. It is recommended that you only run one remote UI at a time. 5- 40 Note z When the Remote UI is started using the printer name, make sure that the DNS settings for the DNS environment and board have been set up correctly. z If Remote UI is started and the print history is displayed as RPrinter/NPrinter, the document name and user information cannot be obtained. Consequently, the document name will only be displayed as "unknown", and the user will only be displayed as "RPRINTER/NPRINTER". 1 Start the Web Browser and enter the following URL in the Location or Address box, then press the Enter key. http:// / Sample: http://XXX.XXX.XXX.XXX/ 2 Select Administrator Mode and then click the Logon button. Remote UI starts. Note z If a password has been setup on the printer, enter the password and then press the Logon button. If a password has not been setup, you do not need to enter a password. トTッOPプ Chapter 1 Basic Use Chapter 2 Using Various Media Chapter 3 Printing by Objective Chapter 4 Maintenance Chapter 5 Using the Printer in a Network Environment Chapter 6 Troubleshooting Chapter 7 Operating the Function Menu Contents Index
  • 1
  • 2
  • 3
  • 4
  • 5
  • 6
  • 7
  • 8
  • 9
  • 10
  • 11
  • 12
  • 13
  • 14
  • 15
  • 16
  • 17
  • 18
  • 19
  • 20
  • 21
  • 22
  • 23
  • 24
  • 25
  • 26
  • 27
  • 28
  • 29
  • 30
  • 31
  • 32
  • 33
  • 34
  • 35
  • 36
  • 37
  • 38
  • 39
  • 40
  • 41
  • 42
  • 43
  • 44
  • 45
  • 46
  • 47
  • 48
  • 49
  • 50
  • 51
  • 52
  • 53
  • 54
  • 55
  • 56
  • 57
  • 58
  • 59
  • 60
  • 61
  • 62
  • 63
  • 64
  • 65
  • 66
  • 67
  • 68
  • 69
  • 70
  • 71
  • 72
  • 73
  • 74
  • 75
  • 76
  • 77
  • 78
  • 79
  • 80
  • 81
  • 82
  • 83
  • 84
  • 85
  • 86
  • 87
  • 88
  • 89
  • 90
  • 91
  • 92
  • 93
  • 94
  • 95
  • 96
  • 97
  • 98
  • 99
  • 100
  • 101
  • 102
  • 103
  • 104
  • 105
  • 106
  • 107
  • 108
  • 109
  • 110
  • 111
  • 112
  • 113
  • 114
  • 115
  • 116
  • 117
  • 118
  • 119
  • 120
  • 121
  • 122
  • 123
  • 124
  • 125
  • 126
  • 127
  • 128
  • 129
  • 130
  • 131
  • 132
  • 133
  • 134
  • 135
  • 136
  • 137
  • 138
  • 139
  • 140
  • 141
  • 142
  • 143
  • 144
  • 145
  • 146
  • 147
  • 148
  • 149
  • 150
  • 151
  • 152
  • 153
  • 154
  • 155
  • 156
  • 157
  • 158
  • 159
  • 160
  • 161
  • 162
  • 163
  • 164
  • 165
  • 166
  • 167
  • 168
  • 169
  • 170
  • 171
  • 172
  • 173
  • 174
  • 175
  • 176
  • 177
  • 178
  • 179
  • 180
  • 181
  • 182
  • 183
  • 184
  • 185
  • 186
  • 187
  • 188
  • 189
  • 190
  • 191
  • 192
  • 193
  • 194
  • 195
  • 196
  • 197
  • 198
  • 199
  • 200
  • 201
  • 202
  • 203
  • 204
  • 205
  • 206
  • 207
  • 208
  • 209
  • 210
  • 211
  • 212
  • 213
  • 214
  • 215
  • 216
  • 217
  • 218
  • 219
  • 220
  • 221
  • 222
  • 223
  • 224
  • 225
  • 226
  • 227
  • 228
  • 229
  • 230
  • 231
  • 232
  • 233
  • 234
  • 235
  • 236
  • 237
  • 238
  • 239
  • 240
  • 241
  • 242
  • 243
  • 244
  • 245
  • 246
  • 247
  • 248
  • 249
  • 250
  • 251
  • 252
  • 253
  • 254
  • 255
  • 256
  • 257
  • 258
  • 259
  • 260
  • 261
  • 262
  • 263
  • 264
  • 265
  • 266
  • 267
  • 268
  • 269
  • 270
  • 271
  • 272
  • 273
  • 274
  • 275
  • 276
  • 277
  • 278
  • 279
  • 280
  • 281
  • 282
  • 283
  • 284
  • 285
  • 286
  • 287
  • 288
  • 289
  • 290
  • 291
  • 292
  • 293
  • 294
  • 295
  • 296
  • 297
  • 298
  • 299
  • 300
  • 301
  • 302
  • 303
  • 304
  • 305
  • 306
  • 307
  • 308
  • 309
  • 310
  • 311
  • 312
  • 313
  • 314
  • 315
  • 316
  • 317
  • 318
  • 319
  • 320
  • 321
  • 322
  • 323
  • 324
  • 325
  • 326
  • 327
  • 328
  • 329
  • 330
  • 331
  • 332
  • 333
  • 334
  • 335
  • 336
  • 337
  • 338
  • 339
  • 340
  • 341
  • 342
  • 343
  • 344
  • 345
  • 346
  • 347
  • 348
  • 349
  • 350
  • 351
  • 352
  • 353
  • 354
  • 355
  • 356
  • 357
  • 358
  • 359
  • 360
  • 361
  • 362
  • 363
  • 364
  • 365
  • 366
  • 367
  • 368
  • 369
  • 370
  • 371
  • 372
  • 373
  • 374
  • 375
  • 376
  • 377
  • 378
  • 379
  • 380
  • 381
  • 382
  • 383
  • 384
  • 385
  • 386
  • 387
  • 388
  • 389
  • 390
  • 391
  • 392
  • 393
  • 394
  • 395
  • 396
  • 397
  • 398
  • 399
  • 400
  • 401
  • 402
  • 403
  • 404
  • 405
  • 406
  • 407
  • 408
  • 409
  • 410
  • 411
  • 412
  • 413
  • 414
  • 415
  • 416
  • 417
  • 418
  • 419
  • 420
  • 421

5- 40
NetWare Settings (Windows)
Chapter 3
Printing by Objective
Chapter 4
Maintenance
Chapter 5
Using the Printer
in a Network
Environment
Chapter 6
Troubleshooting
Chapter 7
Operating the
Function Menu
Index
TOP
Contents
Chapter 2
Using Various Media
Chapter 1
Basic Use
Setting NetWare Protocol
The printer protocol settings can be configured from a
computer using a web browser (Remote UI). First set the
printer IP address. (
P.5-7
)
Configuring the Protocol Using a Web
Browser (Remote UI)
Important
You can use Netscape Navigator/Communicator 6.0 or later,
or Internet Explorer 5.01 or later for the web browser.
You cannot connect to the printer via a proxy server. In
an environment that uses a proxy server, add the
printer IP address to
Exceptions
(addresses that do
not use a proxy) in the web browser proxy server
settings. (These settings vary depending on the
network environment.)
Enable the JavaScript and Cookies settings in the web
browser.
If multiple remote UIs are run at the same time, the last
setting to be made will be used. It is recommended
that you only run one remote UI at a time.
Note
When the Remote UI is started using the printer name,
make sure that the DNS settings for the DNS
environment and board have been set up correctly.
If Remote UI is started and the print history is
displayed as RPrinter/NPrinter, the
document name
and
user
information cannot be obtained.
Consequently, the
document name
will only be
displayed as “unknown”, and the
user
will only be
displayed as “RPRINTER/NPRINTER”.
1
Start the Web Browser and enter the
following URL in the
Location
or
Address
box, then press the
Enter
key.
http://
<Printer IP Address or name>
/
Sample:
http://
XXX.XXX.XXX.XXX
/
2
Select
Administrator Mode
and then click
the
Logon
button.
Remote UI starts.
Note
If a password has been setup on the printer, enter the
password and then press the
Logon
button. If a
password has not been setup, you do not need to
enter a password.