HP Xw6600 HP xw6600 Workstation Service and Technical Reference Guide - Page 108
Installing the processor heatsink, System processor, Removing a system processor
 |
UPC - 883585731121
View all HP Xw6600 manuals
Add to My Manuals
Save this manual to your list of manuals |
Page 108 highlights
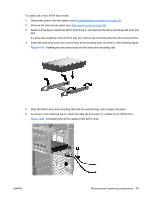
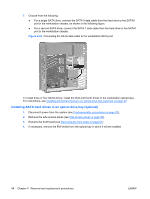
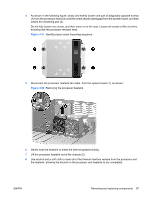
Installing the processor heatsink To install a heatsink: 1. Disconnect power from the system (see Predisassembly procedures on page 52). 2. Remove the side access panel (see Side access panel on page 58). 3. Remove the processor heatsink (see Removing the processor heatsink on page 96). 4. Do one of the following: ● If you are reusing the original heatsink, apply thermal grease to the center of the processor top surface. ● If you are using a new processor heatsink, do not apply thermal grease to the processor because the new heat sink has grease already applied to the heatsink surface. Instead, remove the thermal grease protective liner from the bottom of the new heatsink before installing it. 5. Carefully seat the processor heatsink onto the system board, ensuring that the heatsink fan is facing toward the front of the workstation. 6. Carefully tighten the four screws a little at a time. Do not fully tighten one screw and move onto the next. If you have a torque-limited drive, tighten the screws to 6 in-lbs. CAUTION: Do not overtighten the heatsink screws. If you overtighten them, you might strip the threads in the system board tray. Do not fully tighten one screw and then move on to the next. Instead, tighten all screws a little at a time, ensuring that the processor remains level. 7. When installation is complete, reinstall the workstation side access panel. System processor This section describes how to remove and install a system processor. Removing a system processor 1. Disconnect power from the system (see Predisassembly procedures on page 52). 2. Remove the side access panel (see Side access panel on page 58). 98 Chapter 4 Removal and replacement procedures ENWW
-
 1
1 -
2
-
3
-
4
-
5
-
6
-
7
-
8
-
9
-
10
-
11
-
12
-
13
-
14
-
15
-
16
-
17
-
18
-
19
-
20
-
21
-
22
-
23
-
24
-
25
-
26
-
27
-
28
-
29
-
30
-
31
-
32
-
33
-
34
-
35
-
36
-
37
-
38
-
39
-
40
-
41
-
42
-
43
-
44
-
45
-
46
-
47
-
48
-
49
-
50
-
51
-
52
-
53
-
54
-
55
-
56
-
57
-
58
-
59
-
60
-
61
-
62
-
63
-
64
-
65
-
66
-
67
-
68
-
69
-
70
-
71
-
72
-
73
-
74
-
75
-
76
-
77
-
78
-
79
-
80
-
81
-
82
-
83
-
84
-
85
-
86
-
87
-
88
-
89
-
90
-
91
-
92
-
93
-
94
-
95
-
96
-
97
-
98
-
99
-
100
-
101
-
102
-
 103
103 -
 104
104 -
 105
105 -
 106
106 -
 107
107 -
 108
108 -
 109
109 -
 110
110 -
 111
111 -
 112
112 -
 113
113 -
114
-
115
-
116
-
117
-
118
-
119
-
120
-
121
-
122
-
123
-
124
-
125
-
126
-
127
-
128
-
129
-
130
-
131
-
132
-
133
-
134
-
135
-
136
-
137
-
138
-
139
-
140
-
141
-
142
-
143
-
144
-
145
-
146
-
147
-
148
-
149
-
150
-
151
-
152
-
153
-
154
-
155
-
156
-
157
-
158
-
159
-
160
-
161
-
162
-
163
-
164
-
165
-
166
-
167
-
168
-
169
-
170
 |
 |