HP Xw6600 HP xw6600 Workstation Service and Technical Reference Guide - Page 77
Reinstalling and replacing the speaker, Optical drive, Removing an optical drive
 |
UPC - 883585731121
View all HP Xw6600 manuals
Add to My Manuals
Save this manual to your list of manuals |
Page 77 highlights
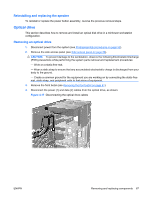
Reinstalling and replacing the speaker To reinstall or replace the power button assembly, reverse the previous removal steps. Optical drive This section describes how to remove and install an optical disk drive in a minitower workstation configuration. Removing an optical drive 1. Disconnect power from the system (see Predisassembly procedures on page 52). 2. Remove the side access panel (see Side access panel on page 58). CAUTION: To prevent damage to the workstation, observe the following Electrostatic Discharge (ESD) precautions while performing the system parts removal and replacement procedures: - Work on a static-free mat. - Wear a static strap to ensure that any accumulated electrostatic charge is discharged from your body to the ground. - Create a common ground for the equipment you are working on by connecting the static-free mat, static strap, and peripheral units to that piece of equipment. 3. Remove the front bezel (see Removing the front bezel on page 61). 4. Disconnect the power (1) and data (2) cables from the optical drive, as shown: Figure 4-17 Disconnecting the optical drive cables ENWW Removing and replacing components 67
-
 1
1 -
2
-
3
-
4
-
5
-
6
-
7
-
8
-
9
-
10
-
11
-
12
-
13
-
14
-
15
-
16
-
17
-
18
-
19
-
20
-
21
-
22
-
23
-
24
-
25
-
26
-
27
-
28
-
29
-
30
-
31
-
32
-
33
-
34
-
35
-
36
-
37
-
38
-
39
-
40
-
41
-
42
-
43
-
44
-
45
-
46
-
47
-
48
-
49
-
50
-
51
-
52
-
53
-
54
-
55
-
56
-
57
-
58
-
59
-
60
-
61
-
62
-
63
-
64
-
65
-
66
-
67
-
68
-
69
-
70
-
71
-
 72
72 -
 73
73 -
 74
74 -
 75
75 -
 76
76 -
 77
77 -
 78
78 -
 79
79 -
 80
80 -
 81
81 -
 82
82 -
83
-
84
-
85
-
86
-
87
-
88
-
89
-
90
-
91
-
92
-
93
-
94
-
95
-
96
-
97
-
98
-
99
-
100
-
101
-
102
-
103
-
104
-
105
-
106
-
107
-
108
-
109
-
110
-
111
-
112
-
113
-
114
-
115
-
116
-
117
-
118
-
119
-
120
-
121
-
122
-
123
-
124
-
125
-
126
-
127
-
128
-
129
-
130
-
131
-
132
-
133
-
134
-
135
-
136
-
137
-
138
-
139
-
140
-
141
-
142
-
143
-
144
-
145
-
146
-
147
-
148
-
149
-
150
-
151
-
152
-
153
-
154
-
155
-
156
-
157
-
158
-
159
-
160
-
161
-
162
-
163
-
164
-
165
-
166
-
167
-
168
-
169
-
170
 |
 |