HP Xw6600 HP xw6600 Workstation Service and Technical Reference Guide - Page 79
Diskette drive (optional), Removing a diskette drive - workstation bios
 |
UPC - 883585731121
View all HP Xw6600 manuals
Add to My Manuals
Save this manual to your list of manuals |
Page 79 highlights
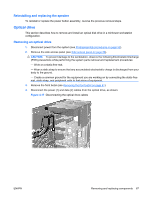
6. Insert the drive into the respective optical drive bay until it locks into place, as shown: Figure 4-19 Installing the optical drive CAUTION: Verify that the optical drive is secure in the workstation chassis by pulling on the drive to see if it can become easily disengaged. Failure to properly secure the drive can damage the drive when moving the workstation. 7. Reinstall the front bezel. 8. Connect the power and data cables to the drive and system board. NOTE: Modes can be selected in the workstation BIOS that affect both optical and hard drives in the workstation. The HP xw6600 Workstation is set to the RAID+AHCI MODE in BIOS at the time of shipment. The following constraints apply when the Configuration Mode for the workstation is set to: IDE Mode-Only SATA ports 0 and 2 are functional for any SATA devices. RAID drives are not accessible in this mode. AHCI Mode-All SATA ports are functional for any SATA devices. RAID drives are not accessible in this mode. RAID + AHCI Mode-System BIOS cannot be updated from the optical drive. Also note that in this mode the option ROM might not allow certain DOS drive letter access at this time. 9. Reinstall the side access panel. Diskette drive (optional) This section describes how to remove and install a diskette drive. Removing a diskette drive 1. Disconnect power from the system (see Predisassembly procedures on page 52). 2. Remove the side access panel (see Side access panel on page 58). 3. Remove the front bezel (see Removing the front bezel on page 61). ENWW Removing and replacing components 69
-
 1
1 -
2
-
3
-
4
-
5
-
6
-
7
-
8
-
9
-
10
-
11
-
12
-
13
-
14
-
15
-
16
-
17
-
18
-
19
-
20
-
21
-
22
-
23
-
24
-
25
-
26
-
27
-
28
-
29
-
30
-
31
-
32
-
33
-
34
-
35
-
36
-
37
-
38
-
39
-
40
-
41
-
42
-
43
-
44
-
45
-
46
-
47
-
48
-
49
-
50
-
51
-
52
-
53
-
54
-
55
-
56
-
57
-
58
-
59
-
60
-
61
-
62
-
63
-
64
-
65
-
66
-
67
-
68
-
69
-
70
-
71
-
72
-
73
-
 74
74 -
 75
75 -
 76
76 -
 77
77 -
 78
78 -
 79
79 -
 80
80 -
 81
81 -
 82
82 -
 83
83 -
 84
84 -
85
-
86
-
87
-
88
-
89
-
90
-
91
-
92
-
93
-
94
-
95
-
96
-
97
-
98
-
99
-
100
-
101
-
102
-
103
-
104
-
105
-
106
-
107
-
108
-
109
-
110
-
111
-
112
-
113
-
114
-
115
-
116
-
117
-
118
-
119
-
120
-
121
-
122
-
123
-
124
-
125
-
126
-
127
-
128
-
129
-
130
-
131
-
132
-
133
-
134
-
135
-
136
-
137
-
138
-
139
-
140
-
141
-
142
-
143
-
144
-
145
-
146
-
147
-
148
-
149
-
150
-
151
-
152
-
153
-
154
-
155
-
156
-
157
-
158
-
159
-
160
-
161
-
162
-
163
-
164
-
165
-
166
-
167
-
168
-
169
-
170
 |
 |
