HP Xw6600 HP xw6600 Workstation Service and Technical Reference Guide - Page 81
Installing a diskette drive, System speaker, Removing the system speaker
 |
UPC - 883585731121
View all HP Xw6600 manuals
Add to My Manuals
Save this manual to your list of manuals |
Page 81 highlights
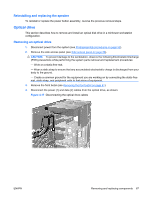
Installing a diskette drive To install a diskette drive: 1. Disconnect power from the workstation (see Predisassembly procedures on page 52). 2. Remove the side access panel (see Side access panel on page 58). 3. Remove the front bezel (see Removing the front bezel on page 61). 4. If present, remove the diskette bay blank from the front bezel. 5. Remove the EMI filler from the diskette bay. 6. Slide the diskette drive into the bay until it locks solidly into place. 7. Connect the diskette drive power and data cables. 8. Reinstall the front bezel and side access panel. 9. Connect power to the workstation. System speaker This section describes how to remove and reinstall or replace the system speaker. Removing the system speaker To remove the system speaker: 1. Disconnect power from the system (see Predisassembly procedures on page 52). 2. Remove the side access panel (see Side access panel on page 58). 3. To provide access to the speaker, remove the optional front chassis PCI card guide and fan, if installed. 4. Detach the speaker cable from the in-line control panel cable, if you have not already done so. 5. Slide the speaker away from the three flanges and remove it from the chassis, as shown: Figure 4-22 Removing the workstation speaker 6. To replace the speaker, reverse the previous steps. ENWW Removing and replacing components 71
-
 1
1 -
2
-
3
-
4
-
5
-
6
-
7
-
8
-
9
-
10
-
11
-
12
-
13
-
14
-
15
-
16
-
17
-
18
-
19
-
20
-
21
-
22
-
23
-
24
-
25
-
26
-
27
-
28
-
29
-
30
-
31
-
32
-
33
-
34
-
35
-
36
-
37
-
38
-
39
-
40
-
41
-
42
-
43
-
44
-
45
-
46
-
47
-
48
-
49
-
50
-
51
-
52
-
53
-
54
-
55
-
56
-
57
-
58
-
59
-
60
-
61
-
62
-
63
-
64
-
65
-
66
-
67
-
68
-
69
-
70
-
71
-
72
-
73
-
74
-
75
-
 76
76 -
 77
77 -
 78
78 -
 79
79 -
 80
80 -
 81
81 -
 82
82 -
 83
83 -
 84
84 -
 85
85 -
 86
86 -
87
-
88
-
89
-
90
-
91
-
92
-
93
-
94
-
95
-
96
-
97
-
98
-
99
-
100
-
101
-
102
-
103
-
104
-
105
-
106
-
107
-
108
-
109
-
110
-
111
-
112
-
113
-
114
-
115
-
116
-
117
-
118
-
119
-
120
-
121
-
122
-
123
-
124
-
125
-
126
-
127
-
128
-
129
-
130
-
131
-
132
-
133
-
134
-
135
-
136
-
137
-
138
-
139
-
140
-
141
-
142
-
143
-
144
-
145
-
146
-
147
-
148
-
149
-
150
-
151
-
152
-
153
-
154
-
155
-
156
-
157
-
158
-
159
-
160
-
161
-
162
-
163
-
164
-
165
-
166
-
167
-
168
-
169
-
170
 |
 |