Netgear GS724Tv4 Software Administration Manual - Page 142
AS, 802.1AS Configuration, To con the global 802.1AS settings on the switch, Switching
 |
View all Netgear GS724Tv4 manuals
Add to My Manuals
Save this manual to your list of manuals |
Page 142 highlights
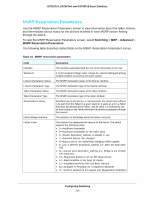
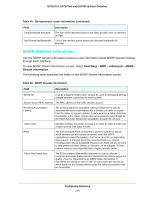
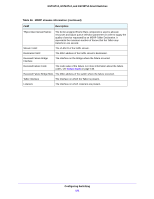
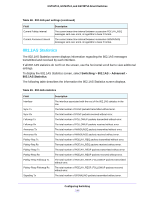
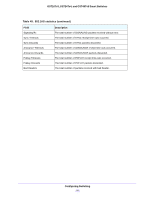
GS716Tv3, GS724Tv4, and GS748Tv5 Smart Switches 802.1AS1 The IEEE 802.1AS standard specifies the protocol and procedures used to ensure that the QoS requirements are guaranteed for time-sensitive applications, such as audio and video. The IEEE 1588 Precision Time Protocol (PTP) forms the basis of the IEEE 802.1AS standard. PTP specifies a precise clock synchronization protocol that relies on time-stamped packets. The PTP protocol is applicable to distributed systems consisting of one or more nodes communicating over some set of communication media. The distribution of synchronous time information is performed in a hierarchical manner with a grandmaster clock at the root of the hierarchy. The grandmaster provides a common and precise time reference for one or more directly-attached slave devices by periodically exchanging timing information. In other words, all slave devices synchronize their clocks with the grandmaster clock. The slave devices can, in-turn, act as master devices for further hierarchical layers of slave devices. From the 802.1AS link, you can access the following screens: • 802.1AS Configuration • 802.1AS Port Settings • 802.1AS Statistics 802.1AS Configuration Use the 802.1AS Configuration screen to enable the 802.1AS mode on the switch and configure local clock priorities. The 802.1AS feature calculates the time delay between devices on a given link and maintains an accurate view of a network clock.The screen also displays various global 802.1AS information. To configure the global 802.1AS settings on the switch: 1. Select Switching > 802.1AS > Basic > 802.1AS Configuration. 2. Next to 802.1AS status, select Enable. 3. In the Local Clock Priority1 field, specify the Priority1 value of the local clock (this time-aware bridge). 4. In the Local Clock Priority2 field, specify the Priority2 value of the local clock (this time-aware bridge). 5. Click the Apply button. 1. The 802.1AS feature is available only with a valid license. To activate this feature, you must purchase a license. Configuring Switching 142
-
 1
1 -
2
-
3
-
4
-
5
-
6
-
7
-
8
-
9
-
10
-
11
-
12
-
13
-
14
-
15
-
16
-
17
-
18
-
19
-
20
-
21
-
22
-
23
-
24
-
25
-
26
-
27
-
28
-
29
-
30
-
31
-
32
-
33
-
34
-
35
-
36
-
37
-
38
-
39
-
40
-
41
-
42
-
43
-
44
-
45
-
46
-
47
-
48
-
49
-
50
-
51
-
52
-
53
-
54
-
55
-
56
-
57
-
58
-
59
-
60
-
61
-
62
-
63
-
64
-
65
-
66
-
67
-
68
-
69
-
70
-
71
-
72
-
73
-
74
-
75
-
76
-
77
-
78
-
79
-
80
-
81
-
82
-
83
-
84
-
85
-
86
-
87
-
88
-
89
-
90
-
91
-
92
-
93
-
94
-
95
-
96
-
97
-
98
-
99
-
100
-
101
-
102
-
103
-
104
-
105
-
106
-
107
-
108
-
109
-
110
-
111
-
112
-
113
-
114
-
115
-
116
-
117
-
118
-
119
-
120
-
121
-
122
-
123
-
124
-
125
-
126
-
127
-
128
-
129
-
130
-
131
-
132
-
133
-
134
-
135
-
136
-
 137
137 -
 138
138 -
 139
139 -
 140
140 -
 141
141 -
 142
142 -
 143
143 -
 144
144 -
 145
145 -
 146
146 -
 147
147 -
148
-
149
-
150
-
151
-
152
-
153
-
154
-
155
-
156
-
157
-
158
-
159
-
160
-
161
-
162
-
163
-
164
-
165
-
166
-
167
-
168
-
169
-
170
-
171
-
172
-
173
-
174
-
175
-
176
-
177
-
178
-
179
-
180
-
181
-
182
-
183
-
184
-
185
-
186
-
187
-
188
-
189
-
190
-
191
-
192
-
193
-
194
-
195
-
196
-
197
-
198
-
199
-
200
-
201
-
202
-
203
-
204
-
205
-
206
-
207
-
208
-
209
-
210
-
211
-
212
-
213
-
214
-
215
-
216
-
217
-
218
-
219
-
220
-
221
-
222
-
223
-
224
-
225
-
226
-
227
-
228
-
229
-
230
-
231
-
232
-
233
-
234
-
235
-
236
-
237
-
238
-
239
-
240
-
241
-
242
-
243
-
244
-
245
-
246
-
247
-
248
-
249
-
250
-
251
-
252
-
253
-
254
-
255
-
256
-
257
-
258
-
259
-
260
-
261
-
262
-
263
-
264
-
265
-
266
-
267
-
268
-
269
-
270
-
271
-
272
-
273
-
274
-
275
-
276
-
277
-
278
-
279
-
280
-
281
-
282
-
283
-
284
-
285
-
286
-
287
-
288
-
289
-
290
 |
 |