Netgear GS724Tv4 Software Administration Manual - Page 272
DiffServ Configuration Example, Destination L4 Port
 |
View all Netgear GS724Tv4 manuals
Add to My Manuals
Save this manual to your list of manuals |
Page 272 highlights
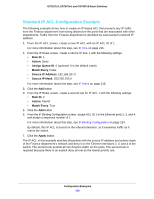
GS716Tv3, GS724Tv4, and GS748Tv5 Smart Switches DiffServ Configuration Example To create a DiffServ Class/Policy and attach it to a switch interface, follow these steps: 1. From the QoS Class Configuration screen, create a new class with the following settings: • Class Name. Class1 • Class Type. All For more information about this step, see Class Configuration on page 169. 2. Click the Class1 hyperlink to view the DiffServ Class Configuration screen for this class. 3. Configure the following settings for Class1: • Protocol Type. UDP • Source IP Address. 192.12.1.0 • Source Mask. 255.255.255.0 • Source L4 Port. Other, and enter 4567 as the source port value • Destination IP Address. 192.12.2.0 • Destination Mask. 255.255.255.0 • Destination L4 Port. Other, and enter 4568 as the destination port value For more information about this step, see Class Configuration on page 169. 4. Click the Apply button. 5. From the Policy Configuration screen, create a new policy with the following settings: • Policy Selector. Policy1 • Member Class. Class1 For more information about this step, see Policy Configuration on page 173. 6. Click the Add button to add the new policy. 7. Click the Policy1 hyperlink to view the Policy Class Configuration screen for this policy. 8. Configure the Policy attributes as follows: • Assign Queue. 3 • Policy Attribute. Simple Policy • Color Mode. Color Blind • Committed Rate. 1000000 Kbps • Committed Burst Size. 128 KB • Confirm Action. Send • Violate Action. Drop For more information about this step, see Policy Configuration on page 173. Configuration Examples 272
-
 1
1 -
2
-
3
-
4
-
5
-
6
-
7
-
8
-
9
-
10
-
11
-
12
-
13
-
14
-
15
-
16
-
17
-
18
-
19
-
20
-
21
-
22
-
23
-
24
-
25
-
26
-
27
-
28
-
29
-
30
-
31
-
32
-
33
-
34
-
35
-
36
-
37
-
38
-
39
-
40
-
41
-
42
-
43
-
44
-
45
-
46
-
47
-
48
-
49
-
50
-
51
-
52
-
53
-
54
-
55
-
56
-
57
-
58
-
59
-
60
-
61
-
62
-
63
-
64
-
65
-
66
-
67
-
68
-
69
-
70
-
71
-
72
-
73
-
74
-
75
-
76
-
77
-
78
-
79
-
80
-
81
-
82
-
83
-
84
-
85
-
86
-
87
-
88
-
89
-
90
-
91
-
92
-
93
-
94
-
95
-
96
-
97
-
98
-
99
-
100
-
101
-
102
-
103
-
104
-
105
-
106
-
107
-
108
-
109
-
110
-
111
-
112
-
113
-
114
-
115
-
116
-
117
-
118
-
119
-
120
-
121
-
122
-
123
-
124
-
125
-
126
-
127
-
128
-
129
-
130
-
131
-
132
-
133
-
134
-
135
-
136
-
137
-
138
-
139
-
140
-
141
-
142
-
143
-
144
-
145
-
146
-
147
-
148
-
149
-
150
-
151
-
152
-
153
-
154
-
155
-
156
-
157
-
158
-
159
-
160
-
161
-
162
-
163
-
164
-
165
-
166
-
167
-
168
-
169
-
170
-
171
-
172
-
173
-
174
-
175
-
176
-
177
-
178
-
179
-
180
-
181
-
182
-
183
-
184
-
185
-
186
-
187
-
188
-
189
-
190
-
191
-
192
-
193
-
194
-
195
-
196
-
197
-
198
-
199
-
200
-
201
-
202
-
203
-
204
-
205
-
206
-
207
-
208
-
209
-
210
-
211
-
212
-
213
-
214
-
215
-
216
-
217
-
218
-
219
-
220
-
221
-
222
-
223
-
224
-
225
-
226
-
227
-
228
-
229
-
230
-
231
-
232
-
233
-
234
-
235
-
236
-
237
-
238
-
239
-
240
-
241
-
242
-
243
-
244
-
245
-
246
-
247
-
248
-
249
-
250
-
251
-
252
-
253
-
254
-
255
-
256
-
257
-
258
-
259
-
260
-
261
-
262
-
263
-
264
-
265
-
266
-
 267
267 -
 268
268 -
 269
269 -
 270
270 -
 271
271 -
 272
272 -
 273
273 -
 274
274 -
 275
275 -
 276
276 -
 277
277 -
278
-
279
-
280
-
281
-
282
-
283
-
284
-
285
-
286
-
287
-
288
-
289
-
290
 |
 |