Netgear GS724Tv4 Software Administration Manual - Page 81
Ports, Port Configuration, Admin Mode - trunk port
 |
View all Netgear GS724Tv4 manuals
Add to My Manuals
Save this manual to your list of manuals |
Page 81 highlights
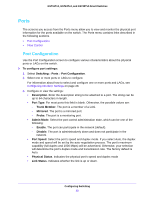
GS716Tv3, GS724Tv4, and GS748Tv5 Smart Switches Ports The screens you access from the Ports menu allow you to view and monitor the physical port information for the ports available on the switch. The Ports menu contains links described in the following sections. • Port Configuration • Flow Control Port Configuration Use the Port Configuration screen to configure various characteristics about the physical ports or LAGs on the switch. To configure port settings: 1. Select Switching > Ports > Port Configuration. 2. Select one or more ports or LAGs to configure. For information about how to select and configure one or more ports and LAGs, see Configuring Interface Settings on page 28. 3. Configure or view the settings: • Description. Enter the description string to be attached to a port. The string can be up to 64 characters in length. • Port Type. For most ports this field is blank. Otherwise, the possible values are: - Trunk Member. The port is a member of a LAG. - Mirrored. The port is a mirrored port. - Probe. The port is a monitoring port. • Admin Mode. Select the port control administration state, which can be one of the following: - Enable. The port can participate in the network (default). - Disable. The port is administratively down and does not participate in the network. • Port Speed. Select the port's speed and duplex mode. If you select Auto, the duplex mode and speed will be set by the auto-negotiation process. The port's maximum capability (full duplex and 1000 Mbps) will be advertised. Otherwise, your selection will determine the port's duplex mode and transmission rate. The factory default is Auto. • Physical Status. Indicates the physical port's speed and duplex mode • Link Status. Indicates whether the link is up or down. Configuring Switching 81
-
 1
1 -
2
-
3
-
4
-
5
-
6
-
7
-
8
-
9
-
10
-
11
-
12
-
13
-
14
-
15
-
16
-
17
-
18
-
19
-
20
-
21
-
22
-
23
-
24
-
25
-
26
-
27
-
28
-
29
-
30
-
31
-
32
-
33
-
34
-
35
-
36
-
37
-
38
-
39
-
40
-
41
-
42
-
43
-
44
-
45
-
46
-
47
-
48
-
49
-
50
-
51
-
52
-
53
-
54
-
55
-
56
-
57
-
58
-
59
-
60
-
61
-
62
-
63
-
64
-
65
-
66
-
67
-
68
-
69
-
70
-
71
-
72
-
73
-
74
-
75
-
 76
76 -
 77
77 -
 78
78 -
 79
79 -
 80
80 -
 81
81 -
 82
82 -
 83
83 -
 84
84 -
 85
85 -
 86
86 -
87
-
88
-
89
-
90
-
91
-
92
-
93
-
94
-
95
-
96
-
97
-
98
-
99
-
100
-
101
-
102
-
103
-
104
-
105
-
106
-
107
-
108
-
109
-
110
-
111
-
112
-
113
-
114
-
115
-
116
-
117
-
118
-
119
-
120
-
121
-
122
-
123
-
124
-
125
-
126
-
127
-
128
-
129
-
130
-
131
-
132
-
133
-
134
-
135
-
136
-
137
-
138
-
139
-
140
-
141
-
142
-
143
-
144
-
145
-
146
-
147
-
148
-
149
-
150
-
151
-
152
-
153
-
154
-
155
-
156
-
157
-
158
-
159
-
160
-
161
-
162
-
163
-
164
-
165
-
166
-
167
-
168
-
169
-
170
-
171
-
172
-
173
-
174
-
175
-
176
-
177
-
178
-
179
-
180
-
181
-
182
-
183
-
184
-
185
-
186
-
187
-
188
-
189
-
190
-
191
-
192
-
193
-
194
-
195
-
196
-
197
-
198
-
199
-
200
-
201
-
202
-
203
-
204
-
205
-
206
-
207
-
208
-
209
-
210
-
211
-
212
-
213
-
214
-
215
-
216
-
217
-
218
-
219
-
220
-
221
-
222
-
223
-
224
-
225
-
226
-
227
-
228
-
229
-
230
-
231
-
232
-
233
-
234
-
235
-
236
-
237
-
238
-
239
-
240
-
241
-
242
-
243
-
244
-
245
-
246
-
247
-
248
-
249
-
250
-
251
-
252
-
253
-
254
-
255
-
256
-
257
-
258
-
259
-
260
-
261
-
262
-
263
-
264
-
265
-
266
-
267
-
268
-
269
-
270
-
271
-
272
-
273
-
274
-
275
-
276
-
277
-
278
-
279
-
280
-
281
-
282
-
283
-
284
-
285
-
286
-
287
-
288
-
289
-
290
 |
 |