Netgear GS724Tv4 Software Administration Manual - Page 224
IP Binding Configuration, IPv6 DSCP Service, Other, Apply, To delete an IPv6 rule, Delete
 |
View all Netgear GS724Tv4 manuals
Add to My Manuals
Save this manual to your list of manuals |
Page 224 highlights
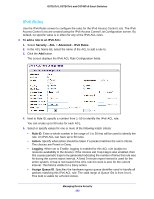
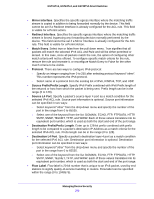
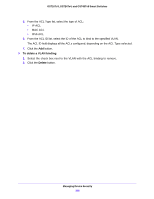
GS716Tv3, GS724Tv4, and GS748Tv5 Smart Switches • IPv6 DSCP Service. Specify the IP DiffServ Code Point (DSCP) field. The DSCP is defined as the high-order six bits of the Service Type octet in the IPv6 header. This is an optional configuration. Enter an integer from 0 to 63. The IPv6 DSCP is selected by possibly selection one of the DSCP keyword from a drop-down menu. If a value is to be selected by specifying its numeric value, then select the Other option in the drop-down menu and a text box will appear where the numeric value of the DSCP can be entered. 6. Click the Apply button. To delete an IPv6 rule: 1. On the IPv6 Rules screen in the ACL Name list, select the name of the ACL that includes the rule to remove. 2. In the IPv6 Rule Table, select the check box of the rule to delete. 3. Click the Delete button. IP Binding Configuration When an ACL is bound to an interface, all the rules that have been defined are applied to the selected interface. Use the IP Binding Configuration screen to assign ACL lists to ACL Priorities and Interfaces. To bind an IP ACL to one or more interfaces: 1. Select Security > ACL > Advanced > IP Binding Configuration. 2. From the ACL ID list, select an existing IP ACL in which you want to add an IP ACL interface binding. The packet filtering direction for ACL is Inbound, which means the IP ACL rules are applied to traffic entering the port. 3. (Optionally) In the Sequence Number field, specify a sequence number to indicate the order of this access list relative to other access lists already assigned to this interface and direction. A low number indicates high precedence order. If a sequence number is already in use for this interface and direction, then the specified access list replaces the currently attached access list using that sequence number. If the sequence number is not specified by the user, then a sequence number that is one greater than the highest sequence number currently in use for this interface and direction will be used. The valid range is 1-4294967295. 4. Click the appropriate orange bar to expose the available ports or LAGs. • To add the selected ACL to a port or LAG, click the box directly below the port or LAG number so that a check mark displays in the box. • To remove the selected ACL from a port or LAG, click the box directly below the port or LAG number to clear the selection. A check mark in the box indicates that the ACL is applied to the interface. 5. Click the Apply button. Managing Device Security 224
-
 1
1 -
2
-
3
-
4
-
5
-
6
-
7
-
8
-
9
-
10
-
11
-
12
-
13
-
14
-
15
-
16
-
17
-
18
-
19
-
20
-
21
-
22
-
23
-
24
-
25
-
26
-
27
-
28
-
29
-
30
-
31
-
32
-
33
-
34
-
35
-
36
-
37
-
38
-
39
-
40
-
41
-
42
-
43
-
44
-
45
-
46
-
47
-
48
-
49
-
50
-
51
-
52
-
53
-
54
-
55
-
56
-
57
-
58
-
59
-
60
-
61
-
62
-
63
-
64
-
65
-
66
-
67
-
68
-
69
-
70
-
71
-
72
-
73
-
74
-
75
-
76
-
77
-
78
-
79
-
80
-
81
-
82
-
83
-
84
-
85
-
86
-
87
-
88
-
89
-
90
-
91
-
92
-
93
-
94
-
95
-
96
-
97
-
98
-
99
-
100
-
101
-
102
-
103
-
104
-
105
-
106
-
107
-
108
-
109
-
110
-
111
-
112
-
113
-
114
-
115
-
116
-
117
-
118
-
119
-
120
-
121
-
122
-
123
-
124
-
125
-
126
-
127
-
128
-
129
-
130
-
131
-
132
-
133
-
134
-
135
-
136
-
137
-
138
-
139
-
140
-
141
-
142
-
143
-
144
-
145
-
146
-
147
-
148
-
149
-
150
-
151
-
152
-
153
-
154
-
155
-
156
-
157
-
158
-
159
-
160
-
161
-
162
-
163
-
164
-
165
-
166
-
167
-
168
-
169
-
170
-
171
-
172
-
173
-
174
-
175
-
176
-
177
-
178
-
179
-
180
-
181
-
182
-
183
-
184
-
185
-
186
-
187
-
188
-
189
-
190
-
191
-
192
-
193
-
194
-
195
-
196
-
197
-
198
-
199
-
200
-
201
-
202
-
203
-
204
-
205
-
206
-
207
-
208
-
209
-
210
-
211
-
212
-
213
-
214
-
215
-
216
-
217
-
218
-
 219
219 -
 220
220 -
 221
221 -
 222
222 -
 223
223 -
 224
224 -
 225
225 -
 226
226 -
 227
227 -
 228
228 -
 229
229 -
230
-
231
-
232
-
233
-
234
-
235
-
236
-
237
-
238
-
239
-
240
-
241
-
242
-
243
-
244
-
245
-
246
-
247
-
248
-
249
-
250
-
251
-
252
-
253
-
254
-
255
-
256
-
257
-
258
-
259
-
260
-
261
-
262
-
263
-
264
-
265
-
266
-
267
-
268
-
269
-
270
-
271
-
272
-
273
-
274
-
275
-
276
-
277
-
278
-
279
-
280
-
281
-
282
-
283
-
284
-
285
-
286
-
287
-
288
-
289
-
290
 |
 |