Netgear GS724Tv4 Software Administration Manual - Page 249
TFTP File Upload, Start File Transfer
 |
View all Netgear GS724Tv4 manuals
Add to My Manuals
Save this manual to your list of manuals |
Page 249 highlights
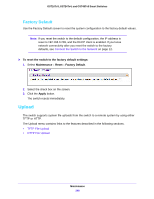
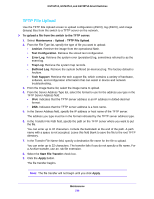
GS716Tv3, GS724Tv4, and GS748Tv5 Smart Switches TFTP File Upload Use the TFTP File Upload screen to upload configuration (ASCII), log (ASCII), and image (binary) files from the switch to a TFTP server on the network. To upload a file from the switch to the TFTP server: 1. Select Maintenance > Upload > TFTP File Upload. 2. From the File Type list, specify the type of file you want to upload: • Archive. Retrieve the image from the operational flash. • Text Configuration. Retrieve the stored text configuration. • Error Log. Retrieve the system error (persistent) log, sometimes referred to as the event log. • Trap Log. Retrieve the system trap records. • Buffered Log. Retrieve the system buffered (in-memory) log. The factory default is Archive. • Tech Support. Retrieve the tech support file, which contains a variety of hardware, software, and configuration information that can assist in device and network troubleshooting. 3. From the Image Name list, select the image name to upload. 4. From the Server Address Type list, select the format to use for the address you type in the TFTP Server Address field: • IPv4. Indicates that the TFTP server address is an IP address in dotted-decimal format. • DNS. Indicates that the TFTP server address is a host name. 5. In the Server Address field, specify the IP address or host name of the TFTP server. The address you type must be in the format indicated by the TFTP server address type. 6. In the Transfer File Path field, specify the path on the TFTP server where you want to put the file. You can enter up to 32 characters. Include the backslash at the end of the path. A path name with a space is not accepted. Leave this field blank to save the file to the root TFTP directory. 7. In the Transfer File Name field, specify a destination file name for the file to upload. You can enter up to 32 characters. The transfer fails if you do not specify a file name. For a Archive transfer, use an .stk file extension. 8. Select the Start File Transfer check box. 9. Click the Apply button. The file transfer begins. Note: The file transfer will not begin until you click Apply. Maintenance 249
-
 1
1 -
2
-
3
-
4
-
5
-
6
-
7
-
8
-
9
-
10
-
11
-
12
-
13
-
14
-
15
-
16
-
17
-
18
-
19
-
20
-
21
-
22
-
23
-
24
-
25
-
26
-
27
-
28
-
29
-
30
-
31
-
32
-
33
-
34
-
35
-
36
-
37
-
38
-
39
-
40
-
41
-
42
-
43
-
44
-
45
-
46
-
47
-
48
-
49
-
50
-
51
-
52
-
53
-
54
-
55
-
56
-
57
-
58
-
59
-
60
-
61
-
62
-
63
-
64
-
65
-
66
-
67
-
68
-
69
-
70
-
71
-
72
-
73
-
74
-
75
-
76
-
77
-
78
-
79
-
80
-
81
-
82
-
83
-
84
-
85
-
86
-
87
-
88
-
89
-
90
-
91
-
92
-
93
-
94
-
95
-
96
-
97
-
98
-
99
-
100
-
101
-
102
-
103
-
104
-
105
-
106
-
107
-
108
-
109
-
110
-
111
-
112
-
113
-
114
-
115
-
116
-
117
-
118
-
119
-
120
-
121
-
122
-
123
-
124
-
125
-
126
-
127
-
128
-
129
-
130
-
131
-
132
-
133
-
134
-
135
-
136
-
137
-
138
-
139
-
140
-
141
-
142
-
143
-
144
-
145
-
146
-
147
-
148
-
149
-
150
-
151
-
152
-
153
-
154
-
155
-
156
-
157
-
158
-
159
-
160
-
161
-
162
-
163
-
164
-
165
-
166
-
167
-
168
-
169
-
170
-
171
-
172
-
173
-
174
-
175
-
176
-
177
-
178
-
179
-
180
-
181
-
182
-
183
-
184
-
185
-
186
-
187
-
188
-
189
-
190
-
191
-
192
-
193
-
194
-
195
-
196
-
197
-
198
-
199
-
200
-
201
-
202
-
203
-
204
-
205
-
206
-
207
-
208
-
209
-
210
-
211
-
212
-
213
-
214
-
215
-
216
-
217
-
218
-
219
-
220
-
221
-
222
-
223
-
224
-
225
-
226
-
227
-
228
-
229
-
230
-
231
-
232
-
233
-
234
-
235
-
236
-
237
-
238
-
239
-
240
-
241
-
242
-
243
-
 244
244 -
 245
245 -
 246
246 -
 247
247 -
 248
248 -
 249
249 -
 250
250 -
 251
251 -
 252
252 -
 253
253 -
 254
254 -
255
-
256
-
257
-
258
-
259
-
260
-
261
-
262
-
263
-
264
-
265
-
266
-
267
-
268
-
269
-
270
-
271
-
272
-
273
-
274
-
275
-
276
-
277
-
278
-
279
-
280
-
281
-
282
-
283
-
284
-
285
-
286
-
287
-
288
-
289
-
290
 |
 |