Netgear GS724Tv4 Software Administration Manual - Page 96
OUI-Based Properties, Port Settings, Auto-VoIP > OUI-based
 |
View all Netgear GS724Tv4 manuals
Add to My Manuals
Save this manual to your list of manuals |
Page 96 highlights
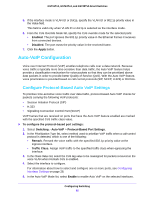
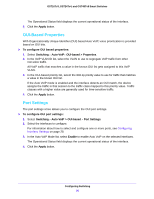
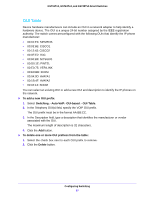
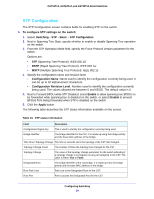
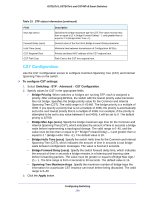
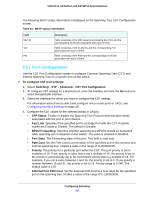
GS716Tv3, GS724Tv4, and GS748Tv5 Smart Switches The Operational Status field displays the current operational status of the interface. 6. Click the Apply button. OUI-Based Properties With Organizationally Unique Identifier (OUI) based Auto VoIP, voice prioritization is provided based on OUI bits. To configure OUI based properties: 1. Select Switching > Auto-VoIP> OUI-based > Properties. 2. In the VoIP VLAN ID list, select the VLAN to use to segregate VoIP traffic from other non-voice traffic. All VoIP traffic that matches a value in the known OUI list gets assigned to this VoIP VLAN. 3. In the OUI-based priority list, select the 802.1p priority value to use for traffic that matches a value in the known OUI list. If the Auto VoIP mode is enabled and the interface detects an OUI match, the device assigns the traffic in that session to the traffic class mapped to this priority value. Traffic classes with a higher value are generally used for time-sensitive traffic. 4. Click the Apply button. Port Settings The port settings scree allows you to configure the OUI port settings. To configure OUI port settings: 1. Select Switching > Auto-VoIP > OUI-based > Port Settings. 2. Select the interfaces to configure. For information about how to select and configure one or more ports, see Configuring Interface Settings on page 28. 3. In the Auto VoIP Mode list, select Enable to enable Auto VoIP on the selected interfaces. The Operational Status field displays the current operational status of the interface. 4. Click the Apply button. Configuring Switching 96
-
 1
1 -
2
-
3
-
4
-
5
-
6
-
7
-
8
-
9
-
10
-
11
-
12
-
13
-
14
-
15
-
16
-
17
-
18
-
19
-
20
-
21
-
22
-
23
-
24
-
25
-
26
-
27
-
28
-
29
-
30
-
31
-
32
-
33
-
34
-
35
-
36
-
37
-
38
-
39
-
40
-
41
-
42
-
43
-
44
-
45
-
46
-
47
-
48
-
49
-
50
-
51
-
52
-
53
-
54
-
55
-
56
-
57
-
58
-
59
-
60
-
61
-
62
-
63
-
64
-
65
-
66
-
67
-
68
-
69
-
70
-
71
-
72
-
73
-
74
-
75
-
76
-
77
-
78
-
79
-
80
-
81
-
82
-
83
-
84
-
85
-
86
-
87
-
88
-
89
-
90
-
 91
91 -
 92
92 -
 93
93 -
 94
94 -
 95
95 -
 96
96 -
 97
97 -
 98
98 -
 99
99 -
 100
100 -
 101
101 -
102
-
103
-
104
-
105
-
106
-
107
-
108
-
109
-
110
-
111
-
112
-
113
-
114
-
115
-
116
-
117
-
118
-
119
-
120
-
121
-
122
-
123
-
124
-
125
-
126
-
127
-
128
-
129
-
130
-
131
-
132
-
133
-
134
-
135
-
136
-
137
-
138
-
139
-
140
-
141
-
142
-
143
-
144
-
145
-
146
-
147
-
148
-
149
-
150
-
151
-
152
-
153
-
154
-
155
-
156
-
157
-
158
-
159
-
160
-
161
-
162
-
163
-
164
-
165
-
166
-
167
-
168
-
169
-
170
-
171
-
172
-
173
-
174
-
175
-
176
-
177
-
178
-
179
-
180
-
181
-
182
-
183
-
184
-
185
-
186
-
187
-
188
-
189
-
190
-
191
-
192
-
193
-
194
-
195
-
196
-
197
-
198
-
199
-
200
-
201
-
202
-
203
-
204
-
205
-
206
-
207
-
208
-
209
-
210
-
211
-
212
-
213
-
214
-
215
-
216
-
217
-
218
-
219
-
220
-
221
-
222
-
223
-
224
-
225
-
226
-
227
-
228
-
229
-
230
-
231
-
232
-
233
-
234
-
235
-
236
-
237
-
238
-
239
-
240
-
241
-
242
-
243
-
244
-
245
-
246
-
247
-
248
-
249
-
250
-
251
-
252
-
253
-
254
-
255
-
256
-
257
-
258
-
259
-
260
-
261
-
262
-
263
-
264
-
265
-
266
-
267
-
268
-
269
-
270
-
271
-
272
-
273
-
274
-
275
-
276
-
277
-
278
-
279
-
280
-
281
-
282
-
283
-
284
-
285
-
286
-
287
-
288
-
289
-
290
 |
 |