Netgear GS724Tv4 Software Administration Manual - Page 39
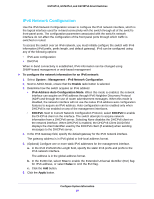
IPv6 Network Configuration
 |
View all Netgear GS724Tv4 manuals
Add to My Manuals
Save this manual to your list of manuals |
Page 39 highlights
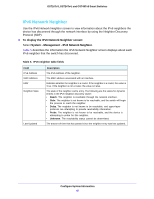
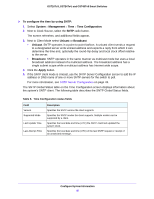
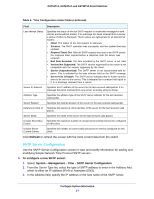
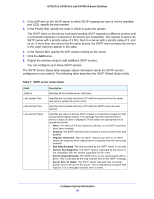
GS716Tv3, GS724Tv4, and GS748Tv5 Smart Switches IPv6 Network Configuration Use the IPv6 Network Configuration screen to configure the IPv6 network interface, which is the logical interface used for in-band connectivity with the switch through all of the switch's front-panel ports. The configuration parameters associated with the switch's network interface do not affect the configuration of the front panel ports through which traffic is switched or routed. To access the switch over an IPv6 network, you must initially configure the switch with IPv6 information (IPv6 prefix, prefix length, and default gateway). IPv6 can be configured using any of the following options: • IPv6 auto configuration • DHCPv6 When in-band connectivity is established, IPv6 information can be changed using SNMP-based management or web-based management To configure the network information for an IPv6 network: 1. Select System > Management > IPv6 Network Configuration. 2. Next to Admin Mode, ensure that the Enable radio button is selected. 3. Determine how the switch acquires an IPv6 address: • IPv6 Address Auto Configuration Mode. When this mode is enabled, the network interface can acquire an IPv6 address through IPv6 Neighbor Discovery Protocol (NDP) and through the use of router advertisement messages. When this mode is disabled, the network interface will not use the native IPv6 address auto configuration features to acquire an IPv6 address. Auto configuration can be enabled only when DHCPv6 is not enabled on any of the management interfaces. • DHCPv6. Next to Current Network Configuration Protocol, select DHCPv6 to enable the DHCPv6 client on the interface. The switch attempts to acquire network information from a DHCPv6 server. Selecting None disables the DHCPv6 client on the network interface. When DHCPv6 is enabled, the DHCPv6 Client DUID field displays the client identifier used by the DHCPv6 client (if enabled) when sending messages to the DHCPv6 server. 4. In the IPv6 Gateway field, specify the default gateway for the IPv6 network interface. The gateway address is in IPv6 global or link-local address format. 5. (Optional) Configure one or more static IPv6 addresses for the management interface. a. In the IPv6 Prefix/Prefix Length field, specify the static IPv6 prefix and prefix to the IPv6 network interface. The address is in the global address format. b. In the EUI64 list, select True to enable the Extended Universal Identifier (EUI) flag for IPv6 address, or select False to omit the EUI flag. c. Click the Add button. 6. Click the Apply button. Configure System Information 39
-
 1
1 -
2
-
3
-
4
-
5
-
6
-
7
-
8
-
9
-
10
-
11
-
12
-
13
-
14
-
15
-
16
-
17
-
18
-
19
-
20
-
21
-
22
-
23
-
24
-
25
-
26
-
27
-
28
-
29
-
30
-
31
-
32
-
33
-
 34
34 -
 35
35 -
 36
36 -
 37
37 -
 38
38 -
 39
39 -
 40
40 -
 41
41 -
 42
42 -
 43
43 -
 44
44 -
45
-
46
-
47
-
48
-
49
-
50
-
51
-
52
-
53
-
54
-
55
-
56
-
57
-
58
-
59
-
60
-
61
-
62
-
63
-
64
-
65
-
66
-
67
-
68
-
69
-
70
-
71
-
72
-
73
-
74
-
75
-
76
-
77
-
78
-
79
-
80
-
81
-
82
-
83
-
84
-
85
-
86
-
87
-
88
-
89
-
90
-
91
-
92
-
93
-
94
-
95
-
96
-
97
-
98
-
99
-
100
-
101
-
102
-
103
-
104
-
105
-
106
-
107
-
108
-
109
-
110
-
111
-
112
-
113
-
114
-
115
-
116
-
117
-
118
-
119
-
120
-
121
-
122
-
123
-
124
-
125
-
126
-
127
-
128
-
129
-
130
-
131
-
132
-
133
-
134
-
135
-
136
-
137
-
138
-
139
-
140
-
141
-
142
-
143
-
144
-
145
-
146
-
147
-
148
-
149
-
150
-
151
-
152
-
153
-
154
-
155
-
156
-
157
-
158
-
159
-
160
-
161
-
162
-
163
-
164
-
165
-
166
-
167
-
168
-
169
-
170
-
171
-
172
-
173
-
174
-
175
-
176
-
177
-
178
-
179
-
180
-
181
-
182
-
183
-
184
-
185
-
186
-
187
-
188
-
189
-
190
-
191
-
192
-
193
-
194
-
195
-
196
-
197
-
198
-
199
-
200
-
201
-
202
-
203
-
204
-
205
-
206
-
207
-
208
-
209
-
210
-
211
-
212
-
213
-
214
-
215
-
216
-
217
-
218
-
219
-
220
-
221
-
222
-
223
-
224
-
225
-
226
-
227
-
228
-
229
-
230
-
231
-
232
-
233
-
234
-
235
-
236
-
237
-
238
-
239
-
240
-
241
-
242
-
243
-
244
-
245
-
246
-
247
-
248
-
249
-
250
-
251
-
252
-
253
-
254
-
255
-
256
-
257
-
258
-
259
-
260
-
261
-
262
-
263
-
264
-
265
-
266
-
267
-
268
-
269
-
270
-
271
-
272
-
273
-
274
-
275
-
276
-
277
-
278
-
279
-
280
-
281
-
282
-
283
-
284
-
285
-
286
-
287
-
288
-
289
-
290
 |
 |