Netgear GS724Tv4 Software Administration Manual - Page 61
LLDP Port Settings, Management IP Address
 |
View all Netgear GS724Tv4 manuals
Add to My Manuals
Save this manual to your list of manuals |
Page 61 highlights
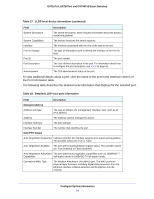
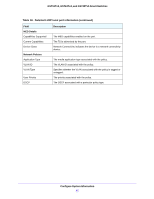
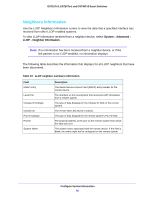
GS716Tv3, GS724Tv4, and GS748Tv5 Smart Switches LLDP Port Settings Use the LLDP Port Settings screen to specify per-interface LLDP settings. To configure LLDP port settings: 1. Select System > LLDP > Advanced > LLDP Port Settings. 2. Select one or more ports to configure. • To configure a single port, select the check box associated with it, or type the port number in the Go To Interface field and click the Go button. • To configure multiple ports with the same settings, select the check box associated with each port to configure. • To configure all ports with the same settings, select the check box in the heading row. 3. Use the lists to configure the LLDP settings for the selected ports: • Admin Status. Select the status for transmitting and receiving LLDP packets: - Tx Only. Enable only transmitting LLDP PDUs on the selected ports. - Rx Only. Enable only receiving LLDP PDUs on the selected ports. - Tx and Rx. Enable both transmitting and receiving LLDP PDUs on the selected ports. - Disabled. Do not transmit or receive LLDP PDUs on the selected ports. • Management IP Address. Choose whether to advertise the management IP address from the interface. The possible field values are: - Stop Advertise. Do not advertise the management IP address from the interface. - Auto Advertise. Advertise the current IP address of the device as the management IP address. • Notification. When notifications are enabled, LLDP interacts with the trap manager to notify subscribers of remote data change statistics. The default is Disabled. • Optional TLV(s). Enable or disable the transmission of optional type-length value (TLV) information from the interface. The TLV information includes the system name, system description, system capabilities, and port description. For information about how to configure the system name, see Management on page 36. For information about how to configure the port description, see Ports on page 81. 4. Click the Apply button. Configure System Information 61
-
 1
1 -
2
-
3
-
4
-
5
-
6
-
7
-
8
-
9
-
10
-
11
-
12
-
13
-
14
-
15
-
16
-
17
-
18
-
19
-
20
-
21
-
22
-
23
-
24
-
25
-
26
-
27
-
28
-
29
-
30
-
31
-
32
-
33
-
34
-
35
-
36
-
37
-
38
-
39
-
40
-
41
-
42
-
43
-
44
-
45
-
46
-
47
-
48
-
49
-
50
-
51
-
52
-
53
-
54
-
55
-
 56
56 -
 57
57 -
 58
58 -
 59
59 -
 60
60 -
 61
61 -
 62
62 -
 63
63 -
 64
64 -
 65
65 -
 66
66 -
67
-
68
-
69
-
70
-
71
-
72
-
73
-
74
-
75
-
76
-
77
-
78
-
79
-
80
-
81
-
82
-
83
-
84
-
85
-
86
-
87
-
88
-
89
-
90
-
91
-
92
-
93
-
94
-
95
-
96
-
97
-
98
-
99
-
100
-
101
-
102
-
103
-
104
-
105
-
106
-
107
-
108
-
109
-
110
-
111
-
112
-
113
-
114
-
115
-
116
-
117
-
118
-
119
-
120
-
121
-
122
-
123
-
124
-
125
-
126
-
127
-
128
-
129
-
130
-
131
-
132
-
133
-
134
-
135
-
136
-
137
-
138
-
139
-
140
-
141
-
142
-
143
-
144
-
145
-
146
-
147
-
148
-
149
-
150
-
151
-
152
-
153
-
154
-
155
-
156
-
157
-
158
-
159
-
160
-
161
-
162
-
163
-
164
-
165
-
166
-
167
-
168
-
169
-
170
-
171
-
172
-
173
-
174
-
175
-
176
-
177
-
178
-
179
-
180
-
181
-
182
-
183
-
184
-
185
-
186
-
187
-
188
-
189
-
190
-
191
-
192
-
193
-
194
-
195
-
196
-
197
-
198
-
199
-
200
-
201
-
202
-
203
-
204
-
205
-
206
-
207
-
208
-
209
-
210
-
211
-
212
-
213
-
214
-
215
-
216
-
217
-
218
-
219
-
220
-
221
-
222
-
223
-
224
-
225
-
226
-
227
-
228
-
229
-
230
-
231
-
232
-
233
-
234
-
235
-
236
-
237
-
238
-
239
-
240
-
241
-
242
-
243
-
244
-
245
-
246
-
247
-
248
-
249
-
250
-
251
-
252
-
253
-
254
-
255
-
256
-
257
-
258
-
259
-
260
-
261
-
262
-
263
-
264
-
265
-
266
-
267
-
268
-
269
-
270
-
271
-
272
-
273
-
274
-
275
-
276
-
277
-
278
-
279
-
280
-
281
-
282
-
283
-
284
-
285
-
286
-
287
-
288
-
289
-
290
 |
 |