Netgear GS724Tv4 Software Administration Manual - Page 88
Basic VLAN Configuration
 |
View all Netgear GS724Tv4 manuals
Add to My Manuals
Save this manual to your list of manuals |
Page 88 highlights
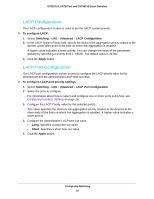
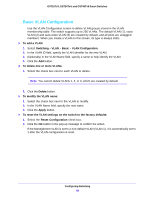
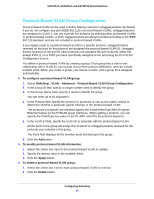
GS716Tv3, GS724Tv4, and GS748Tv5 Smart Switches Basic VLAN Configuration Use the VLAN Configuration screen to define VLAN groups stored in the VLAN membership table. The switch supports up to 256 VLANs. The default VLAN (1), voice VLAN (2) and auto-video VLAN (3) are created by default, and all ports are untagged members. When you create a VLAN on this screen, its type is always static. To add a VLAN: 1. Select Switching > VLAN > Basic > VLAN Configuration. 2. In the VLAN ID field, specify the VLAN identifier for the new VLAN. 3. (Optionally) In the VLAN Name field, specify a name to help identify the VLAN. 4. Click the Add button. To delete one or more VLANs: 1. Select the check box next to each VLAN to delete. Note: You cannot delete VLANs 1, 2, or 3, which are created by default. 2. Click the Delete button. To modify the VLAN name: 1. Select the check box next to the VLAN to modify. 2. In the VLAN Name field, specify the new name. 3. Click the Apply button. To reset the VLAN settings on the switch to the factory defaults: 1. Select the Reset Configuration check box. 2. Click the OK button in the pop-up message to confirm the action. If the Management VLAN is set to a non-default VLAN (VLAN 1), it is automatically set to 1 after the VLAN configuration is reset. Configuring Switching 88
-
 1
1 -
2
-
3
-
4
-
5
-
6
-
7
-
8
-
9
-
10
-
11
-
12
-
13
-
14
-
15
-
16
-
17
-
18
-
19
-
20
-
21
-
22
-
23
-
24
-
25
-
26
-
27
-
28
-
29
-
30
-
31
-
32
-
33
-
34
-
35
-
36
-
37
-
38
-
39
-
40
-
41
-
42
-
43
-
44
-
45
-
46
-
47
-
48
-
49
-
50
-
51
-
52
-
53
-
54
-
55
-
56
-
57
-
58
-
59
-
60
-
61
-
62
-
63
-
64
-
65
-
66
-
67
-
68
-
69
-
70
-
71
-
72
-
73
-
74
-
75
-
76
-
77
-
78
-
79
-
80
-
81
-
82
-
 83
83 -
 84
84 -
 85
85 -
 86
86 -
 87
87 -
 88
88 -
 89
89 -
 90
90 -
 91
91 -
 92
92 -
 93
93 -
94
-
95
-
96
-
97
-
98
-
99
-
100
-
101
-
102
-
103
-
104
-
105
-
106
-
107
-
108
-
109
-
110
-
111
-
112
-
113
-
114
-
115
-
116
-
117
-
118
-
119
-
120
-
121
-
122
-
123
-
124
-
125
-
126
-
127
-
128
-
129
-
130
-
131
-
132
-
133
-
134
-
135
-
136
-
137
-
138
-
139
-
140
-
141
-
142
-
143
-
144
-
145
-
146
-
147
-
148
-
149
-
150
-
151
-
152
-
153
-
154
-
155
-
156
-
157
-
158
-
159
-
160
-
161
-
162
-
163
-
164
-
165
-
166
-
167
-
168
-
169
-
170
-
171
-
172
-
173
-
174
-
175
-
176
-
177
-
178
-
179
-
180
-
181
-
182
-
183
-
184
-
185
-
186
-
187
-
188
-
189
-
190
-
191
-
192
-
193
-
194
-
195
-
196
-
197
-
198
-
199
-
200
-
201
-
202
-
203
-
204
-
205
-
206
-
207
-
208
-
209
-
210
-
211
-
212
-
213
-
214
-
215
-
216
-
217
-
218
-
219
-
220
-
221
-
222
-
223
-
224
-
225
-
226
-
227
-
228
-
229
-
230
-
231
-
232
-
233
-
234
-
235
-
236
-
237
-
238
-
239
-
240
-
241
-
242
-
243
-
244
-
245
-
246
-
247
-
248
-
249
-
250
-
251
-
252
-
253
-
254
-
255
-
256
-
257
-
258
-
259
-
260
-
261
-
262
-
263
-
264
-
265
-
266
-
267
-
268
-
269
-
270
-
271
-
272
-
273
-
274
-
275
-
276
-
277
-
278
-
279
-
280
-
281
-
282
-
283
-
284
-
285
-
286
-
287
-
288
-
289
-
290
 |
 |