Dell PowerEdge 2321DS User Manual - Page 116
Customizing the Explorer Window, Modifying the Selected View on Startup
 |
View all Dell PowerEdge 2321DS manuals
Add to My Manuals
Save this manual to your list of manuals |
Page 116 highlights
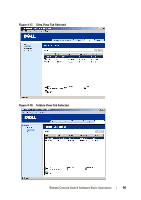
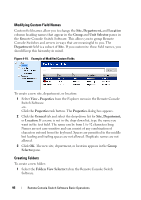
4 Click OK to save the new name. -orClick Cancel to exit without saving changes. Customizing the Explorer Window The Remote Console Switch Software Explorer window can be resized at any time. Each time you launch the application, the Explorer window opens to its default size and location. You can manually resize the window while the application is running, but the information is not saved. The next time Explorer is started, it will come up in its default size and location. A split-pane divider that runs from top to bottom separates the Group Selector pane and the Unit Selector pane. You can move the divider left and right to change the viewing area of the Group Selector pane and the Unit Selector pane. Each time Explorer is started the divider will appear in its default location. Modifying the Selected View on Startup When Default is checked under the Selected view on startup option, the Explorer will determine which view to display. If you have one or more servers defined, the Servers tab will appear by default. If you do not, the Remote Console Switches tab will appear. When Default is unchecked, the Explorer will display the view selected in the drop-down list shown below the check box. The drop-down list contains the following values: Remote Console Switches, Servers, Sites, and Folders. The drop-down list is only enabled when the check box is disabled. To modify the selected view on startup: 1 Select Tools - Options from the Explorer menu in the Remote Console Switch Software. The Options dialog box appears. 2 Select Remote Console Switches, Servers, Sites, or Folders from the dropdown list. 3 Click OK to save the new startup view. -orClick Cancel to exit without saving changes. 99 Remote Console Switch Software Basic Operations
-
 1
1 -
2
-
3
-
4
-
5
-
6
-
7
-
8
-
9
-
10
-
11
-
12
-
13
-
14
-
15
-
16
-
17
-
18
-
19
-
20
-
21
-
22
-
23
-
24
-
25
-
26
-
27
-
28
-
29
-
30
-
31
-
32
-
33
-
34
-
35
-
36
-
37
-
38
-
39
-
40
-
41
-
42
-
43
-
44
-
45
-
46
-
47
-
48
-
49
-
50
-
51
-
52
-
53
-
54
-
55
-
56
-
57
-
58
-
59
-
60
-
61
-
62
-
63
-
64
-
65
-
66
-
67
-
68
-
69
-
70
-
71
-
72
-
73
-
74
-
75
-
76
-
77
-
78
-
79
-
80
-
81
-
82
-
83
-
84
-
85
-
86
-
87
-
88
-
89
-
90
-
91
-
92
-
93
-
94
-
95
-
96
-
97
-
98
-
99
-
100
-
101
-
102
-
103
-
104
-
105
-
106
-
107
-
108
-
109
-
110
-
 111
111 -
 112
112 -
 113
113 -
 114
114 -
 115
115 -
 116
116 -
 117
117 -
 118
118 -
 119
119 -
 120
120 -
 121
121 -
122
-
123
-
124
-
125
-
126
-
127
-
128
-
129
-
130
-
131
-
132
-
133
-
134
-
135
-
136
-
137
-
138
-
139
-
140
-
141
-
142
-
143
-
144
-
145
-
146
-
147
-
148
-
149
-
150
-
151
-
152
-
153
-
154
-
155
-
156
-
157
-
158
-
159
-
160
-
161
-
162
-
163
-
164
-
165
-
166
-
167
-
168
-
169
-
170
-
171
-
172
-
173
-
174
-
175
-
176
-
177
-
178
-
179
-
180
-
181
-
182
-
183
-
184
-
185
-
186
-
187
-
188
-
189
-
190
-
191
-
192
-
193
-
194
-
195
-
196
-
197
-
198
-
199
-
200
-
201
-
202
-
203
-
204
-
205
-
206
-
207
-
208
-
209
-
210
-
211
-
212
-
213
-
214
-
215
-
216
-
217
-
218
-
219
-
220
-
221
-
222
-
223
-
224
-
225
-
226
-
227
-
228
-
229
-
230
-
231
-
232
-
233
-
234
-
235
-
236
-
237
-
238
-
239
-
240
-
241
-
242
-
243
-
244
-
245
-
246
-
247
-
248
-
249
-
250
-
251
-
252
-
253
-
254
-
255
-
256
-
257
-
258
-
259
-
260
-
261
-
262
-
263
-
264
-
265
-
266
-
267
-
268
-
269
-
270
-
271
-
272
-
273
-
274
-
275
-
276
-
277
-
278
-
279
-
280
 |
 |