Dell PowerEdge 2321DS User Manual - Page 63
Controlling the Status Flag, Security, Enable Screen Saver, Energy, Screen
 |
View all Dell PowerEdge 2321DS manuals
Add to My Manuals
Save this manual to your list of manuals |
Page 63 highlights
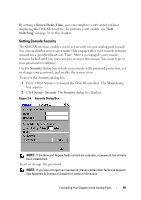
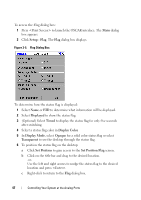
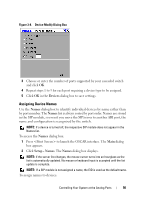
1 If your console does not require a password to gain access to the Security dialog box, proceed to step 2. or If your console is password protected, see the previous procedure, then go to step 2. 2 Select Enable Screen Saver. 3 Type the number of minutes for Inactivity Time (from 1 to 99) to delay activation of the screen saver. 4 Choose Energy if your monitor is ENERGY STAR® compliant; otherwise select Screen. CAUTION: Monitor damage can result from the use of Energy mode with monitors not compliant with Energy Star®. 5 (Optional) Click Test to activate the screen saver test, which lasts 10 seconds then returns you to the Security dialog box. 6 Click OK. NOTE: Activation of the screen saver mode disconnects the user from a device; no device is selected. The status flag displays the status "Free." To exit the screen saver mode: Press any key or move your mouse. The Main dialog box displays and any previous device connection is restored after the password is validated by the appliance. To turn off the screen saver: 1 In the Security dialog box, clear Enable Screen Saver. 2 Click OK. To immediately turn on the screen saver: Press , then press . Controlling the Status Flag The status flag displays on your desktop and shows the name or EID number of the selected device or the status of the selected port. Use the Flag dialog box to configure the status flag to display by device name or EID number, or to change the status flag color, opacity, display time, and location on the desktop. Controlling Your System at the Analog Ports 46
-
 1
1 -
2
-
3
-
4
-
5
-
6
-
7
-
8
-
9
-
10
-
11
-
12
-
13
-
14
-
15
-
16
-
17
-
18
-
19
-
20
-
21
-
22
-
23
-
24
-
25
-
26
-
27
-
28
-
29
-
30
-
31
-
32
-
33
-
34
-
35
-
36
-
37
-
38
-
39
-
40
-
41
-
42
-
43
-
44
-
45
-
46
-
47
-
48
-
49
-
50
-
51
-
52
-
53
-
54
-
55
-
56
-
57
-
 58
58 -
 59
59 -
 60
60 -
 61
61 -
 62
62 -
 63
63 -
 64
64 -
 65
65 -
 66
66 -
 67
67 -
 68
68 -
69
-
70
-
71
-
72
-
73
-
74
-
75
-
76
-
77
-
78
-
79
-
80
-
81
-
82
-
83
-
84
-
85
-
86
-
87
-
88
-
89
-
90
-
91
-
92
-
93
-
94
-
95
-
96
-
97
-
98
-
99
-
100
-
101
-
102
-
103
-
104
-
105
-
106
-
107
-
108
-
109
-
110
-
111
-
112
-
113
-
114
-
115
-
116
-
117
-
118
-
119
-
120
-
121
-
122
-
123
-
124
-
125
-
126
-
127
-
128
-
129
-
130
-
131
-
132
-
133
-
134
-
135
-
136
-
137
-
138
-
139
-
140
-
141
-
142
-
143
-
144
-
145
-
146
-
147
-
148
-
149
-
150
-
151
-
152
-
153
-
154
-
155
-
156
-
157
-
158
-
159
-
160
-
161
-
162
-
163
-
164
-
165
-
166
-
167
-
168
-
169
-
170
-
171
-
172
-
173
-
174
-
175
-
176
-
177
-
178
-
179
-
180
-
181
-
182
-
183
-
184
-
185
-
186
-
187
-
188
-
189
-
190
-
191
-
192
-
193
-
194
-
195
-
196
-
197
-
198
-
199
-
200
-
201
-
202
-
203
-
204
-
205
-
206
-
207
-
208
-
209
-
210
-
211
-
212
-
213
-
214
-
215
-
216
-
217
-
218
-
219
-
220
-
221
-
222
-
223
-
224
-
225
-
226
-
227
-
228
-
229
-
230
-
231
-
232
-
233
-
234
-
235
-
236
-
237
-
238
-
239
-
240
-
241
-
242
-
243
-
244
-
245
-
246
-
247
-
248
-
249
-
250
-
251
-
252
-
253
-
254
-
255
-
256
-
257
-
258
-
259
-
260
-
261
-
262
-
263
-
264
-
265
-
266
-
267
-
268
-
269
-
270
-
271
-
272
-
273
-
274
-
275
-
276
-
277
-
278
-
279
-
280
 |
 |