Dell PowerEdge 2321DS User Manual - Page 127
Viewer, Single Cursor Mode, Align Local Cursor, Refresh Image, View - Refresh, Maximize
 |
View all Dell PowerEdge 2321DS manuals
Add to My Manuals
Save this manual to your list of manuals |
Page 127 highlights
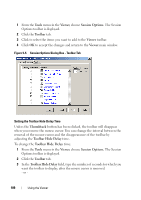
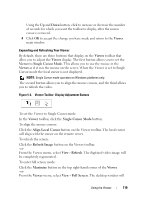
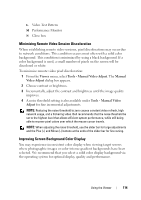
Using the Up and Down button, click to increase or decrease the number of seconds for which you want the toolbar to display, after the mouse cursor is removed. 4 Click OK to accept the change you have made and return to the Viewer main window. Expanding and Refreshing Your Viewer By default, there are three buttons that display on the Viewer toolbar that allow you to adjust the Viewer display. The first button allows you to set the Viewer to Single Cursor Mode. This allows you to use the mouse in the Viewer as if it was the mouse on the server. When the Viewer is set to Single Cursor mode the local cursor is not displayed. NOTE: Single Cursor mode operates on Windows platforms only. The second button allows you to align the mouse cursors, and the third allows you to refresh the video. Figure 5-6. Viewer Toolbar- Display Adjustment Buttons To set the Viewer to Single Cursor mode: In the Viewer toolbar, click the Single Cursor Mode button. To align the mouse cursors: Click the Align Local Cursor button on the Viewer toolbar. The local cursor will align with the cursor on the remote server. To refresh the screen: Click the Refresh Image button on the Viewer toolbar. -orFrom the Viewer menu, select View - Refresh. The digitized video image will be completely regenerated. To enter full screen mode: Click the Maximize button in the top right-hand corner of the Viewer. -orFrom the Viewer menu, select View - Full Screen. The desktop window will Using the Viewer 110
-
 1
1 -
2
-
3
-
4
-
5
-
6
-
7
-
8
-
9
-
10
-
11
-
12
-
13
-
14
-
15
-
16
-
17
-
18
-
19
-
20
-
21
-
22
-
23
-
24
-
25
-
26
-
27
-
28
-
29
-
30
-
31
-
32
-
33
-
34
-
35
-
36
-
37
-
38
-
39
-
40
-
41
-
42
-
43
-
44
-
45
-
46
-
47
-
48
-
49
-
50
-
51
-
52
-
53
-
54
-
55
-
56
-
57
-
58
-
59
-
60
-
61
-
62
-
63
-
64
-
65
-
66
-
67
-
68
-
69
-
70
-
71
-
72
-
73
-
74
-
75
-
76
-
77
-
78
-
79
-
80
-
81
-
82
-
83
-
84
-
85
-
86
-
87
-
88
-
89
-
90
-
91
-
92
-
93
-
94
-
95
-
96
-
97
-
98
-
99
-
100
-
101
-
102
-
103
-
104
-
105
-
106
-
107
-
108
-
109
-
110
-
111
-
112
-
113
-
114
-
115
-
116
-
117
-
118
-
119
-
120
-
121
-
 122
122 -
 123
123 -
 124
124 -
 125
125 -
 126
126 -
 127
127 -
 128
128 -
 129
129 -
 130
130 -
 131
131 -
 132
132 -
133
-
134
-
135
-
136
-
137
-
138
-
139
-
140
-
141
-
142
-
143
-
144
-
145
-
146
-
147
-
148
-
149
-
150
-
151
-
152
-
153
-
154
-
155
-
156
-
157
-
158
-
159
-
160
-
161
-
162
-
163
-
164
-
165
-
166
-
167
-
168
-
169
-
170
-
171
-
172
-
173
-
174
-
175
-
176
-
177
-
178
-
179
-
180
-
181
-
182
-
183
-
184
-
185
-
186
-
187
-
188
-
189
-
190
-
191
-
192
-
193
-
194
-
195
-
196
-
197
-
198
-
199
-
200
-
201
-
202
-
203
-
204
-
205
-
206
-
207
-
208
-
209
-
210
-
211
-
212
-
213
-
214
-
215
-
216
-
217
-
218
-
219
-
220
-
221
-
222
-
223
-
224
-
225
-
226
-
227
-
228
-
229
-
230
-
231
-
232
-
233
-
234
-
235
-
236
-
237
-
238
-
239
-
240
-
241
-
242
-
243
-
244
-
245
-
246
-
247
-
248
-
249
-
250
-
251
-
252
-
253
-
254
-
255
-
256
-
257
-
258
-
259
-
260
-
261
-
262
-
263
-
264
-
265
-
266
-
267
-
268
-
269
-
270
-
271
-
272
-
273
-
274
-
275
-
276
-
277
-
278
-
279
-
280
 |
 |