Dell PowerEdge 2321DS User Manual - Page 167
Enabling Individual SNMP Traps, Read, Write, Allowable Managers, Trap Destination, Restore
 |
View all Dell PowerEdge 2321DS manuals
Add to My Manuals
Save this manual to your list of manuals |
Page 167 highlights
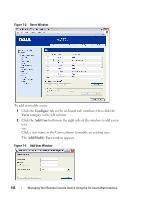
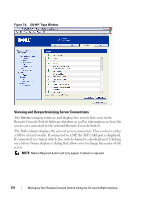
4 Type the Read, Write, and Trap community names. These specify the community strings that must be used in SNMP actions. The Read and Write strings only apply to SNMP over UDP port 161 and act as passwords that protect access to the Remote Console Switch. The values can be up to 64 characters in length. These fields may not be left blank. 5 Type the address of up to four management workstations that are allowed to manage this Remote Console Switch in the Allowable Managers fields. Alternatively, you may leave these fields blank to allow any station to manage the Remote Console Switch. 6 Type the address of up to four management workstations to which this Remote Console Switch will send traps in the Trap Destination fields. 7 Click Save to save the settings and close the window. -orClick Restore to cancel the changes and exit the window. The last saved settings will be restored. NOTE: After changing SNMP settings, the Reboot Required button will be displayed on all pages, indicating that the switch must be rebooted before the changes will take effect. Click the button to reboot the switch. Enabling Individual SNMP Traps An SNMP trap is a notification sent by the Remote Console Switch to a management station indicating that an event has occurred in the Remote Console Switch that may require further attention. The Dell OpenManageTM IT Assistant software is the event manager. You can specify what SNMP traps are sent to the management stations by simply clicking the appropriate check boxes in the list. Alternatively, you can select or clear the check box next to Enabled Traps to easily select or deselect the entire list. Managing Your Remote Console Switch Using the On-board Web Interface 150
-
 1
1 -
2
-
3
-
4
-
5
-
6
-
7
-
8
-
9
-
10
-
11
-
12
-
13
-
14
-
15
-
16
-
17
-
18
-
19
-
20
-
21
-
22
-
23
-
24
-
25
-
26
-
27
-
28
-
29
-
30
-
31
-
32
-
33
-
34
-
35
-
36
-
37
-
38
-
39
-
40
-
41
-
42
-
43
-
44
-
45
-
46
-
47
-
48
-
49
-
50
-
51
-
52
-
53
-
54
-
55
-
56
-
57
-
58
-
59
-
60
-
61
-
62
-
63
-
64
-
65
-
66
-
67
-
68
-
69
-
70
-
71
-
72
-
73
-
74
-
75
-
76
-
77
-
78
-
79
-
80
-
81
-
82
-
83
-
84
-
85
-
86
-
87
-
88
-
89
-
90
-
91
-
92
-
93
-
94
-
95
-
96
-
97
-
98
-
99
-
100
-
101
-
102
-
103
-
104
-
105
-
106
-
107
-
108
-
109
-
110
-
111
-
112
-
113
-
114
-
115
-
116
-
117
-
118
-
119
-
120
-
121
-
122
-
123
-
124
-
125
-
126
-
127
-
128
-
129
-
130
-
131
-
132
-
133
-
134
-
135
-
136
-
137
-
138
-
139
-
140
-
141
-
142
-
143
-
144
-
145
-
146
-
147
-
148
-
149
-
150
-
151
-
152
-
153
-
154
-
155
-
156
-
157
-
158
-
159
-
160
-
161
-
 162
162 -
 163
163 -
 164
164 -
 165
165 -
 166
166 -
 167
167 -
 168
168 -
 169
169 -
 170
170 -
 171
171 -
 172
172 -
173
-
174
-
175
-
176
-
177
-
178
-
179
-
180
-
181
-
182
-
183
-
184
-
185
-
186
-
187
-
188
-
189
-
190
-
191
-
192
-
193
-
194
-
195
-
196
-
197
-
198
-
199
-
200
-
201
-
202
-
203
-
204
-
205
-
206
-
207
-
208
-
209
-
210
-
211
-
212
-
213
-
214
-
215
-
216
-
217
-
218
-
219
-
220
-
221
-
222
-
223
-
224
-
225
-
226
-
227
-
228
-
229
-
230
-
231
-
232
-
233
-
234
-
235
-
236
-
237
-
238
-
239
-
240
-
241
-
242
-
243
-
244
-
245
-
246
-
247
-
248
-
249
-
250
-
251
-
252
-
253
-
254
-
255
-
256
-
257
-
258
-
259
-
260
-
261
-
262
-
263
-
264
-
265
-
266
-
267
-
268
-
269
-
270
-
271
-
272
-
273
-
274
-
275
-
276
-
277
-
278
-
279
-
280
 |
 |
