Dell PowerEdge 2321DS User Manual - Page 89
Network Address, Select Remote Console Switch, Configuring Remote Console Switch
 |
View all Dell PowerEdge 2321DS manuals
Add to My Manuals
Save this manual to your list of manuals |
Page 89 highlights
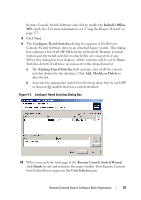
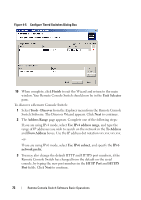
6 The Network Address window appears. Type the IP address, subnet mask (if using IPv4 mode) or prefix length (if using IPv6 mode), and gateway you wish to assign to the unit and click Next. NOTE: The 2161DS Console Switch supports BootP (Bootstrap Protocol) and static IP addressing. Dell recommends that IP addresses be reserved for each unit and that they remain static while the 2161DS Console Switch units are connected to the network. The 2161DS Console Switch does not support dynamic IP address assignment, BootP emulation through DHCP, or IPv6 mode. DHCP is supported for 2161DS-2, 4161DS, and 2321DS appliances. 7 The Select Remote Console Switch window appears, prompting you to select the unit to add from the list of new Remote Console Switches that were found. Select the product and then click Next. 8 The Configuring Remote Console Switch window appears to indicate whether the IP information was successfully configured. If the configuration was successful, the Remote Console Switch Software will search for the new Remote Console Switch as well as all SIPs, Avocent IQ modules, and server names associated with it. Click Next. 9 The Configure Tiered Switches dialog box appears if the Remote Console Switch Software detects an attached legacy switch. This dialog box contains a list of all SIP and Avocent IQ module EIDs retrieved from the Remote Console Switch and the tiered switches to which they are connected, if any. a The Existing Tiered Switches field contains a list of all the current switches defined in the database. You may add to, delete, or modify the list. b Associate the appropriate switch from the drop-down lists for each SIP or Avocent IQ modules that has a switch attached. Remote Console Switch Software Basic Operations 72
-
 1
1 -
2
-
3
-
4
-
5
-
6
-
7
-
8
-
9
-
10
-
11
-
12
-
13
-
14
-
15
-
16
-
17
-
18
-
19
-
20
-
21
-
22
-
23
-
24
-
25
-
26
-
27
-
28
-
29
-
30
-
31
-
32
-
33
-
34
-
35
-
36
-
37
-
38
-
39
-
40
-
41
-
42
-
43
-
44
-
45
-
46
-
47
-
48
-
49
-
50
-
51
-
52
-
53
-
54
-
55
-
56
-
57
-
58
-
59
-
60
-
61
-
62
-
63
-
64
-
65
-
66
-
67
-
68
-
69
-
70
-
71
-
72
-
73
-
74
-
75
-
76
-
77
-
78
-
79
-
80
-
81
-
82
-
83
-
 84
84 -
 85
85 -
 86
86 -
 87
87 -
 88
88 -
 89
89 -
 90
90 -
 91
91 -
 92
92 -
 93
93 -
 94
94 -
95
-
96
-
97
-
98
-
99
-
100
-
101
-
102
-
103
-
104
-
105
-
106
-
107
-
108
-
109
-
110
-
111
-
112
-
113
-
114
-
115
-
116
-
117
-
118
-
119
-
120
-
121
-
122
-
123
-
124
-
125
-
126
-
127
-
128
-
129
-
130
-
131
-
132
-
133
-
134
-
135
-
136
-
137
-
138
-
139
-
140
-
141
-
142
-
143
-
144
-
145
-
146
-
147
-
148
-
149
-
150
-
151
-
152
-
153
-
154
-
155
-
156
-
157
-
158
-
159
-
160
-
161
-
162
-
163
-
164
-
165
-
166
-
167
-
168
-
169
-
170
-
171
-
172
-
173
-
174
-
175
-
176
-
177
-
178
-
179
-
180
-
181
-
182
-
183
-
184
-
185
-
186
-
187
-
188
-
189
-
190
-
191
-
192
-
193
-
194
-
195
-
196
-
197
-
198
-
199
-
200
-
201
-
202
-
203
-
204
-
205
-
206
-
207
-
208
-
209
-
210
-
211
-
212
-
213
-
214
-
215
-
216
-
217
-
218
-
219
-
220
-
221
-
222
-
223
-
224
-
225
-
226
-
227
-
228
-
229
-
230
-
231
-
232
-
233
-
234
-
235
-
236
-
237
-
238
-
239
-
240
-
241
-
242
-
243
-
244
-
245
-
246
-
247
-
248
-
249
-
250
-
251
-
252
-
253
-
254
-
255
-
256
-
257
-
258
-
259
-
260
-
261
-
262
-
263
-
264
-
265
-
266
-
267
-
268
-
269
-
270
-
271
-
272
-
273
-
274
-
275
-
276
-
277
-
278
-
279
-
280
 |
 |