Dell PowerEdge 2321DS User Manual - Page 138
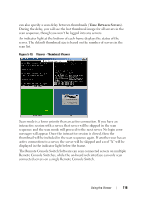
Navigating the Thumbnail Viewer, View Time Per Server
 |
View all Dell PowerEdge 2321DS manuals
Add to My Manuals
Save this manual to your list of manuals |
Page 138 highlights
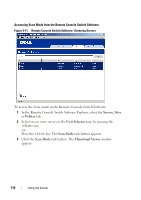
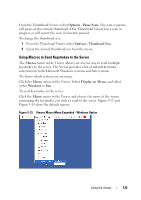
1 From the Thumbnail Viewer, select Options - Preferences. The Preferences dialog box appears. 2 Enter the time each thumbnail will be active during the scan (10 to 60 seconds) in the View Time Per Server box. 3 Enter the length of time the scan stops between each server (5 to 60 seconds) in the Time Between Servers box. 4 Click OK. Navigating the Thumbnail Viewer When you highlight an individual thumbnail frame and select the Thumbnail menu, you can launch an interactive session to that server, add that server to the scan sequence or set the login credentials for that server. The Options menu allows you to access scanning preferences as well as pause the scan and set the thumbnail size for all servers. To launch a server Video session: 1 Select a server thumbnail. 2 From the Thumbnail Viewer, select Thumbnail - [server name] - View Interactive Session. -or- Right-click a server thumbnail and select View Interactive Session. That server's video will be launched in an interactive Viewer window. To enable or disable a server in the scan sequence: 1 Select a server thumbnail. 2 From the Thumbnail Viewer, select Thumbnail - [server name] - Enable. -or- Right-click a server thumbnail and select Enable. That server will be included/excluded in the server thumbnail scan sequence. NOTE: The Enable menu item state can be toggled from checked (enabled) to unchecked (disabled) each time it is selected. NOTE: If a server is being accessed by a user, the Enable menu will be disabled for that server thumbnail. To pause or restart a scan sequence: 121 Using the Viewer
-
 1
1 -
2
-
3
-
4
-
5
-
6
-
7
-
8
-
9
-
10
-
11
-
12
-
13
-
14
-
15
-
16
-
17
-
18
-
19
-
20
-
21
-
22
-
23
-
24
-
25
-
26
-
27
-
28
-
29
-
30
-
31
-
32
-
33
-
34
-
35
-
36
-
37
-
38
-
39
-
40
-
41
-
42
-
43
-
44
-
45
-
46
-
47
-
48
-
49
-
50
-
51
-
52
-
53
-
54
-
55
-
56
-
57
-
58
-
59
-
60
-
61
-
62
-
63
-
64
-
65
-
66
-
67
-
68
-
69
-
70
-
71
-
72
-
73
-
74
-
75
-
76
-
77
-
78
-
79
-
80
-
81
-
82
-
83
-
84
-
85
-
86
-
87
-
88
-
89
-
90
-
91
-
92
-
93
-
94
-
95
-
96
-
97
-
98
-
99
-
100
-
101
-
102
-
103
-
104
-
105
-
106
-
107
-
108
-
109
-
110
-
111
-
112
-
113
-
114
-
115
-
116
-
117
-
118
-
119
-
120
-
121
-
122
-
123
-
124
-
125
-
126
-
127
-
128
-
129
-
130
-
131
-
132
-
 133
133 -
 134
134 -
 135
135 -
 136
136 -
 137
137 -
 138
138 -
 139
139 -
 140
140 -
 141
141 -
 142
142 -
 143
143 -
144
-
145
-
146
-
147
-
148
-
149
-
150
-
151
-
152
-
153
-
154
-
155
-
156
-
157
-
158
-
159
-
160
-
161
-
162
-
163
-
164
-
165
-
166
-
167
-
168
-
169
-
170
-
171
-
172
-
173
-
174
-
175
-
176
-
177
-
178
-
179
-
180
-
181
-
182
-
183
-
184
-
185
-
186
-
187
-
188
-
189
-
190
-
191
-
192
-
193
-
194
-
195
-
196
-
197
-
198
-
199
-
200
-
201
-
202
-
203
-
204
-
205
-
206
-
207
-
208
-
209
-
210
-
211
-
212
-
213
-
214
-
215
-
216
-
217
-
218
-
219
-
220
-
221
-
222
-
223
-
224
-
225
-
226
-
227
-
228
-
229
-
230
-
231
-
232
-
233
-
234
-
235
-
236
-
237
-
238
-
239
-
240
-
241
-
242
-
243
-
244
-
245
-
246
-
247
-
248
-
249
-
250
-
251
-
252
-
253
-
254
-
255
-
256
-
257
-
258
-
259
-
260
-
261
-
262
-
263
-
264
-
265
-
266
-
267
-
268
-
269
-
270
-
271
-
272
-
273
-
274
-
275
-
276
-
277
-
278
-
279
-
280
 |
 |