HP HD Pro 2 User Guide - Page 127
how do I replace scanner parts? - HP HD Pro Scanner
 |
View all HP HD Pro 2 manuals
Add to My Manuals
Save this manual to your list of manuals |
Page 127 highlights
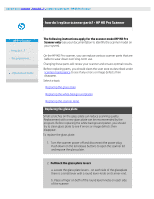
you are here: welcome how do I...? replace scanner parts - HP HD Pro Scanner how do I replace scanner parts? - HP HD Pro Scanner HP Pro Scanner how do I...? the problem is... alphabetical index The following instructions apply for the scanner model HP HD Pro Scanner only (see your documentation to identify the scanner model on your sysem). On the HP HD Pro scanner, you can replace various scanner parts that are liable to wear down over long-term use. Changing these parts will renew your scanner and ensure optimal results. Before replacing parts, you should clean the scan area as described under scanner maintenance to see if any errors or image defects then disappear. Select a topic: Replacing the glass plate Replacing the white background platen Replacing the scanner lamp Replacing the glass plate Small scratches on the glass plate can reduce scanning quality. Replacement with a new glass plate can be recommended by the program. Before replacing the white background platen, you should try to clean glass plate to see if errors or image defects then disappear. To replace the glass plate: 1. Turn the scanner power off and disconnect the power plug. Push down on the lid release buttons to open the scanner lid and expose the glass plate. 2. Pull back the glass plate levers a. Locate the glass plate levers - on each side of the glassplate there is a small lever with a round lever-knob on its inner-end. b. Place a finger on both of the round lever knobs on each side of the scanner
-
 1
1 -
2
-
3
-
4
-
5
-
6
-
7
-
8
-
9
-
10
-
11
-
12
-
13
-
14
-
15
-
16
-
17
-
18
-
19
-
20
-
21
-
22
-
23
-
24
-
25
-
26
-
27
-
28
-
29
-
30
-
31
-
32
-
33
-
34
-
35
-
36
-
37
-
38
-
39
-
40
-
41
-
42
-
43
-
44
-
45
-
46
-
47
-
48
-
49
-
50
-
51
-
52
-
53
-
54
-
55
-
56
-
57
-
58
-
59
-
60
-
61
-
62
-
63
-
64
-
65
-
66
-
67
-
68
-
69
-
70
-
71
-
72
-
73
-
74
-
75
-
76
-
77
-
78
-
79
-
80
-
81
-
82
-
83
-
84
-
85
-
86
-
87
-
88
-
89
-
90
-
91
-
92
-
93
-
94
-
95
-
96
-
97
-
98
-
99
-
100
-
101
-
102
-
103
-
104
-
105
-
106
-
107
-
108
-
109
-
110
-
111
-
112
-
113
-
114
-
115
-
116
-
117
-
118
-
119
-
120
-
121
-
 122
122 -
 123
123 -
 124
124 -
 125
125 -
 126
126 -
 127
127 -
 128
128 -
 129
129 -
 130
130 -
 131
131 -
 132
132 -
133
-
134
-
135
-
136
-
137
-
138
-
139
-
140
-
141
-
142
-
143
-
144
-
145
-
146
-
147
-
148
-
149
-
150
-
151
-
152
-
153
-
154
-
155
-
156
-
157
-
158
-
159
-
160
-
161
-
162
-
163
-
164
-
165
-
166
-
167
-
168
-
169
-
170
-
171
-
172
-
173
-
174
-
175
-
176
-
177
-
178
-
179
-
180
-
181
-
182
-
183
-
184
-
185
-
186
-
187
-
188
-
189
-
190
-
191
-
192
-
193
-
194
-
195
-
196
-
197
-
198
-
199
-
200
-
201
-
202
 |
 |