HP HD Pro 2 User Guide - Page 20
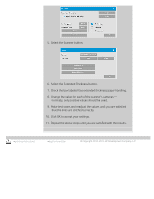
Select the Extended Thickness button.
 |
View all HP HD Pro 2 manuals
Add to My Manuals
Save this manual to your list of manuals |
Page 20 highlights
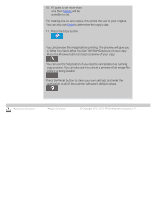
5. Select the Scanner button. 6. Select the Extended Thickness button. 7. Check the box labeled Use extended thickness paper handling. 8. Change the value for each of the scanner's cameras - normally, only positive values should be used. 9. Make test scans and readjust the values until you are satisfied that the lines are stitched correctly. 10. Click OK to accept your settings. 11. Repeat the above steps until you are satisfied with the results. printing instructions legal information © Copyright 2012, 2015 HP Development Company, L.P
-
 1
1 -
2
-
3
-
4
-
5
-
6
-
7
-
8
-
9
-
10
-
11
-
12
-
13
-
14
-
 15
15 -
 16
16 -
 17
17 -
 18
18 -
 19
19 -
 20
20 -
 21
21 -
 22
22 -
 23
23 -
 24
24 -
 25
25 -
26
-
27
-
28
-
29
-
30
-
31
-
32
-
33
-
34
-
35
-
36
-
37
-
38
-
39
-
40
-
41
-
42
-
43
-
44
-
45
-
46
-
47
-
48
-
49
-
50
-
51
-
52
-
53
-
54
-
55
-
56
-
57
-
58
-
59
-
60
-
61
-
62
-
63
-
64
-
65
-
66
-
67
-
68
-
69
-
70
-
71
-
72
-
73
-
74
-
75
-
76
-
77
-
78
-
79
-
80
-
81
-
82
-
83
-
84
-
85
-
86
-
87
-
88
-
89
-
90
-
91
-
92
-
93
-
94
-
95
-
96
-
97
-
98
-
99
-
100
-
101
-
102
-
103
-
104
-
105
-
106
-
107
-
108
-
109
-
110
-
111
-
112
-
113
-
114
-
115
-
116
-
117
-
118
-
119
-
120
-
121
-
122
-
123
-
124
-
125
-
126
-
127
-
128
-
129
-
130
-
131
-
132
-
133
-
134
-
135
-
136
-
137
-
138
-
139
-
140
-
141
-
142
-
143
-
144
-
145
-
146
-
147
-
148
-
149
-
150
-
151
-
152
-
153
-
154
-
155
-
156
-
157
-
158
-
159
-
160
-
161
-
162
-
163
-
164
-
165
-
166
-
167
-
168
-
169
-
170
-
171
-
172
-
173
-
174
-
175
-
176
-
177
-
178
-
179
-
180
-
181
-
182
-
183
-
184
-
185
-
186
-
187
-
188
-
189
-
190
-
191
-
192
-
193
-
194
-
195
-
196
-
197
-
198
-
199
-
200
-
201
-
202
 |
 |

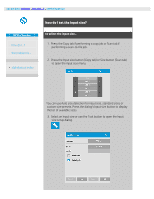
5. Select the Scanner button.
6. Select the Extended Thickness button.
7. Check the box labeled Use extended thickness paper handling.
8. Change the value for each of the scanner's cameras —
normally, only positive values should be used.
9. Make test scans and readjust the values until you are satisfied
that the lines are stitched correctly.
10. Click OK to accept your settings.
11. Repeat the above steps until you are satisfied with the results.
printing instructions
legal information
© Copyright 2012, 2015 HP Development Company, L.P