HP HD Pro 2 User Guide - Page 62
Enhance Gray, Invert, Optimize for drawing, Max detail
 |
View all HP HD Pro 2 manuals
Add to My Manuals
Save this manual to your list of manuals |
Page 62 highlights
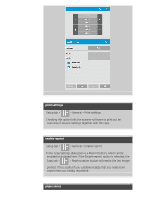
The Blur feature blends colors and thus removes unwanted "noise" during image capture. Many images are created with dithering, which is used for representing different colors in the original, and this dithering often creates unnecessary "noise" in the image. Blurring smoothes out unwanted transitions between colors. With Black and White copying the Blur feature smoothes out gray dither by removing unwanted sharp transitions between excessive shades of gray. Don't think of blurring as the opposite of sharpening. Sharpening works on the image's edges only while blurring looks at whole color or graytone areas and smoothes them out. TIP: Using Sharpen together with the Blur feature can often enhance image quality by first blurring away noise in the image and then sharpening the result. Enhance Gray Enhance Gray is available with color type of original setup. Press the More button to access the setting. Check the Enhance Gray option to reduce the saturation of colors on copies or prints made from low saturated color originals. This setting will make graytones more neutral. Invert This setting inverts the colors in an image. Use this command, for example, to make a positive black-and-white image negative. Optimize for drawing Optimize for drawing is available with both color and B&W type of original setup. For color type of original setup - press the More button to access the setting. Setting this option is recommended when copying text and drawings. It will tell the printer to output optimally in relation to clear and sharp edges. It is not advisable to activate this setting with pictures as visible bands can be created on the output. Max detail Max detail is available with both color and B&W type of original setup. For color type of original setup - press the More button to access the setting. Set Max detail for enhancing detailed graphics. Activating Max detail is recommended for originals with many small details such as maps and certain CAD drawings. It is not recommended with pictures as the setting will have a negative effect on color matching and graytone output.
-
 1
1 -
2
-
3
-
4
-
5
-
6
-
7
-
8
-
9
-
10
-
11
-
12
-
13
-
14
-
15
-
16
-
17
-
18
-
19
-
20
-
21
-
22
-
23
-
24
-
25
-
26
-
27
-
28
-
29
-
30
-
31
-
32
-
33
-
34
-
35
-
36
-
37
-
38
-
39
-
40
-
41
-
42
-
43
-
44
-
45
-
46
-
47
-
48
-
49
-
50
-
51
-
52
-
53
-
54
-
55
-
56
-
 57
57 -
 58
58 -
 59
59 -
 60
60 -
 61
61 -
 62
62 -
 63
63 -
 64
64 -
 65
65 -
 66
66 -
 67
67 -
68
-
69
-
70
-
71
-
72
-
73
-
74
-
75
-
76
-
77
-
78
-
79
-
80
-
81
-
82
-
83
-
84
-
85
-
86
-
87
-
88
-
89
-
90
-
91
-
92
-
93
-
94
-
95
-
96
-
97
-
98
-
99
-
100
-
101
-
102
-
103
-
104
-
105
-
106
-
107
-
108
-
109
-
110
-
111
-
112
-
113
-
114
-
115
-
116
-
117
-
118
-
119
-
120
-
121
-
122
-
123
-
124
-
125
-
126
-
127
-
128
-
129
-
130
-
131
-
132
-
133
-
134
-
135
-
136
-
137
-
138
-
139
-
140
-
141
-
142
-
143
-
144
-
145
-
146
-
147
-
148
-
149
-
150
-
151
-
152
-
153
-
154
-
155
-
156
-
157
-
158
-
159
-
160
-
161
-
162
-
163
-
164
-
165
-
166
-
167
-
168
-
169
-
170
-
171
-
172
-
173
-
174
-
175
-
176
-
177
-
178
-
179
-
180
-
181
-
182
-
183
-
184
-
185
-
186
-
187
-
188
-
189
-
190
-
191
-
192
-
193
-
194
-
195
-
196
-
197
-
198
-
199
-
200
-
201
-
202
 |
 |
