HP HD Pro 2 User Guide - Page 135
how do I replace the glass plate? - HP SD Pro Scanner
 |
View all HP HD Pro 2 manuals
Add to My Manuals
Save this manual to your list of manuals |
Page 135 highlights
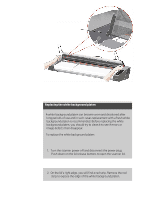
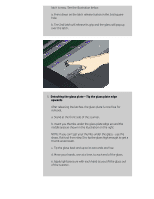
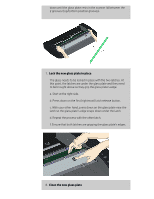
you are here: welcome how do I...? replace glass - HP SD Pro Scanner HP Pro Scanner how do I...? the problem is... alphabetical index how do I replace the glass plate? - HP SD Pro Scanner The following instructions apply for scanner model HP SD Pro Scanner only (see your documentation to identify the scanner model on your sysem. Small scratches on the glass plate can reduce scanning quality. Replacement with a new glass plate can be recommended by the program. You can replace the glass on your HP SD Pro Scanner. Replacing the glass plate 1. Power off and open the lid Turn the scanner power off and disconnect the power plug. Open the scanner lid by pushing the 2 backside lid release buttons towards the middle of the scanner 2. Identify the latch release buttons The illustration below shows the scanner from above with its lid open. The illustration indicates the key parts and buttons you need to recognize when replacing a worn glass plate. The glass plate is held and locked in place with 2 small whitecolored latches. Each latch can be released from the glass plate by pressing down on its corresponding latch release button (see iluustration below). Each latch release button is placed in a square hole just under the latch it releases.
-
 1
1 -
2
-
3
-
4
-
5
-
6
-
7
-
8
-
9
-
10
-
11
-
12
-
13
-
14
-
15
-
16
-
17
-
18
-
19
-
20
-
21
-
22
-
23
-
24
-
25
-
26
-
27
-
28
-
29
-
30
-
31
-
32
-
33
-
34
-
35
-
36
-
37
-
38
-
39
-
40
-
41
-
42
-
43
-
44
-
45
-
46
-
47
-
48
-
49
-
50
-
51
-
52
-
53
-
54
-
55
-
56
-
57
-
58
-
59
-
60
-
61
-
62
-
63
-
64
-
65
-
66
-
67
-
68
-
69
-
70
-
71
-
72
-
73
-
74
-
75
-
76
-
77
-
78
-
79
-
80
-
81
-
82
-
83
-
84
-
85
-
86
-
87
-
88
-
89
-
90
-
91
-
92
-
93
-
94
-
95
-
96
-
97
-
98
-
99
-
100
-
101
-
102
-
103
-
104
-
105
-
106
-
107
-
108
-
109
-
110
-
111
-
112
-
113
-
114
-
115
-
116
-
117
-
118
-
119
-
120
-
121
-
122
-
123
-
124
-
125
-
126
-
127
-
128
-
129
-
 130
130 -
 131
131 -
 132
132 -
 133
133 -
 134
134 -
 135
135 -
 136
136 -
 137
137 -
 138
138 -
 139
139 -
 140
140 -
141
-
142
-
143
-
144
-
145
-
146
-
147
-
148
-
149
-
150
-
151
-
152
-
153
-
154
-
155
-
156
-
157
-
158
-
159
-
160
-
161
-
162
-
163
-
164
-
165
-
166
-
167
-
168
-
169
-
170
-
171
-
172
-
173
-
174
-
175
-
176
-
177
-
178
-
179
-
180
-
181
-
182
-
183
-
184
-
185
-
186
-
187
-
188
-
189
-
190
-
191
-
192
-
193
-
194
-
195
-
196
-
197
-
198
-
199
-
200
-
201
-
202
 |
 |
