HP HD Pro 2 User Guide - Page 167
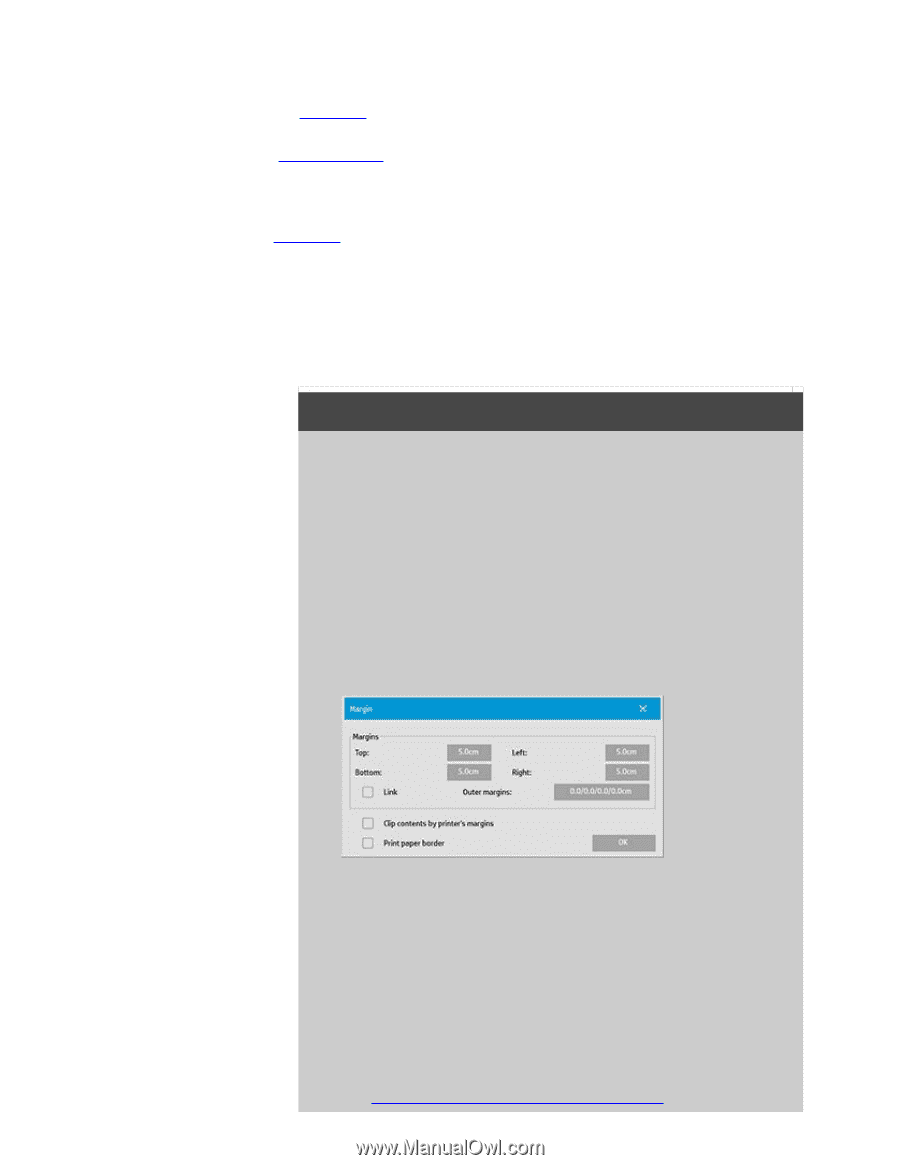
Set the Top, Bottom, Left and Right margins in the Margins
 |
View all HP HD Pro 2 manuals
Add to My Manuals
Save this manual to your list of manuals |
Page 167 highlights
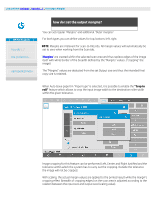
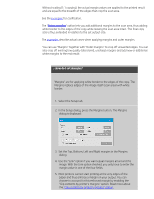
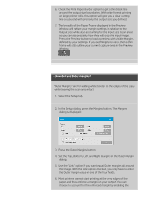
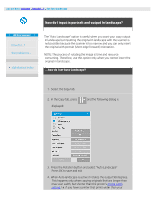
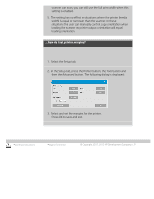
Without scaling (1:1 copying), the actual margin values are applied to the printed result and are equal to the breadth of the edges that crop the scan area. See the examples for clarification. The "Outer margins" option lets you add additional margins to the scan area, thus adding white border to the edges of the copy while leaving the scan area intact. The final copy size is thus extended in relation to the set output size. The examples describe actual cases when applying margins and outer margins. You can use "Margins" together with "Outer margins" to crop off unwanted edges. You can also crop off existing low quality (discolored, unsharp) margins and add new or additional white margins to the end result. ...how do I set margins? "Margins" are for applying white border to the edges of the copy. The Margins replace edges of the image itself (scan area) with white border. 1. Select the Setup tab. 2. In the Setup dialog, press the Margins button. The Margins dialog is displayed: 3. Set the Top, Bottom, Left and Right margins in the Margins dialog. 4. Use the "Link" option if you want equal margins all around the image. With the Link option checked, you only have to enter the margin value in one of the four fields. 5. Most printers cannot start printing at the very edges of the paper and thus enforce a margin on your output. You can choose to account for this enforced margin by enabling the "Clip contents by printer's margins" option. Read more about the "Clip contents by printer's margins" option.
-
 1
1 -
2
-
3
-
4
-
5
-
6
-
7
-
8
-
9
-
10
-
11
-
12
-
13
-
14
-
15
-
16
-
17
-
18
-
19
-
20
-
21
-
22
-
23
-
24
-
25
-
26
-
27
-
28
-
29
-
30
-
31
-
32
-
33
-
34
-
35
-
36
-
37
-
38
-
39
-
40
-
41
-
42
-
43
-
44
-
45
-
46
-
47
-
48
-
49
-
50
-
51
-
52
-
53
-
54
-
55
-
56
-
57
-
58
-
59
-
60
-
61
-
62
-
63
-
64
-
65
-
66
-
67
-
68
-
69
-
70
-
71
-
72
-
73
-
74
-
75
-
76
-
77
-
78
-
79
-
80
-
81
-
82
-
83
-
84
-
85
-
86
-
87
-
88
-
89
-
90
-
91
-
92
-
93
-
94
-
95
-
96
-
97
-
98
-
99
-
100
-
101
-
102
-
103
-
104
-
105
-
106
-
107
-
108
-
109
-
110
-
111
-
112
-
113
-
114
-
115
-
116
-
117
-
118
-
119
-
120
-
121
-
122
-
123
-
124
-
125
-
126
-
127
-
128
-
129
-
130
-
131
-
132
-
133
-
134
-
135
-
136
-
137
-
138
-
139
-
140
-
141
-
142
-
143
-
144
-
145
-
146
-
147
-
148
-
149
-
150
-
151
-
152
-
153
-
154
-
155
-
156
-
157
-
158
-
159
-
160
-
161
-
 162
162 -
 163
163 -
 164
164 -
 165
165 -
 166
166 -
 167
167 -
 168
168 -
 169
169 -
 170
170 -
 171
171 -
 172
172 -
173
-
174
-
175
-
176
-
177
-
178
-
179
-
180
-
181
-
182
-
183
-
184
-
185
-
186
-
187
-
188
-
189
-
190
-
191
-
192
-
193
-
194
-
195
-
196
-
197
-
198
-
199
-
200
-
201
-
202
 |
 |