HP HD Pro 2 User Guide - Page 139
Lock the new glass plate in place, Clean the new glass plate
 |
View all HP HD Pro 2 manuals
Add to My Manuals
Save this manual to your list of manuals |
Page 139 highlights
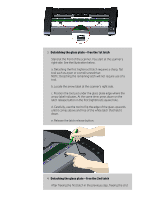
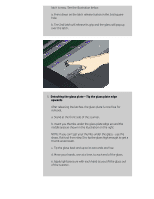
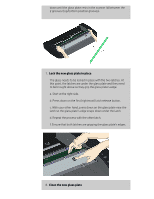
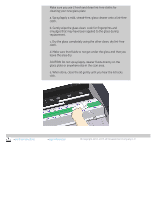
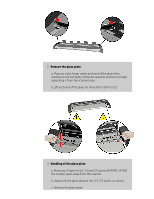
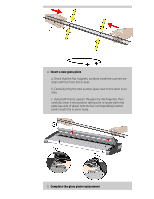
down until the glass plate rests in the scanner lid between the 2 grooves (top/bottom position grooves). 7. Lock the new glass plate in place The glass needs to be locked in place with the two latches. At this point, the latches are under the glass plate and they need to be brought above so they grip the glass plate's edge. a. Start at the right side. b. Press down on the first (rightmost) latch release button. c. With your other hand, press down on the glass plate near the latch so the glass plate's edge snaps down under the latch. d. Repeat the process with the other latch. f. Ensure that both latches are gripping the glass plate's edges. 8. Clean the new glass plate
-
 1
1 -
2
-
3
-
4
-
5
-
6
-
7
-
8
-
9
-
10
-
11
-
12
-
13
-
14
-
15
-
16
-
17
-
18
-
19
-
20
-
21
-
22
-
23
-
24
-
25
-
26
-
27
-
28
-
29
-
30
-
31
-
32
-
33
-
34
-
35
-
36
-
37
-
38
-
39
-
40
-
41
-
42
-
43
-
44
-
45
-
46
-
47
-
48
-
49
-
50
-
51
-
52
-
53
-
54
-
55
-
56
-
57
-
58
-
59
-
60
-
61
-
62
-
63
-
64
-
65
-
66
-
67
-
68
-
69
-
70
-
71
-
72
-
73
-
74
-
75
-
76
-
77
-
78
-
79
-
80
-
81
-
82
-
83
-
84
-
85
-
86
-
87
-
88
-
89
-
90
-
91
-
92
-
93
-
94
-
95
-
96
-
97
-
98
-
99
-
100
-
101
-
102
-
103
-
104
-
105
-
106
-
107
-
108
-
109
-
110
-
111
-
112
-
113
-
114
-
115
-
116
-
117
-
118
-
119
-
120
-
121
-
122
-
123
-
124
-
125
-
126
-
127
-
128
-
129
-
130
-
131
-
132
-
133
-
 134
134 -
 135
135 -
 136
136 -
 137
137 -
 138
138 -
 139
139 -
 140
140 -
 141
141 -
 142
142 -
 143
143 -
 144
144 -
145
-
146
-
147
-
148
-
149
-
150
-
151
-
152
-
153
-
154
-
155
-
156
-
157
-
158
-
159
-
160
-
161
-
162
-
163
-
164
-
165
-
166
-
167
-
168
-
169
-
170
-
171
-
172
-
173
-
174
-
175
-
176
-
177
-
178
-
179
-
180
-
181
-
182
-
183
-
184
-
185
-
186
-
187
-
188
-
189
-
190
-
191
-
192
-
193
-
194
-
195
-
196
-
197
-
198
-
199
-
200
-
201
-
202
 |
 |

down until the glass plate rests in the scanner lid between the
2 grooves (top/bottom position grooves).
7.
Lock the new glass plate in place
The glass needs to be locked in place with the two latches. At
this point, the latches are under the glass plate and they need
to be brought above so they grip the glass plate’s edge.
a. Start at the right side.
b. Press down on the first (rightmost) latch release button.
c. With your other hand, press down on the glass plate near the
latch so the glass plate’s edge snaps down under the latch.
d. Repeat the process with the other latch.
f. Ensure that both latches are gripping the glass plate’s edges.
8.
Clean the new glass plate