HP HD Pro 2 User Guide - Page 19
how do I copy/scan thick media?
 |
View all HP HD Pro 2 manuals
Add to My Manuals
Save this manual to your list of manuals |
Page 19 highlights
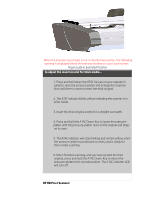
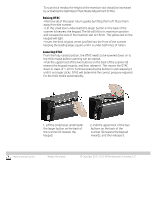
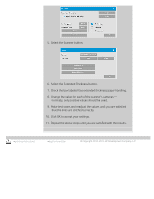
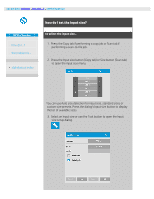
you are here: welcome how do I...? copy/scan thick media HP Pro Scanner how do I...? the problem is... alphabetical index how do I copy/scan thick media? Follow the guidelines below for problem free scanning of thick media. First you must adjust the insertion slot height to accommodate your thick media. See: ...how do I change the insertion slot height? NOTE: Adjustment for thickness, and the following instructions apply only with the scanners, HP HD Pro Scanner and HP HD Pro 2 Scanner. Scanning thick media will require enlarging the insertion slot and this can affect the scanner's automatic control of border lines between the cameras, called Stitching. Instructions for compensating for this follow below. to copy thick media.. 1. Change the insertion slot height to fit the original as described in ...how do I change the insertion slot height?. 2. Make a test scan. Bulky thick media need to be supported with both hands both into and out of the scanner. Stitching errors will be easiest to see on an image with one or more clear diagonal lines. Normally, only stiff media will affect stitching. Flexible media will usually be stitched correctly regardless of thickness. If the lines seem uneven, do the following: 3. Select the Setup tab. 4. Select > Scanning.
-
 1
1 -
2
-
3
-
4
-
5
-
6
-
7
-
8
-
9
-
10
-
11
-
12
-
13
-
 14
14 -
 15
15 -
 16
16 -
 17
17 -
 18
18 -
 19
19 -
 20
20 -
 21
21 -
 22
22 -
 23
23 -
 24
24 -
25
-
26
-
27
-
28
-
29
-
30
-
31
-
32
-
33
-
34
-
35
-
36
-
37
-
38
-
39
-
40
-
41
-
42
-
43
-
44
-
45
-
46
-
47
-
48
-
49
-
50
-
51
-
52
-
53
-
54
-
55
-
56
-
57
-
58
-
59
-
60
-
61
-
62
-
63
-
64
-
65
-
66
-
67
-
68
-
69
-
70
-
71
-
72
-
73
-
74
-
75
-
76
-
77
-
78
-
79
-
80
-
81
-
82
-
83
-
84
-
85
-
86
-
87
-
88
-
89
-
90
-
91
-
92
-
93
-
94
-
95
-
96
-
97
-
98
-
99
-
100
-
101
-
102
-
103
-
104
-
105
-
106
-
107
-
108
-
109
-
110
-
111
-
112
-
113
-
114
-
115
-
116
-
117
-
118
-
119
-
120
-
121
-
122
-
123
-
124
-
125
-
126
-
127
-
128
-
129
-
130
-
131
-
132
-
133
-
134
-
135
-
136
-
137
-
138
-
139
-
140
-
141
-
142
-
143
-
144
-
145
-
146
-
147
-
148
-
149
-
150
-
151
-
152
-
153
-
154
-
155
-
156
-
157
-
158
-
159
-
160
-
161
-
162
-
163
-
164
-
165
-
166
-
167
-
168
-
169
-
170
-
171
-
172
-
173
-
174
-
175
-
176
-
177
-
178
-
179
-
180
-
181
-
182
-
183
-
184
-
185
-
186
-
187
-
188
-
189
-
190
-
191
-
192
-
193
-
194
-
195
-
196
-
197
-
198
-
199
-
200
-
201
-
202
 |
 |