HP HD Pro 2 User Guide - Page 30
how do I use the previewing tools?
 |
View all HP HD Pro 2 manuals
Add to My Manuals
Save this manual to your list of manuals |
Page 30 highlights
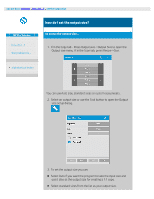
you are here: welcome how do I...? use the previewing tools HP Pro Scanner how do I...? the problem is... alphabetical index how do I use the previewing tools? The Preview button loads a fresh preview of the copy each time it is selected. The image always uses the last settings made and the effects of the settings will be visible in the new preview. This feature allows you to fine-tune your settings as you watch them take effect before committing the copy to print. how to... ...display the whole image... ...zoom in on a specific area... ...zoom out from a selected area... ...set one-to-one pixel viewing... ...resize the paper frame... ...move the image... ...position the paper frame... ...align the image... to display the whole image... You can use the Zoom All tool to view large format originals in the preview window. No matter what zooming level you start from, the Zoom All tool resizes the image so that it exactly fits in the preview window. to zoom in on a specific area... Use the Zoom In tool when you need to view details for making enhancement settings and for aligning. Zooming takes place immediately with the zoom axis in the center of the preview window. This means you may need to move the image to center on a specific area before zooming. This is done with the Move Image tool (see below). If you need to enlarge the image further, then continue to press the Zoom In button until you get the required level of detail in the view.
-
 1
1 -
2
-
3
-
4
-
5
-
6
-
7
-
8
-
9
-
10
-
11
-
12
-
13
-
14
-
15
-
16
-
17
-
18
-
19
-
20
-
21
-
22
-
23
-
24
-
 25
25 -
 26
26 -
 27
27 -
 28
28 -
 29
29 -
 30
30 -
 31
31 -
 32
32 -
 33
33 -
 34
34 -
 35
35 -
36
-
37
-
38
-
39
-
40
-
41
-
42
-
43
-
44
-
45
-
46
-
47
-
48
-
49
-
50
-
51
-
52
-
53
-
54
-
55
-
56
-
57
-
58
-
59
-
60
-
61
-
62
-
63
-
64
-
65
-
66
-
67
-
68
-
69
-
70
-
71
-
72
-
73
-
74
-
75
-
76
-
77
-
78
-
79
-
80
-
81
-
82
-
83
-
84
-
85
-
86
-
87
-
88
-
89
-
90
-
91
-
92
-
93
-
94
-
95
-
96
-
97
-
98
-
99
-
100
-
101
-
102
-
103
-
104
-
105
-
106
-
107
-
108
-
109
-
110
-
111
-
112
-
113
-
114
-
115
-
116
-
117
-
118
-
119
-
120
-
121
-
122
-
123
-
124
-
125
-
126
-
127
-
128
-
129
-
130
-
131
-
132
-
133
-
134
-
135
-
136
-
137
-
138
-
139
-
140
-
141
-
142
-
143
-
144
-
145
-
146
-
147
-
148
-
149
-
150
-
151
-
152
-
153
-
154
-
155
-
156
-
157
-
158
-
159
-
160
-
161
-
162
-
163
-
164
-
165
-
166
-
167
-
168
-
169
-
170
-
171
-
172
-
173
-
174
-
175
-
176
-
177
-
178
-
179
-
180
-
181
-
182
-
183
-
184
-
185
-
186
-
187
-
188
-
189
-
190
-
191
-
192
-
193
-
194
-
195
-
196
-
197
-
198
-
199
-
200
-
201
-
202
 |
 |
