HP HD Pro 2 User Guide - Page 133
scanner power ON.
 |
View all HP HD Pro 2 manuals
Add to My Manuals
Save this manual to your list of manuals |
Page 133 highlights
4. Reinsert the new lamp-unit by resting the power-connector side on the slider and carefully push the lamp-unit into the scanner. 5. Insert the lamp-unit all the way so the internal power connections engage with the connections on the lamp-unit. 6. Replace the lamp cover on the scanner - fit the covers left siade tab with the corresponding notche on the scanner and snap the cover shut. The cover must always be closed before turning scanner power ON. 7. Test the replacement by turning power and scanner on to see if the lamp lights. 8. NOTE: Remember to reset the lamp replacement flag in WIDEsystem.
-
 1
1 -
2
-
3
-
4
-
5
-
6
-
7
-
8
-
9
-
10
-
11
-
12
-
13
-
14
-
15
-
16
-
17
-
18
-
19
-
20
-
21
-
22
-
23
-
24
-
25
-
26
-
27
-
28
-
29
-
30
-
31
-
32
-
33
-
34
-
35
-
36
-
37
-
38
-
39
-
40
-
41
-
42
-
43
-
44
-
45
-
46
-
47
-
48
-
49
-
50
-
51
-
52
-
53
-
54
-
55
-
56
-
57
-
58
-
59
-
60
-
61
-
62
-
63
-
64
-
65
-
66
-
67
-
68
-
69
-
70
-
71
-
72
-
73
-
74
-
75
-
76
-
77
-
78
-
79
-
80
-
81
-
82
-
83
-
84
-
85
-
86
-
87
-
88
-
89
-
90
-
91
-
92
-
93
-
94
-
95
-
96
-
97
-
98
-
99
-
100
-
101
-
102
-
103
-
104
-
105
-
106
-
107
-
108
-
109
-
110
-
111
-
112
-
113
-
114
-
115
-
116
-
117
-
118
-
119
-
120
-
121
-
122
-
123
-
124
-
125
-
126
-
127
-
 128
128 -
 129
129 -
 130
130 -
 131
131 -
 132
132 -
 133
133 -
 134
134 -
 135
135 -
 136
136 -
 137
137 -
 138
138 -
139
-
140
-
141
-
142
-
143
-
144
-
145
-
146
-
147
-
148
-
149
-
150
-
151
-
152
-
153
-
154
-
155
-
156
-
157
-
158
-
159
-
160
-
161
-
162
-
163
-
164
-
165
-
166
-
167
-
168
-
169
-
170
-
171
-
172
-
173
-
174
-
175
-
176
-
177
-
178
-
179
-
180
-
181
-
182
-
183
-
184
-
185
-
186
-
187
-
188
-
189
-
190
-
191
-
192
-
193
-
194
-
195
-
196
-
197
-
198
-
199
-
200
-
201
-
202
 |
 |

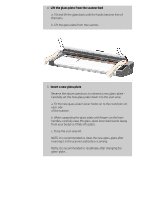
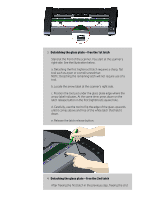
4. Reinsert the new lamp-unit by resting the power-connector
side on the slider and carefully push the lamp-unit into the
scanner.
5. Insert the lamp-unit all the way so the internal power
connections engage with the connections on the lamp-unit.
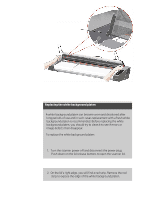
6. Replace the lamp cover on the scanner - fit the covers left siade
tab with the corresponding notche on the scanner and snap the
cover shut. The cover must always be closed before turning
scanner power ON.
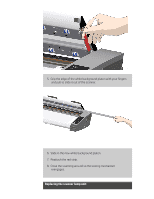
7. Test the replacement by turning power and scanner on to see if
the lamp lights.
8. NOTE: Remember to reset the lamp replacement flag in
WIDEsystem.