HP HD Pro 2 User Guide - Page 34
how do I scan to a file?
 |
View all HP HD Pro 2 manuals
Add to My Manuals
Save this manual to your list of manuals |
Page 34 highlights
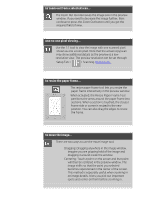
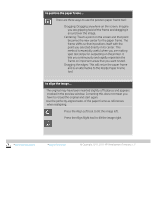
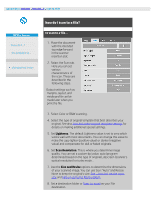
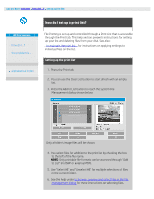
you are here: welcome how do I...? scan to a file HP Pro Scanner how do I...? the problem is... alphabetical index how do I scan to a file? to scan to a file... 1. Place the document with the intended top edge forward in the scanner insertion slot. 2. Select the Scan tab. Here you can set various characteristics of the scan. These are described in the following steps. Output settings such as margins, layout, and media profile can be made later when you print the file. 3. Select Color or B&W scanning. 4. Select the type of original template that best describes your original. See also how do I make original template settings for details on making additional special settings. 5. Set Lightness. The default Lightness value is set to zero which works well with most documents. You can change this value to make the copy lighter (positive value) or darker (negative value) and compensate for dull or faded originals. 6. Set Scan Resolution. This is where you determine image quality. You can set a custom dpi value, auto (program determined based on the type of original), descreen (scanner's optical resolution) or turbo mode. . 7. Use the Size and Resize options to determine the dimensions of your scanned image. You can use Size: "Auto" and Resize: None to keep the original's size. See ...how do I set the input size and help on using the Resize option. 8. Set a destination folder or Scan-to-email as your File destination.
-
 1
1 -
2
-
3
-
4
-
5
-
6
-
7
-
8
-
9
-
10
-
11
-
12
-
13
-
14
-
15
-
16
-
17
-
18
-
19
-
20
-
21
-
22
-
23
-
24
-
25
-
26
-
27
-
28
-
 29
29 -
 30
30 -
 31
31 -
 32
32 -
 33
33 -
 34
34 -
 35
35 -
 36
36 -
 37
37 -
 38
38 -
 39
39 -
40
-
41
-
42
-
43
-
44
-
45
-
46
-
47
-
48
-
49
-
50
-
51
-
52
-
53
-
54
-
55
-
56
-
57
-
58
-
59
-
60
-
61
-
62
-
63
-
64
-
65
-
66
-
67
-
68
-
69
-
70
-
71
-
72
-
73
-
74
-
75
-
76
-
77
-
78
-
79
-
80
-
81
-
82
-
83
-
84
-
85
-
86
-
87
-
88
-
89
-
90
-
91
-
92
-
93
-
94
-
95
-
96
-
97
-
98
-
99
-
100
-
101
-
102
-
103
-
104
-
105
-
106
-
107
-
108
-
109
-
110
-
111
-
112
-
113
-
114
-
115
-
116
-
117
-
118
-
119
-
120
-
121
-
122
-
123
-
124
-
125
-
126
-
127
-
128
-
129
-
130
-
131
-
132
-
133
-
134
-
135
-
136
-
137
-
138
-
139
-
140
-
141
-
142
-
143
-
144
-
145
-
146
-
147
-
148
-
149
-
150
-
151
-
152
-
153
-
154
-
155
-
156
-
157
-
158
-
159
-
160
-
161
-
162
-
163
-
164
-
165
-
166
-
167
-
168
-
169
-
170
-
171
-
172
-
173
-
174
-
175
-
176
-
177
-
178
-
179
-
180
-
181
-
182
-
183
-
184
-
185
-
186
-
187
-
188
-
189
-
190
-
191
-
192
-
193
-
194
-
195
-
196
-
197
-
198
-
199
-
200
-
201
-
202
 |
 |
