HP HD Pro 2 User Guide - Page 179
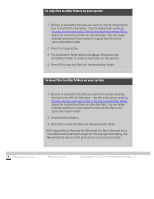
Press the New Folder button.
 |
View all HP HD Pro 2 manuals
Add to My Manuals
Save this manual to your list of manuals |
Page 179 highlights
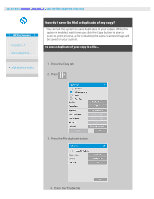
2. Press the Delete button and confirm. NOTE about files in the print list (Print tab): if a file in the print list is moved/deleted/renamed through the file management dialog, the file will still be shown in the print list but it can not be printed. to Rename files on your system 1. Browse to and select the files you want to rename by checking the box to the left of a file name - See the instructions under to browse, preview and select files in the file management dialog above for more instructions on selecting files. 2. Press the Rename button. An edit box with the current file name entered will appear. Edit the name and select OK when done. 3. You can select more than one file at a time. When you select multiple files and then press the Rename button, you will be able to enter a name for each file in turn. NOTE about files in the print list (Print tab): if a file in the print list is moved/deleted/renamed through the file management dialog, the file will still be shown in the print list but it can not be printed. to Create a new folder on your system 1. Browse to and select the directory/folder in which you wish to create the new folder - See the instructions under to browse, preview and select files in the file management dialog above for more instructions on browsing the file system. 2. Press the New Folder button. 3. Enter a name for your new folder in the edit dialog and press OK. 4. The new folder will be insterted as a subfolder to the current directory.
-
 1
1 -
2
-
3
-
4
-
5
-
6
-
7
-
8
-
9
-
10
-
11
-
12
-
13
-
14
-
15
-
16
-
17
-
18
-
19
-
20
-
21
-
22
-
23
-
24
-
25
-
26
-
27
-
28
-
29
-
30
-
31
-
32
-
33
-
34
-
35
-
36
-
37
-
38
-
39
-
40
-
41
-
42
-
43
-
44
-
45
-
46
-
47
-
48
-
49
-
50
-
51
-
52
-
53
-
54
-
55
-
56
-
57
-
58
-
59
-
60
-
61
-
62
-
63
-
64
-
65
-
66
-
67
-
68
-
69
-
70
-
71
-
72
-
73
-
74
-
75
-
76
-
77
-
78
-
79
-
80
-
81
-
82
-
83
-
84
-
85
-
86
-
87
-
88
-
89
-
90
-
91
-
92
-
93
-
94
-
95
-
96
-
97
-
98
-
99
-
100
-
101
-
102
-
103
-
104
-
105
-
106
-
107
-
108
-
109
-
110
-
111
-
112
-
113
-
114
-
115
-
116
-
117
-
118
-
119
-
120
-
121
-
122
-
123
-
124
-
125
-
126
-
127
-
128
-
129
-
130
-
131
-
132
-
133
-
134
-
135
-
136
-
137
-
138
-
139
-
140
-
141
-
142
-
143
-
144
-
145
-
146
-
147
-
148
-
149
-
150
-
151
-
152
-
153
-
154
-
155
-
156
-
157
-
158
-
159
-
160
-
161
-
162
-
163
-
164
-
165
-
166
-
167
-
168
-
169
-
170
-
171
-
172
-
173
-
 174
174 -
 175
175 -
 176
176 -
 177
177 -
 178
178 -
 179
179 -
 180
180 -
 181
181 -
 182
182 -
 183
183 -
 184
184 -
185
-
186
-
187
-
188
-
189
-
190
-
191
-
192
-
193
-
194
-
195
-
196
-
197
-
198
-
199
-
200
-
201
-
202
 |
 |
