HP HD Pro 2 User Guide - Page 72
how do I set paneling and tiling options and assemble, panels
 |
View all HP HD Pro 2 manuals
Add to My Manuals
Save this manual to your list of manuals |
Page 72 highlights
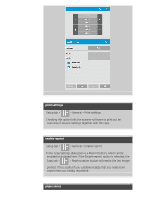
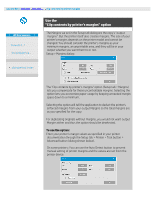
you are here: welcome how do I .. set paneling and tiling options and assemble HP Pro Scanner how do I...? the problem is... alphabetical index how do I set paneling and tiling options and assemble panels Paneling enables you to create huge enlargements. With Paneling you print wide format sections of your image as "panels" and then glue the panels together to reconstruct the image. In effect, the Paneling option creates a virtual printer with unlimited width capabilities. The HP Scanner software makes Paneling easy by supplying precisely placed cutting lines and guiding glue marks on the panel edges, so you can connect your panels with near-invisible seams. Tiling is also paneling - but gives you the option to make your panel sections by dividing the image both horizontally and vertically. See: ...options ...assembling the panels options 1. Width: for setting the width of the panels. The width includes the Overlap area. The panel width can at most be as wide as the printer's printable area. For maximum sized panels, set the panel width to the same value you set as the printer's Media Width (through the Setup tab > Printer > Unprintable area) minus the printer's left/right unprintable areas. This value should correspond with the documented printable area for your printer. The scanner software will calculate the size of the last panel. When calculating special panel widths, for example for dividing the image into equally wide panels, you must remember to add extra space for panel overlap (see the example below). 2. Overlap: determines the width of the overlap areas - that is, the edges that contain equal image data on two adjacent panels. Large, heavy panels will need wider overlap and gluing areas than smaller panels. 3. Glue Marks: small gray arrows are printed on the panel's edges to help guide you when you connect the panels. The glue marks will hardly be distinguishable in your large copy. The arrows vary in size: the larger the Overlap width, the larger the arrows printed. Maximum arrow size is 1" high. 4. Tiling: allows you to determine the length of your panels. Select the Tiling option when you want to determine the length of each section and assemble multiple short sections vertically
-
 1
1 -
2
-
3
-
4
-
5
-
6
-
7
-
8
-
9
-
10
-
11
-
12
-
13
-
14
-
15
-
16
-
17
-
18
-
19
-
20
-
21
-
22
-
23
-
24
-
25
-
26
-
27
-
28
-
29
-
30
-
31
-
32
-
33
-
34
-
35
-
36
-
37
-
38
-
39
-
40
-
41
-
42
-
43
-
44
-
45
-
46
-
47
-
48
-
49
-
50
-
51
-
52
-
53
-
54
-
55
-
56
-
57
-
58
-
59
-
60
-
61
-
62
-
63
-
64
-
65
-
66
-
 67
67 -
 68
68 -
 69
69 -
 70
70 -
 71
71 -
 72
72 -
 73
73 -
 74
74 -
 75
75 -
 76
76 -
 77
77 -
78
-
79
-
80
-
81
-
82
-
83
-
84
-
85
-
86
-
87
-
88
-
89
-
90
-
91
-
92
-
93
-
94
-
95
-
96
-
97
-
98
-
99
-
100
-
101
-
102
-
103
-
104
-
105
-
106
-
107
-
108
-
109
-
110
-
111
-
112
-
113
-
114
-
115
-
116
-
117
-
118
-
119
-
120
-
121
-
122
-
123
-
124
-
125
-
126
-
127
-
128
-
129
-
130
-
131
-
132
-
133
-
134
-
135
-
136
-
137
-
138
-
139
-
140
-
141
-
142
-
143
-
144
-
145
-
146
-
147
-
148
-
149
-
150
-
151
-
152
-
153
-
154
-
155
-
156
-
157
-
158
-
159
-
160
-
161
-
162
-
163
-
164
-
165
-
166
-
167
-
168
-
169
-
170
-
171
-
172
-
173
-
174
-
175
-
176
-
177
-
178
-
179
-
180
-
181
-
182
-
183
-
184
-
185
-
186
-
187
-
188
-
189
-
190
-
191
-
192
-
193
-
194
-
195
-
196
-
197
-
198
-
199
-
200
-
201
-
202
 |
 |
