HP HD Pro 2 User Guide - Page 18
Raising OTAC, Lowering OTAC
 |
View all HP HD Pro 2 manuals
Add to My Manuals
Save this manual to your list of manuals |
Page 18 highlights
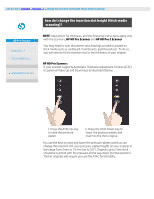
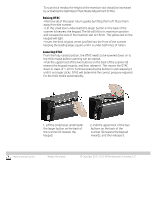
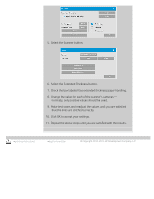
To scan thick medias the height of the insertion slot should be increased by activating the Optimized Thick Media Adjustment (OTAC). Raising OTAC • Remove all of the paper return guides by lifting them off. Place them away from the scanner • Lift the small lever underneath the larger button on the back of the scanner lid nearest the keypad. The lid will lift to its maximum position and increase the size of the insertion slot to 16mm. The yellow led on the keypad will light. • Insert the thick original center justified into the front of the scanner keeping the leading edge square until it is under both lines of rollers Lowering OTAC From the fully raised position, the OTAC needs to be lowered down on to the thick media before scanning can be started. • Pull the uppermost of the two buttons on the back of the scanner lid nearest the keypad inwards, and then release it. This moves the OTAC down in steps of 1-2mm. Continue pressing the button in and releasing it until it no longer clicks. OTAC will determine the correct pressure required for the thick media automatically. 1. Lift the small lever underneath the larger button on the back of the scanner lid nearest the keypad. 2. Pull the uppermost of the two buttons on the back of the scanner lid nearest the keypad inwards, and then release it. printing instructions legal information © Copyright 2012, 2015 HP Development Company, L.P
-
 1
1 -
2
-
3
-
4
-
5
-
6
-
7
-
8
-
9
-
10
-
11
-
12
-
 13
13 -
 14
14 -
 15
15 -
 16
16 -
 17
17 -
 18
18 -
 19
19 -
 20
20 -
 21
21 -
 22
22 -
 23
23 -
24
-
25
-
26
-
27
-
28
-
29
-
30
-
31
-
32
-
33
-
34
-
35
-
36
-
37
-
38
-
39
-
40
-
41
-
42
-
43
-
44
-
45
-
46
-
47
-
48
-
49
-
50
-
51
-
52
-
53
-
54
-
55
-
56
-
57
-
58
-
59
-
60
-
61
-
62
-
63
-
64
-
65
-
66
-
67
-
68
-
69
-
70
-
71
-
72
-
73
-
74
-
75
-
76
-
77
-
78
-
79
-
80
-
81
-
82
-
83
-
84
-
85
-
86
-
87
-
88
-
89
-
90
-
91
-
92
-
93
-
94
-
95
-
96
-
97
-
98
-
99
-
100
-
101
-
102
-
103
-
104
-
105
-
106
-
107
-
108
-
109
-
110
-
111
-
112
-
113
-
114
-
115
-
116
-
117
-
118
-
119
-
120
-
121
-
122
-
123
-
124
-
125
-
126
-
127
-
128
-
129
-
130
-
131
-
132
-
133
-
134
-
135
-
136
-
137
-
138
-
139
-
140
-
141
-
142
-
143
-
144
-
145
-
146
-
147
-
148
-
149
-
150
-
151
-
152
-
153
-
154
-
155
-
156
-
157
-
158
-
159
-
160
-
161
-
162
-
163
-
164
-
165
-
166
-
167
-
168
-
169
-
170
-
171
-
172
-
173
-
174
-
175
-
176
-
177
-
178
-
179
-
180
-
181
-
182
-
183
-
184
-
185
-
186
-
187
-
188
-
189
-
190
-
191
-
192
-
193
-
194
-
195
-
196
-
197
-
198
-
199
-
200
-
201
-
202
 |
 |
