HP HD Pro 2 User Guide - Page 66
values in Cyan, Magenta, and Yellow CMY or Red, Green, and Blue
 |
View all HP HD Pro 2 manuals
Add to My Manuals
Save this manual to your list of manuals |
Page 66 highlights
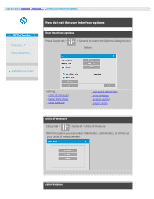
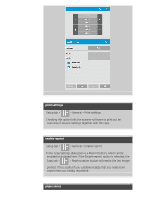
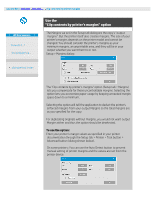
Setup tab > > General > Color balance This option tells your scanner software whether to display color values in Cyan, Magenta, and Yellow (CMY) or Red, Green, and Blue (RGB) when setting Type of Original options. paper lists show Setup tab > > General > Paper lists show This option tells the scanner software whether to display paper sizes (dimensions) or paper titles (such as E-0, A3) where possible. use quick select lists Setup tab > > General > Use quick select lists This option determines the behavior of your interface in relation to making settings for Type of original, Input size, Output size, Scale, Printer, Accounting, and Scanner. This option is set by default. The default dialog order is that you first access an east-to-use list dialog and from there you can choose a specific Setup dialog by pressing the tool button With Quick select lists un-selected, you reverse the above order: your interface first presents the specific Setup dialog and you must from there choose to view the List dialog with current predefined and standard values for the options. Leave this option selected if you primarily use the scanner software with standard and customized pre definined option values. Make the option empty if you primarily need to make specific adjustments and settings for your different copy jobs and usually bypass the lists with predefined values. You can see below the Input size button behavior with and without the Quick select lists option selected: Quick select lists ON (first) and OFF (second). The Tool button on the Input Size dialog will activate the Input Size Setup dialog, and the Input size button in the Input Size Setup dialog will activate the Input Size dialog.
-
 1
1 -
2
-
3
-
4
-
5
-
6
-
7
-
8
-
9
-
10
-
11
-
12
-
13
-
14
-
15
-
16
-
17
-
18
-
19
-
20
-
21
-
22
-
23
-
24
-
25
-
26
-
27
-
28
-
29
-
30
-
31
-
32
-
33
-
34
-
35
-
36
-
37
-
38
-
39
-
40
-
41
-
42
-
43
-
44
-
45
-
46
-
47
-
48
-
49
-
50
-
51
-
52
-
53
-
54
-
55
-
56
-
57
-
58
-
59
-
60
-
 61
61 -
 62
62 -
 63
63 -
 64
64 -
 65
65 -
 66
66 -
 67
67 -
 68
68 -
 69
69 -
 70
70 -
 71
71 -
72
-
73
-
74
-
75
-
76
-
77
-
78
-
79
-
80
-
81
-
82
-
83
-
84
-
85
-
86
-
87
-
88
-
89
-
90
-
91
-
92
-
93
-
94
-
95
-
96
-
97
-
98
-
99
-
100
-
101
-
102
-
103
-
104
-
105
-
106
-
107
-
108
-
109
-
110
-
111
-
112
-
113
-
114
-
115
-
116
-
117
-
118
-
119
-
120
-
121
-
122
-
123
-
124
-
125
-
126
-
127
-
128
-
129
-
130
-
131
-
132
-
133
-
134
-
135
-
136
-
137
-
138
-
139
-
140
-
141
-
142
-
143
-
144
-
145
-
146
-
147
-
148
-
149
-
150
-
151
-
152
-
153
-
154
-
155
-
156
-
157
-
158
-
159
-
160
-
161
-
162
-
163
-
164
-
165
-
166
-
167
-
168
-
169
-
170
-
171
-
172
-
173
-
174
-
175
-
176
-
177
-
178
-
179
-
180
-
181
-
182
-
183
-
184
-
185
-
186
-
187
-
188
-
189
-
190
-
191
-
192
-
193
-
194
-
195
-
196
-
197
-
198
-
199
-
200
-
201
-
202
 |
 |
