HP HD Pro 2 User Guide - Page 170
Example4, input
 |
View all HP HD Pro 2 manuals
Add to My Manuals
Save this manual to your list of manuals |
Page 170 highlights
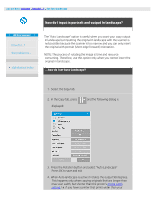
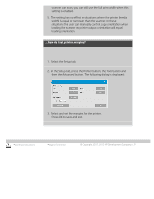
printing instructions output size by 1" around all the edges totaling to the 12x12" output result. Example4: The Input size is: 10x10". The Output size is 20x20" (2 x scaling) Margins are set at 1" at all edges. Outer Margins are set at 1" at all edges. Result: Total size 22x22", Scanned area 9x9", 2" white border at all edges. Explanation: Example 4 shows margin value application on the scan area (input) with scaling, i.e., when the output size is larger than the input size. As with the previous examples, the margin's value of 1" is still deducted from the output size and this 1" white space plus 1" outer margin will be output on the printer totaling to a 2" wide white border. However, because of scaling, the 1" margin that should be taken within the scan area during input is automatically reduced relatively (in this case by half since its a 1:2 relation) so that only 1/2" is deducted from the scan area at all edges during input. In this way, cropping of the scan area is logically adjusted to fit the Margin that was defined for the enlarged end result and match normal intentions. legal information © Copyright 2012, 2015 HP Development Company, L.P
-
 1
1 -
2
-
3
-
4
-
5
-
6
-
7
-
8
-
9
-
10
-
11
-
12
-
13
-
14
-
15
-
16
-
17
-
18
-
19
-
20
-
21
-
22
-
23
-
24
-
25
-
26
-
27
-
28
-
29
-
30
-
31
-
32
-
33
-
34
-
35
-
36
-
37
-
38
-
39
-
40
-
41
-
42
-
43
-
44
-
45
-
46
-
47
-
48
-
49
-
50
-
51
-
52
-
53
-
54
-
55
-
56
-
57
-
58
-
59
-
60
-
61
-
62
-
63
-
64
-
65
-
66
-
67
-
68
-
69
-
70
-
71
-
72
-
73
-
74
-
75
-
76
-
77
-
78
-
79
-
80
-
81
-
82
-
83
-
84
-
85
-
86
-
87
-
88
-
89
-
90
-
91
-
92
-
93
-
94
-
95
-
96
-
97
-
98
-
99
-
100
-
101
-
102
-
103
-
104
-
105
-
106
-
107
-
108
-
109
-
110
-
111
-
112
-
113
-
114
-
115
-
116
-
117
-
118
-
119
-
120
-
121
-
122
-
123
-
124
-
125
-
126
-
127
-
128
-
129
-
130
-
131
-
132
-
133
-
134
-
135
-
136
-
137
-
138
-
139
-
140
-
141
-
142
-
143
-
144
-
145
-
146
-
147
-
148
-
149
-
150
-
151
-
152
-
153
-
154
-
155
-
156
-
157
-
158
-
159
-
160
-
161
-
162
-
163
-
164
-
 165
165 -
 166
166 -
 167
167 -
 168
168 -
 169
169 -
 170
170 -
 171
171 -
 172
172 -
 173
173 -
 174
174 -
 175
175 -
176
-
177
-
178
-
179
-
180
-
181
-
182
-
183
-
184
-
185
-
186
-
187
-
188
-
189
-
190
-
191
-
192
-
193
-
194
-
195
-
196
-
197
-
198
-
199
-
200
-
201
-
202
 |
 |
