HP HD Pro 2 User Guide - Page 138
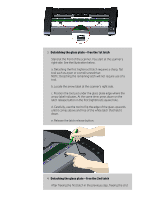
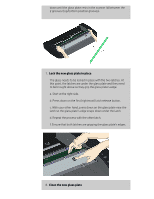
Insert a new glass plate - lower a new glass plate into the, scanner
 |
View all HP HD Pro 2 manuals
Add to My Manuals
Save this manual to your list of manuals |
Page 138 highlights
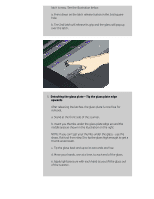
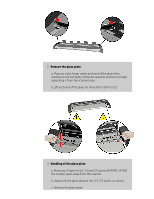
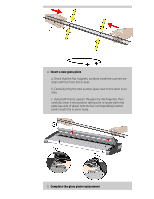
6. Insert a new glass plate - lower a new glass plate into the scanner a. Pick up the new glass plate in the same manner as you removed the old one - with two hands holding the glass on each end so you avoid touching the glass surface. NOTE: Take special care to avoid touching the glass plate's bottom surface which normally will not be cleaned during maintenance. b. Stand at the front of the scanner as you hold the glass. Make sure you hold the glass for insertion with the correct surface facing down. Note the direction of the facetted edges that indicate which is the bottom surface of the glass. See the illustration of the glass plate's profile below. 1.=Top surface, 2.= Bottom surface c. Hold the glass so that the bottom side surface faces your body as indicated in the glass plate's profile view below. d. Lower the new glass plate into the scanner at an angle, as shown in the glass plate's profile view below, so that the glass's lower edge meets the scanner's bottom position groove. CAUTION: The glass plate is long and thin and thus fragile. Take care not to break it. The glass plate will rest in the scanner's lid between the bottom and top position grooves. Locate the glass plate's bottom position groove in the lid. This is the groove furthest from your body when you stand at the scanner's front. f. Place the lower edge of the glass plate so it rests in the glass plate's bottom position groove. g. Carefully tilt the upper edge (the edge closest to your body)
-
 1
1 -
2
-
3
-
4
-
5
-
6
-
7
-
8
-
9
-
10
-
11
-
12
-
13
-
14
-
15
-
16
-
17
-
18
-
19
-
20
-
21
-
22
-
23
-
24
-
25
-
26
-
27
-
28
-
29
-
30
-
31
-
32
-
33
-
34
-
35
-
36
-
37
-
38
-
39
-
40
-
41
-
42
-
43
-
44
-
45
-
46
-
47
-
48
-
49
-
50
-
51
-
52
-
53
-
54
-
55
-
56
-
57
-
58
-
59
-
60
-
61
-
62
-
63
-
64
-
65
-
66
-
67
-
68
-
69
-
70
-
71
-
72
-
73
-
74
-
75
-
76
-
77
-
78
-
79
-
80
-
81
-
82
-
83
-
84
-
85
-
86
-
87
-
88
-
89
-
90
-
91
-
92
-
93
-
94
-
95
-
96
-
97
-
98
-
99
-
100
-
101
-
102
-
103
-
104
-
105
-
106
-
107
-
108
-
109
-
110
-
111
-
112
-
113
-
114
-
115
-
116
-
117
-
118
-
119
-
120
-
121
-
122
-
123
-
124
-
125
-
126
-
127
-
128
-
129
-
130
-
131
-
132
-
 133
133 -
 134
134 -
 135
135 -
 136
136 -
 137
137 -
 138
138 -
 139
139 -
 140
140 -
 141
141 -
 142
142 -
 143
143 -
144
-
145
-
146
-
147
-
148
-
149
-
150
-
151
-
152
-
153
-
154
-
155
-
156
-
157
-
158
-
159
-
160
-
161
-
162
-
163
-
164
-
165
-
166
-
167
-
168
-
169
-
170
-
171
-
172
-
173
-
174
-
175
-
176
-
177
-
178
-
179
-
180
-
181
-
182
-
183
-
184
-
185
-
186
-
187
-
188
-
189
-
190
-
191
-
192
-
193
-
194
-
195
-
196
-
197
-
198
-
199
-
200
-
201
-
202
 |
 |
