HP HD Pro 2 User Guide - Page 35
File Format
 |
View all HP HD Pro 2 manuals
Add to My Manuals
Save this manual to your list of manuals |
Page 35 highlights
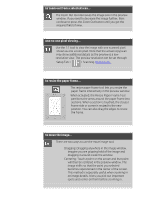
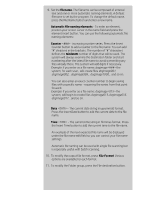
9. Set the filename. The filename can be composed of entered text and one or more automatic naming elements. A default filename is set by the program. To change the default name, press the File Name button and enter a new name. Automatic file naming elements - To enter an element, position your screen cursor in the name field and press the element insert button. You can use the following automatic file naming elements: Counter - increasing number series. Press the Insert Counter button to add a counter to the file name. You can add "#" chracters in the brackets. The number of "#" characters defines the minimum number of digits that will be used. The system will always examine the destination folder and start numbering after the latest file name to avoid overwriting any files already there. The system will add digits if necessary. Example: if you enter as a file name: dogimage the system, for each scan, will create files dogimage001, dogimage002... dogimage999... dogimage1000... and so on. You can also enter an exact counter number to begin saving files with a specific name - resuming the series from that point forward. Example: if you enter as a file name: dogimage the system, will begin to create files dogimage015, dogimage016, dogimage017... and so on. Date - The current date string in yyyymmdd format. Press the Insert Date button to add the current date to the file name. Time - The current time string in hhmmss format. Press the Insert Time button to add the current time to the file name. An example of the next expected file name will be displayed under the file name edit field so you can control your file name settings. Automatic file naming can be used with single file scanning but is especially useful with batch scanning. 10. To modify the output file format, press File Format. Various options are available for each format. 11. To modify the Folder group, press the File destination button.
-
 1
1 -
2
-
3
-
4
-
5
-
6
-
7
-
8
-
9
-
10
-
11
-
12
-
13
-
14
-
15
-
16
-
17
-
18
-
19
-
20
-
21
-
22
-
23
-
24
-
25
-
26
-
27
-
28
-
29
-
 30
30 -
 31
31 -
 32
32 -
 33
33 -
 34
34 -
 35
35 -
 36
36 -
 37
37 -
 38
38 -
 39
39 -
 40
40 -
41
-
42
-
43
-
44
-
45
-
46
-
47
-
48
-
49
-
50
-
51
-
52
-
53
-
54
-
55
-
56
-
57
-
58
-
59
-
60
-
61
-
62
-
63
-
64
-
65
-
66
-
67
-
68
-
69
-
70
-
71
-
72
-
73
-
74
-
75
-
76
-
77
-
78
-
79
-
80
-
81
-
82
-
83
-
84
-
85
-
86
-
87
-
88
-
89
-
90
-
91
-
92
-
93
-
94
-
95
-
96
-
97
-
98
-
99
-
100
-
101
-
102
-
103
-
104
-
105
-
106
-
107
-
108
-
109
-
110
-
111
-
112
-
113
-
114
-
115
-
116
-
117
-
118
-
119
-
120
-
121
-
122
-
123
-
124
-
125
-
126
-
127
-
128
-
129
-
130
-
131
-
132
-
133
-
134
-
135
-
136
-
137
-
138
-
139
-
140
-
141
-
142
-
143
-
144
-
145
-
146
-
147
-
148
-
149
-
150
-
151
-
152
-
153
-
154
-
155
-
156
-
157
-
158
-
159
-
160
-
161
-
162
-
163
-
164
-
165
-
166
-
167
-
168
-
169
-
170
-
171
-
172
-
173
-
174
-
175
-
176
-
177
-
178
-
179
-
180
-
181
-
182
-
183
-
184
-
185
-
186
-
187
-
188
-
189
-
190
-
191
-
192
-
193
-
194
-
195
-
196
-
197
-
198
-
199
-
200
-
201
-
202
 |
 |
