HP HD Pro 2 User Guide - Page 155
Remove FTP connections
 |
View all HP HD Pro 2 manuals
Add to My Manuals
Save this manual to your list of manuals |
Page 155 highlights
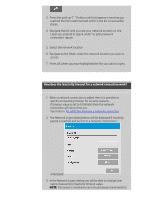
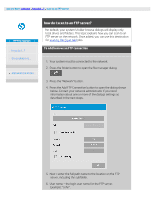
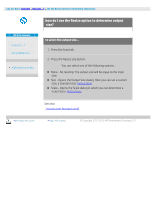
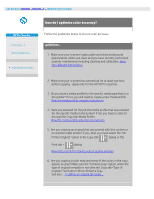
7. Password - the login password for the FTP server. 8. Label - this is what your HP Scanner system will display in its browse dialogs. Enter a name that will help you identify the FTP destination. Remove FTP connections : You remove FTP connections through the Folder button Connection". > Network > "Remove Network/FTP To scan to the FTP server 1. Complete the steps above under "To add an FTP connection". 2. Select the Scan tab and make your settings as with any scanto-file job. 3. Press the "File destination" button. 4. Press the path up ("..") button until it disappears meaning you reached the list's topmost level which is the list of accessible drives. 5. Navigate the list until you see your FTP location i.e. the Label you entered in step 8 under "to add an FTP connection" above. 6. Select the FTP destination. 7. Press OK when you have highlighted the destination folder you want to use. NOTE: All scans will be saved directly in the FTP server (or subfolder) you have specified while creating the FTP connection. You cannot perform file management tasks on the FTP connections (deleting files, creating subfolders, etc.). printing instructions legal information © Copyright 2012, 2015 HP Development Company, L.P
-
 1
1 -
2
-
3
-
4
-
5
-
6
-
7
-
8
-
9
-
10
-
11
-
12
-
13
-
14
-
15
-
16
-
17
-
18
-
19
-
20
-
21
-
22
-
23
-
24
-
25
-
26
-
27
-
28
-
29
-
30
-
31
-
32
-
33
-
34
-
35
-
36
-
37
-
38
-
39
-
40
-
41
-
42
-
43
-
44
-
45
-
46
-
47
-
48
-
49
-
50
-
51
-
52
-
53
-
54
-
55
-
56
-
57
-
58
-
59
-
60
-
61
-
62
-
63
-
64
-
65
-
66
-
67
-
68
-
69
-
70
-
71
-
72
-
73
-
74
-
75
-
76
-
77
-
78
-
79
-
80
-
81
-
82
-
83
-
84
-
85
-
86
-
87
-
88
-
89
-
90
-
91
-
92
-
93
-
94
-
95
-
96
-
97
-
98
-
99
-
100
-
101
-
102
-
103
-
104
-
105
-
106
-
107
-
108
-
109
-
110
-
111
-
112
-
113
-
114
-
115
-
116
-
117
-
118
-
119
-
120
-
121
-
122
-
123
-
124
-
125
-
126
-
127
-
128
-
129
-
130
-
131
-
132
-
133
-
134
-
135
-
136
-
137
-
138
-
139
-
140
-
141
-
142
-
143
-
144
-
145
-
146
-
147
-
148
-
149
-
 150
150 -
 151
151 -
 152
152 -
 153
153 -
 154
154 -
 155
155 -
 156
156 -
 157
157 -
 158
158 -
 159
159 -
 160
160 -
161
-
162
-
163
-
164
-
165
-
166
-
167
-
168
-
169
-
170
-
171
-
172
-
173
-
174
-
175
-
176
-
177
-
178
-
179
-
180
-
181
-
182
-
183
-
184
-
185
-
186
-
187
-
188
-
189
-
190
-
191
-
192
-
193
-
194
-
195
-
196
-
197
-
198
-
199
-
200
-
201
-
202
 |
 |
