Netgear AC1600-WiFi User Manual - Page 121
ADVANCED > Advanced Setup > Remote Management, Turn Remote Management
 |
View all Netgear AC1600-WiFi manuals
Add to My Manuals
Save this manual to your list of manuals |
Page 121 highlights
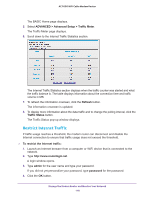
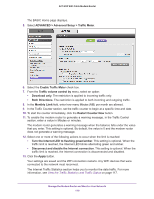
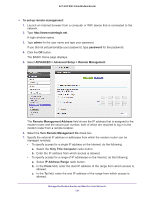
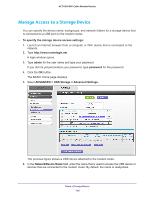
AC1600 WiFi Cable Modem Router To set up remote management: 1. Launch an Internet browser from a computer or WiFi device that is connected to the network. 2. Type http://www.routerlogin.net. A login window opens. 3. Type admin for the user name and type your password. If you did not yet personalize your password, type password for the password. 4. Click the OK button. The BASIC Home page displays. 5. Select ADVANCED > Advanced Setup > Remote Management. The Remote Management Address field shows the IP address that is assigned to the modem router and the secure port number, both of which are required to log in to the modem router from a remote location. 6. Select the Turn Remote Management On check box. 7. Specify the external IP address or addresses from which the modem router can be managed remotely: • To specify access for a single IP address on the Internet, do the following: a. Select the Only This Computer radio button. b. Enter the IP address from which access is allowed. • To specify access for a range of IP addresses on the Internet, do the following: a. Select IP Address Range radio button. b. In the From field, enter the start IP address of the range from which access is allowed. c. In the To field, enter the end IP address of the range from which access is allowed. Manage the Modem Router and Monitor Your Network 121
-
 1
1 -
2
-
3
-
4
-
5
-
6
-
7
-
8
-
9
-
10
-
11
-
12
-
13
-
14
-
15
-
16
-
17
-
18
-
19
-
20
-
21
-
22
-
23
-
24
-
25
-
26
-
27
-
28
-
29
-
30
-
31
-
32
-
33
-
34
-
35
-
36
-
37
-
38
-
39
-
40
-
41
-
42
-
43
-
44
-
45
-
46
-
47
-
48
-
49
-
50
-
51
-
52
-
53
-
54
-
55
-
56
-
57
-
58
-
59
-
60
-
61
-
62
-
63
-
64
-
65
-
66
-
67
-
68
-
69
-
70
-
71
-
72
-
73
-
74
-
75
-
76
-
77
-
78
-
79
-
80
-
81
-
82
-
83
-
84
-
85
-
86
-
87
-
88
-
89
-
90
-
91
-
92
-
93
-
94
-
95
-
96
-
97
-
98
-
99
-
100
-
101
-
102
-
103
-
104
-
105
-
106
-
107
-
108
-
109
-
110
-
111
-
112
-
113
-
114
-
115
-
 116
116 -
 117
117 -
 118
118 -
 119
119 -
 120
120 -
 121
121 -
 122
122 -
 123
123 -
 124
124 -
 125
125 -
 126
126 -
127
-
128
-
129
-
130
-
131
-
132
-
133
-
134
-
135
-
136
-
137
-
138
-
139
-
140
-
141
-
142
-
143
-
144
-
145
-
146
-
147
-
148
-
149
-
150
-
151
-
152
-
153
-
154
-
155
-
156
-
157
-
158
-
159
-
160
-
161
-
162
-
163
-
164
-
165
-
166
-
167
-
168
-
169
-
170
-
171
-
172
-
173
-
174
-
175
-
176
-
177
-
178
-
179
-
180
-
181
-
182
-
183
-
184
-
185
-
186
-
187
-
188
-
189
-
190
-
191
-
192
-
193
-
194
-
195
-
196
-
197
-
198
 |
 |