Netgear AC1600-WiFi User Manual - Page 76
ADVANCED > Security > Schedule, Schedule Name, Days to Block, Every Day, Time of Day to Block
 |
View all Netgear AC1600-WiFi manuals
Add to My Manuals
Save this manual to your list of manuals |
Page 76 highlights
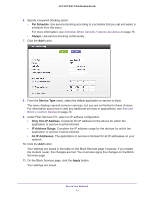
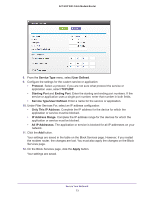
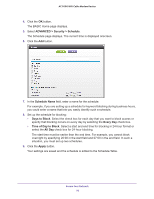
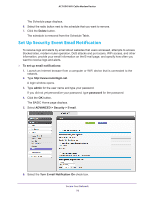
AC1600 WiFi Cable Modem Router 4. Click the OK button. The BASIC Home page displays. 5. Select ADVANCED > Security > Schedule. The Schedule page displays. The current time is displayed onscreen. 6. Click the Add button. 7. In the Schedule Name field, enter a name for the schedule. For example, if you are setting up a schedule for keyword blocking during business hours, you could enter a name that lets you easily identify such a schedule. 8. Set up the schedule for blocking: • Days to Block. Select the check box for each day that you want to block access or specify that blocking occurs on every day by selecting the Every Day check box. • Time of Day to Block. Select a start and end time for blocking in 24-hour format or select the All Day check box for 24-hour blocking. The start time must be earlier than the end time. For example, you cannot block overnight by specifying 20:00 in the start field and 07:00 in the end field. In such a situation, you must set up two schedules. 9. Click the Apply button. Your settings are saved and the schedule is added to the Schedule Table. Secure Your Network 76
-
 1
1 -
2
-
3
-
4
-
5
-
6
-
7
-
8
-
9
-
10
-
11
-
12
-
13
-
14
-
15
-
16
-
17
-
18
-
19
-
20
-
21
-
22
-
23
-
24
-
25
-
26
-
27
-
28
-
29
-
30
-
31
-
32
-
33
-
34
-
35
-
36
-
37
-
38
-
39
-
40
-
41
-
42
-
43
-
44
-
45
-
46
-
47
-
48
-
49
-
50
-
51
-
52
-
53
-
54
-
55
-
56
-
57
-
58
-
59
-
60
-
61
-
62
-
63
-
64
-
65
-
66
-
67
-
68
-
69
-
70
-
 71
71 -
 72
72 -
 73
73 -
 74
74 -
 75
75 -
 76
76 -
 77
77 -
 78
78 -
 79
79 -
 80
80 -
 81
81 -
82
-
83
-
84
-
85
-
86
-
87
-
88
-
89
-
90
-
91
-
92
-
93
-
94
-
95
-
96
-
97
-
98
-
99
-
100
-
101
-
102
-
103
-
104
-
105
-
106
-
107
-
108
-
109
-
110
-
111
-
112
-
113
-
114
-
115
-
116
-
117
-
118
-
119
-
120
-
121
-
122
-
123
-
124
-
125
-
126
-
127
-
128
-
129
-
130
-
131
-
132
-
133
-
134
-
135
-
136
-
137
-
138
-
139
-
140
-
141
-
142
-
143
-
144
-
145
-
146
-
147
-
148
-
149
-
150
-
151
-
152
-
153
-
154
-
155
-
156
-
157
-
158
-
159
-
160
-
161
-
162
-
163
-
164
-
165
-
166
-
167
-
168
-
169
-
170
-
171
-
172
-
173
-
174
-
175
-
176
-
177
-
178
-
179
-
180
-
181
-
182
-
183
-
184
-
185
-
186
-
187
-
188
-
189
-
190
-
191
-
192
-
193
-
194
-
195
-
196
-
197
-
198
 |
 |